Air King B300, B500 Replacement Parts Diagram, Receptacles Screw Washer, Blower Bottom Plate

Models: B300 B500

1 8
Download 8 pages 2.99 Kb
Page 2
Image 2

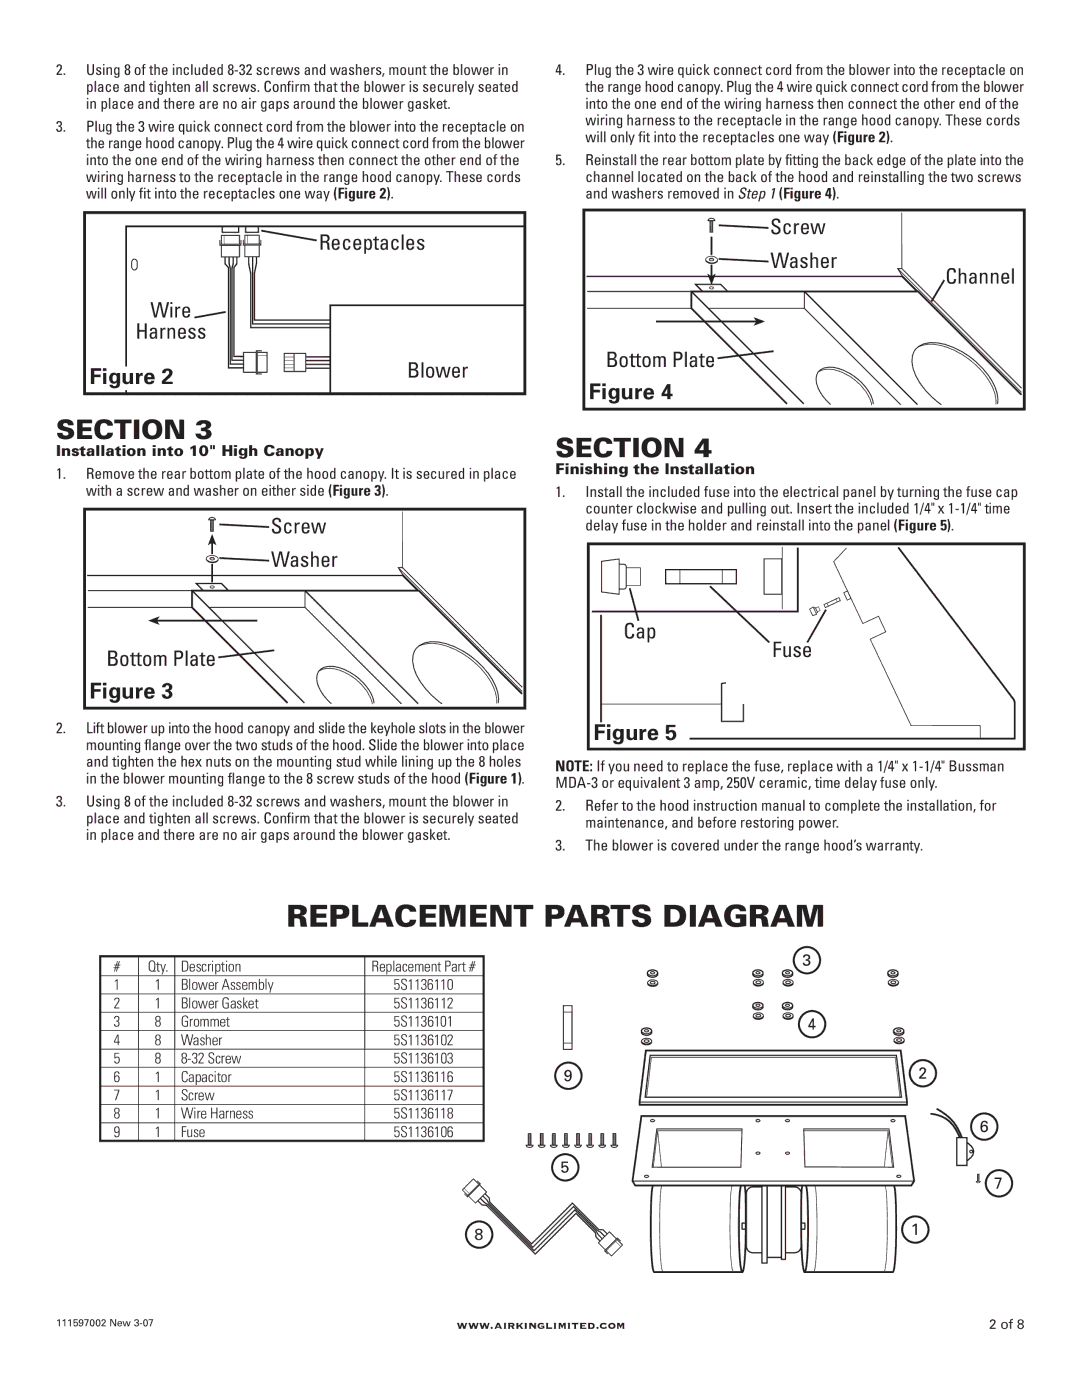
2.Using 8 of the included 8-32 screws and washers, mount the blower in place and tighten all screws. Confirm that the blower is securely seated in place and there are no air gaps around the blower gasket.

3.Plug the 3 wire quick connect cord from the blower into the receptacle on the range hood canopy. Plug the 4 wire quick connect cord from the blower into the one end of the wiring harness then connect the other end of the wiring harness to the receptacle in the range hood canopy. These cords will only fit into the receptacles one way (Figure 2).

4.Plug the 3 wire quick connect cord from the blower into the receptacle on the range hood canopy. Plug the 4 wire quick connect cord from the blower into the one end of the wiring harness then connect the other end of the wiring harness to the receptacle in the range hood canopy. These cords will only fit into the receptacles one way (Figure 2).

5.Reinstall the rear bottom plate by fitting the back edge of the plate into the channel located on the back of the hood and reinstalling the two screws and washers removed in Step 1 (Figure 4).


Receptacles

Screw


Washer


Channel

Wire


Harness


Figure 2

Blower

Bottom Plate

Figure 4


SECTION 3

SECTION 4

Installation into 10" High Canopy

1. Remove the rear bottom plate of the hood canopy. It is secured in place

Finishing the Installation

with a screw and washer on either side (Figure 3).

1. Install the included fuse into the electrical panel by turning the fuse cap

Screw

counter clockwise and pulling out. Insert the included 1/4" x 1-1/4" time

delay fuse in the holder and reinstall into the panel (Figure 5).

Washer


Cap

Bottom Plate

Fuse


Figure 3


2. Lift blower up into the hood canopy and slide the keyhole slots in the blower

Figure 5

mounting flange over the two studs of the hood. Slide the blower into place


and tighten the hex nuts on the mounting stud while lining up the 8 holes

NOTE: If you need to replace the fuse, replace with a 1/4" x 1-1/4" Bussman

in the blower mounting flange to the 8 screw studs of the hood (Figure 1).

MDA-3 or equivalent 3 amp, 250V ceramic, time delay fuse only.

3. Using 8 of the included 8-32 screws and washers, mount the blower in

2.

Refer to the hood instruction manual to complete the installation, for

place and tighten all screws. Confirm that the blower is securely seated


maintenance, and before restoring power.

in place and there are no air gaps around the blower gasket.

3.

The blower is covered under the range hood’s warranty.


REPLACEMENT PARTS DIAGRAM

#

Qty.

Description

Replacement Part #


3


1

1

Blower Assembly

5S1136110


2

1

Blower Gasket

5S1136112


3

8

Grommet

5S1136101


4

4

8

Washer

5S1136102


5

8

8-32 Screw

5S1136103

9

2

6

1

Capacitor

5S1136116

7

1

Screw

5S1136117


8

1

Wire Harness

5S1136118


6

9

1

Fuse

5S1136106


5

7

8

1

111597002 New 3-07

www.airkinglimited.com

2 of 8

Page 2
Image 2
Air King B300, B500 Replacement Parts Diagram, Receptacles Screw Washer, Blower Bottom Plate, Washer Cap Bottom Plate Fuse

B300, B500 specifications

The Air King B500 and B300 are two of the standout models in the Air King line of ventilation products, specifically designed to meet the diverse needs of residential and commercial spaces. Both models bring innovative technologies and features that enhance air quality and energy efficiency.

The Air King B500 is known for its advanced airflow capabilities, offering an impressive CFM (cubic feet per minute) rating that ensures effective air movement in larger spaces. This model is equipped with a powerful motor that not only provides high performance but also operates quietly, making it ideal for use in homes, offices, and workshops. The B500 features a durable, corrosion-resistant housing, making it suitable for humid environments such as bathrooms or kitchens.

One of the most notable technologies in the B500 is its multi-speed settings, allowing users to customize the airflow to their specific needs. This flexibility is complemented by an easy-to-use control panel that provides quick access to speed adjustments and other functionalities. Additionally, the model incorporates a built-in timer, which enables users to set the ventilation to run for a predetermined period, ensuring efficient energy use.

Similarly, the Air King B300 offers an excellent balance of performance and efficiency. With a slightly lower CFM compared to the B500, the B300 is perfect for smaller spaces while still delivering effective ventilation. This model also boasts a compact design, making it easy to install in tight areas without sacrificing performance.

The B300 features a lightweight but robust construction, which includes sound-insulated components to minimize noise during operation. This is particularly advantageous for residential applications where quiet operation is essential, such as in bedrooms or close to living areas. Users can also take advantage of its user-friendly controls, which parallel those of the B500, ensuring a seamless experience regardless of the model chosen.

Both the B500 and B300 are energy-efficient, designed to comply with modern standards for sustainability. They utilize efficient motors that reduce energy consumption while maximizing airflow, thus benefiting both the environment and reducing utility bills.

Overall, the Air King B500 and B300 provide exceptional ventilation solutions, combining powerful performance with innovative features. Their durability, efficiency, and user-friendly designs make them suitable for a wide range of applications, ensuring that they remain at the forefront of ventilation technology. Whether in a large workshop or a small bathroom, these models stand out for their ability to enhance indoor air quality effortlessly.