MECHANICAL ADJUSTMENTS

1. CONFIRMATION AND ADJUSTMENT

Read the following NOTES before starting work.

Place an object which weighs between 450g~500g on the Cassette Tape to keep it steady when you want to make the tape run without the Cassette Holder. (Do not place an object which weighs over 500g.)

When you activate the deck without the Cassette Holder, short circuit between TP1001 and TP1002.

(Refer to ELECTRICAL ADJUSTMENT PARTS LOCATION GUIDE) In this condition the BOT/EOT/Reel Sensor will not function.

1-1: CONFIRMATION AND ADJUSTMENT OF REEL DISK HEIGHT

1.Turn on the power and set to the STOP mode.

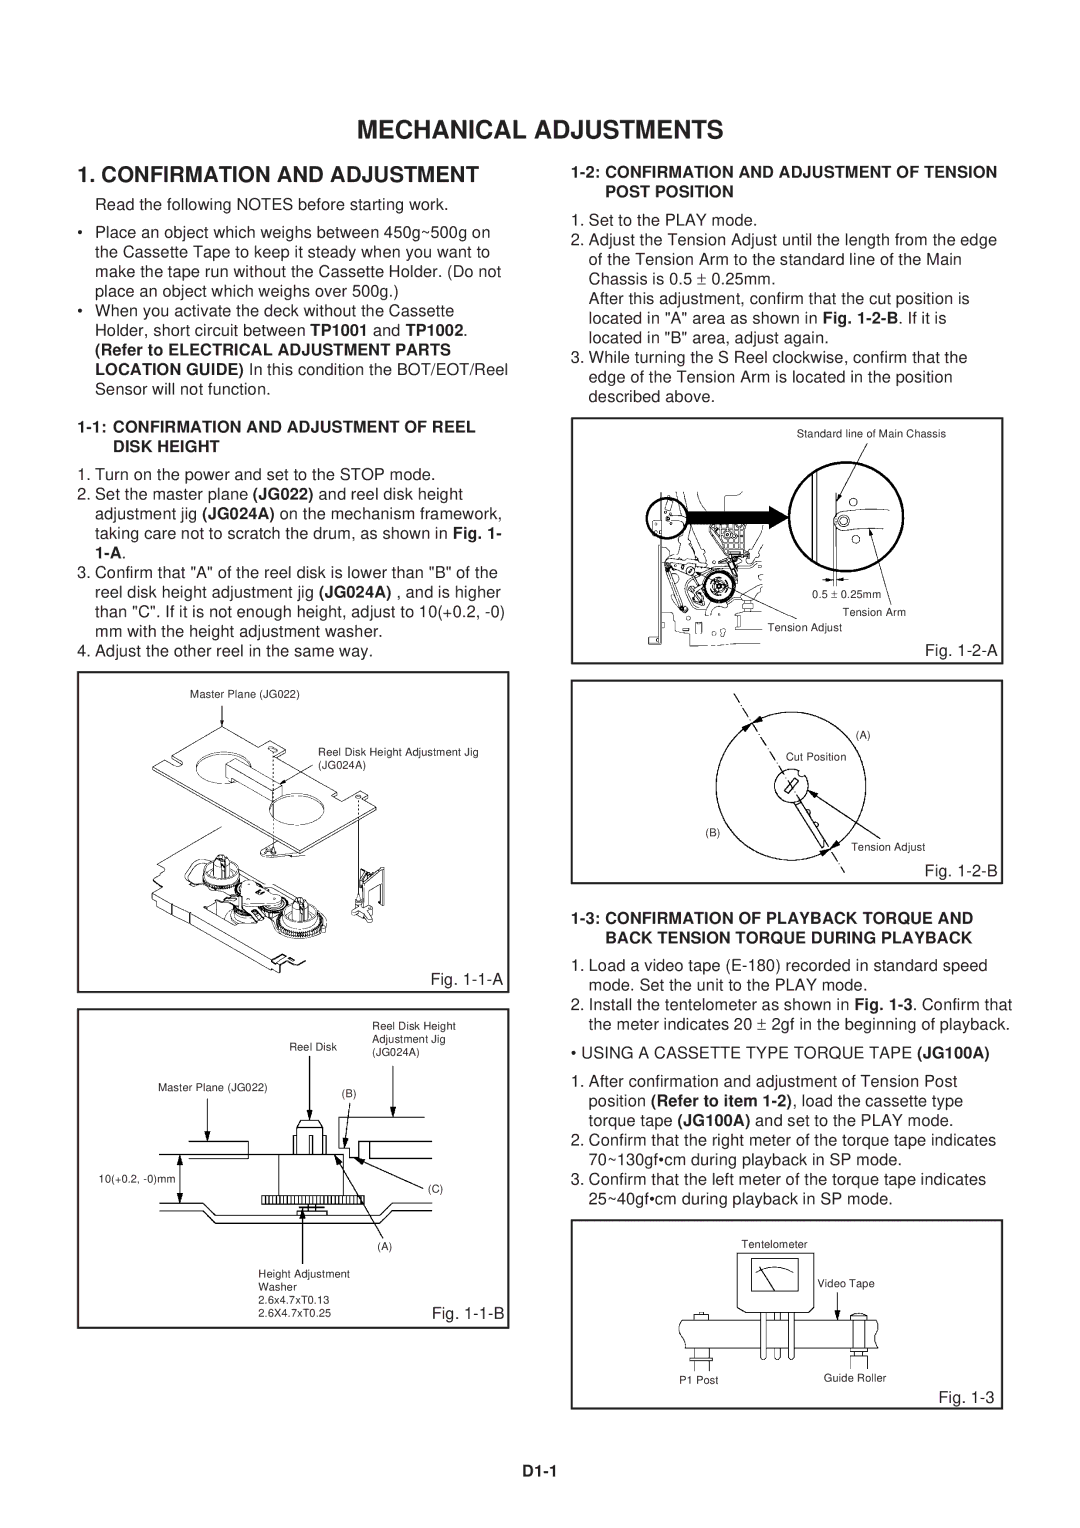
2.Set the master plane (JG022) and reel disk height adjustment jig (JG024A) on the mechanism framework, taking care not to scratch the drum, as shown in Fig. 1- 1-A.

3.Confirm that "A" of the reel disk is lower than "B" of the reel disk height adjustment jig (JG024A) , and is higher than "C". If it is not enough height, adjust to 10(+0.2, -0) mm with the height adjustment washer.

4.Adjust the other reel in the same way.

Master Plane (JG022)

Reel Disk Height Adjustment Jig (JG024A)

Fig. 1-1-A


Reel Disk Height


Reel Disk

Adjustment Jig


(JG024A)


Master Plane (JG022)


(B)


10(+0.2, -0)mm


(C)


(A)

Height Adjustment


Washer


2.6x4.7xT0.13

Fig. 1-1-B

2.6X4.7xT0.25

1-2: CONFIRMATION AND ADJUSTMENT OF TENSION POST POSITION

1.Set to the PLAY mode.

2.Adjust the Tension Adjust until the length from the edge

of the Tension Arm to the standard line of the Main Chassis is 0.5 ± 0.25mm.

After this adjustment, confirm that the cut position is located in "A" area as shown in Fig. 1-2-B. If it is located in "B" area, adjust again.

3.While turning the S Reel clockwise, confirm that the edge of the Tension Arm is located in the position described above.

Standard line of Main Chassis

0.5 ± 0.25mm Tension Arm

Tension Adjust

Fig. 1-2-A

(A)

Cut Position

(B)

Tension Adjust

Fig. 1-2-B

1-3: CONFIRMATION OF PLAYBACK TORQUE AND BACK TENSION TORQUE DURING PLAYBACK

1.Load a video tape (E-180) recorded in standard speed mode. Set the unit to the PLAY mode.

2.Install the tentelometer as shown in Fig. 1-3. Confirm that the meter indicates 20 ± 2gf in the beginning of playback.

• USING A CASSETTE TYPE TORQUE TAPE (JG100A)

1.After confirmation and adjustment of Tension Post position (Refer to item 1-2), load the cassette type torque tape (JG100A) and set to the PLAY mode.

2.Confirm that the right meter of the torque tape indicates 70~130gf•cm during playback in SP mode.

3.Confirm that the left meter of the torque tape indicates 25~40gf•cm during playback in SP mode.

Tentelometer

Video Tape

P1 Post

Guide Roller

Fig. 1-3

D1-1

Page 18
Image 18
Aiwa HV-FX5100 Mechanical Adjustments, Confirmation and Adjustment, Using a Cassette Type Torque Tape JG100A, D1-1

HV-FX5100 specifications

The Aiwa HV-FX5100 is a remarkable piece of technology that showcases Aiwa’s commitment to innovation and quality in the realm of home entertainment. Released as part of their VHS video cassette recorder lineup, the HV-FX5100 quickly gained popularity for its advanced features and user-friendly design.

One of the standout characteristics of the Aiwa HV-FX5100 is its impressive playback quality. The machine delivers crisp and clear video resolution, thanks to its advanced video processing technology. This ensures that viewers experience a vibrant picture with natural color reproduction, enhancing the viewing experience for VHS tapes.

The Aiwa HV-FX5100 is equipped with a range of functionalities that cater to the needs of modern consumers. A key feature is its Time Base Correction (TBC) technology, which helps eliminate jittery video, making it particularly useful for viewing older tapes or those that have been recorded on different machines. This technology significantly enhances the stability of the video playback, allowing for a smoother viewing experience.

Another notable feature of the HV-FX5100 is its built-in digital tuner, which allows users to receive and record digital broadcasts. This helps bridge the gap between analog recordings and the growing trend towards digital content, making it a versatile addition to any home entertainment system.

The design of the Aiwa HV-FX5100 also reflects its ease of use. With a straightforward interface and intuitive remote control, users can navigate and control the unit effortlessly. The VCR includes features like auto-tuning and programmed recording, which make it incredibly convenient for users to schedule recordings with minimal hassle.

In terms of connectivity, the Aiwa HV-FX5100 is equipped with various input and output options, including RCA connectors and S-Video outputs, allowing for seamless integration with TVs and other audiovisual equipment. This flexibility ensures that users can enjoy their favorite content across different media formats.

Furthermore, the construction of the HV-FX5100 is robust, promising longevity and durability. This makes it a reliable choice for those who want a dependable VCR to preserve and play their video collections.

Overall, the Aiwa HV-FX5100 stands out not just for its impressive list of features but also for its ability to adapt to both vintage and contemporary media needs. It represents a perfect harmony of classic technology and modern consumer demands, making it a treasured device for video enthusiasts.