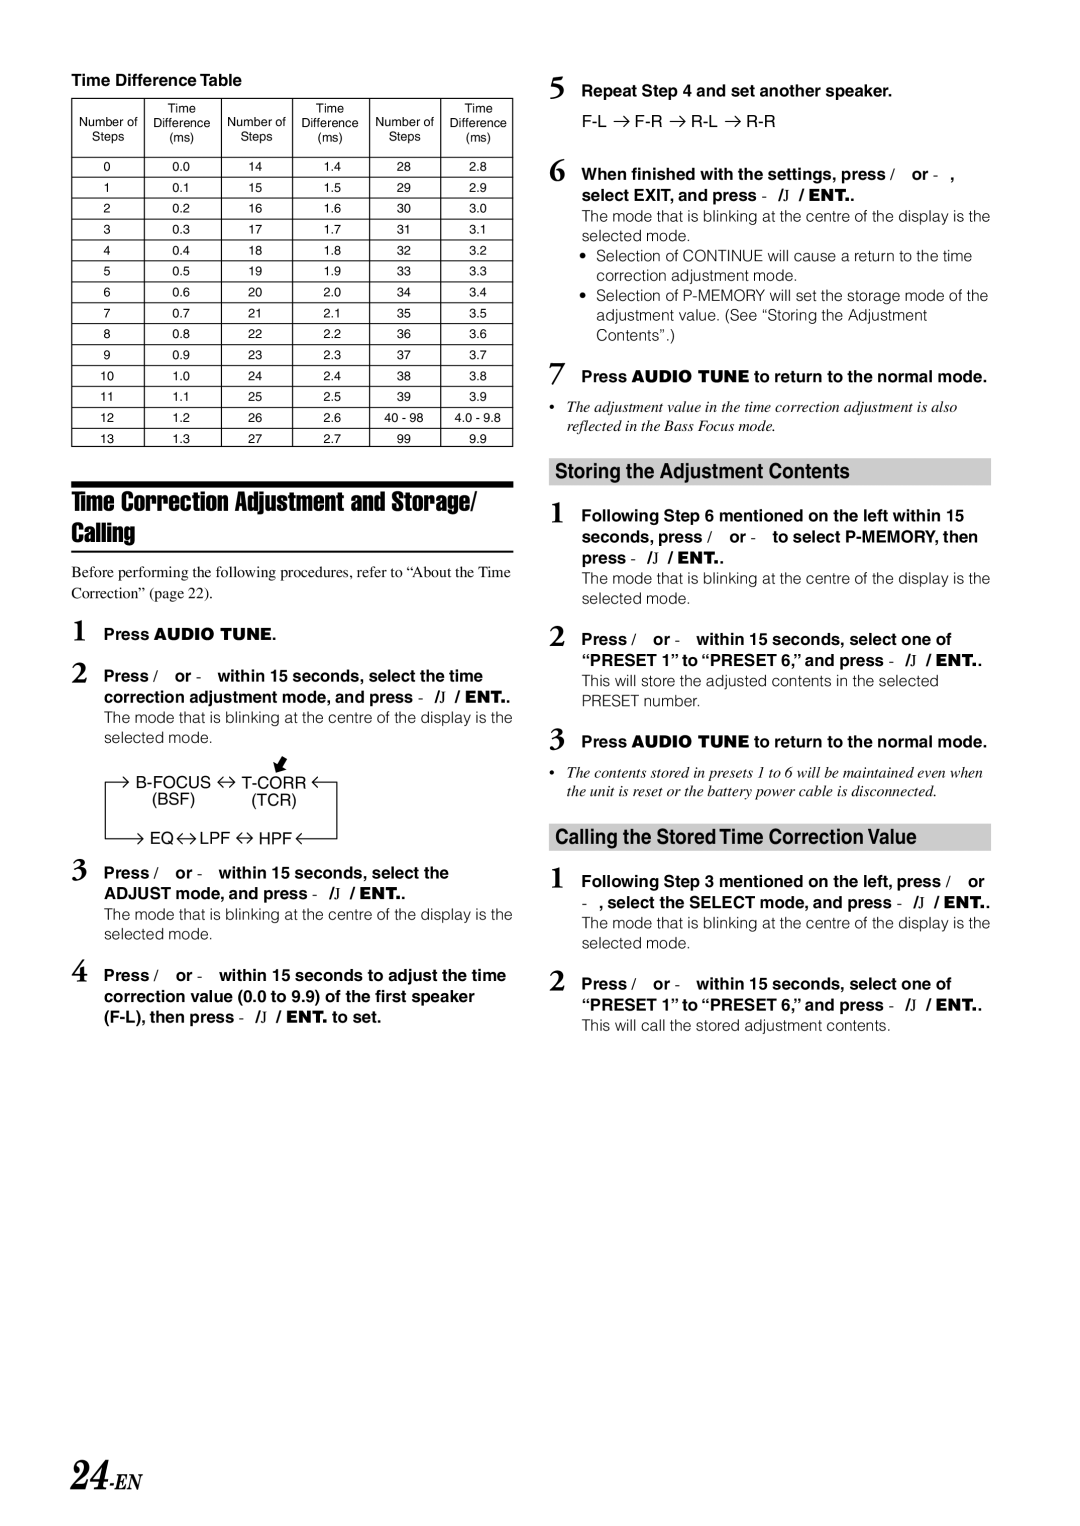
Time Difference Table
Number of | Time | Number of | Time | Number of | Time |
Difference | Difference | Difference | |||
Steps | (ms) | Steps | (ms) | Steps | (ms) |
|
|
|
|
|
|
0 | 0.0 | 14 | 1.4 | 28 | 2.8 |
|
|
|
|
|
|
1 | 0.1 | 15 | 1.5 | 29 | 2.9 |
|
|
|
|
|
|
2 | 0.2 | 16 | 1.6 | 30 | 3.0 |
|
|
|
|
|
|
3 | 0.3 | 17 | 1.7 | 31 | 3.1 |
|
|
|
|
|
|
4 | 0.4 | 18 | 1.8 | 32 | 3.2 |
|
|
|
|
|
|
5 | 0.5 | 19 | 1.9 | 33 | 3.3 |
|
|
|
|
|
|
6 | 0.6 | 20 | 2.0 | 34 | 3.4 |
|
|
|
|
|
|
7 | 0.7 | 21 | 2.1 | 35 | 3.5 |
|
|
|
|
|
|
8 | 0.8 | 22 | 2.2 | 36 | 3.6 |
|
|
|
|
|
|
9 | 0.9 | 23 | 2.3 | 37 | 3.7 |
|
|
|
|
|
|
10 | 1.0 | 24 | 2.4 | 38 | 3.8 |
|
|
|
|
|
|
11 | 1.1 | 25 | 2.5 | 39 | 3.9 |
|
|
|
|
|
|
12 | 1.2 | 26 | 2.6 | 40 - 98 | 4.0 - 9.8 |
|
|
|
|
|
|
13 | 1.3 | 27 | 2.7 | 99 | 9.9 |
Time Correction Adjustment and Storage/ Calling
Before performing the following procedures, refer to “About the Time Correction” (page 22).
1 Press AUDIO TUNE.
2 Press / or - within 15 seconds, select the time correction adjustment mode, and press
The mode that is blinking at the centre of the display is the selected mode.
B-FOCUS T-CORR
(BSF) (TCR)
EQ LPF HPF
3 Press / or - within 15 seconds, select the ADJUST mode, and press
The mode that is blinking at the centre of the display is the selected mode.
4 Press / or - within 15 seconds to adjust the time
correction value (0.0 to 9.9) of the first speaker
5 Repeat Step 4 and set another speaker.
![]()
![]()
![]()
6 When finished with the settings, press / or
The mode that is blinking at the centre of the display is the selected mode.
•Selection of CONTINUE will cause a return to the time correction adjustment mode.
•Selection of
7 Press AUDIO TUNE to return to the normal mode.
•The adjustment value in the time correction adjustment is also reflected in the Bass Focus mode.
Storing the Adjustment Contents
1 Following Step 6 mentioned on the left within 15 seconds, press / or - to select
The mode that is blinking at the centre of the display is the selected mode.
2 Press / or - within 15 seconds, select one of “PRESET 1” to “PRESET 6,” and press
This will store the adjusted contents in the selected PRESET number.
3 Press AUDIO TUNE to return to the normal mode.
•The contents stored in presets 1 to 6 will be maintained even when the unit is reset or the battery power cable is disconnected.
Calling the Stored Time Correction Value
1 Following Step 3 mentioned on the left, press / or
The mode that is blinking at the centre of the display is the selected mode.
2 Press / or - within 15 seconds, select one of “PRESET 1” to “PRESET 6,” and press
This will call the stored adjustment contents.
