English

Français

Español

7 – 10 mm (9/32" – 3/8")


Lead end side of the


product/Côté extrémité du


produit/Extremo del


producto


Fig. A


Hexagon screw/Vis à six pans/


Tornillo hexagonal


Lead/Conducteur/Alambre


Lead Terminal/Borne de conducteur/Terminal


Cautions on wire lead connections

When using third-party wire cables (power supply cord), use the supplied hex screws and the hex wrench to sim- plify the connection.

Refer to the description below for the proper procedure. If you are in doubt about how to make this connection, consult your dealer.

1.Check the wire size.

Notes:

Recommended wire size for this unit is AWG6 – AWG18.

If the wire gauge used is unknown, ask your dealer.

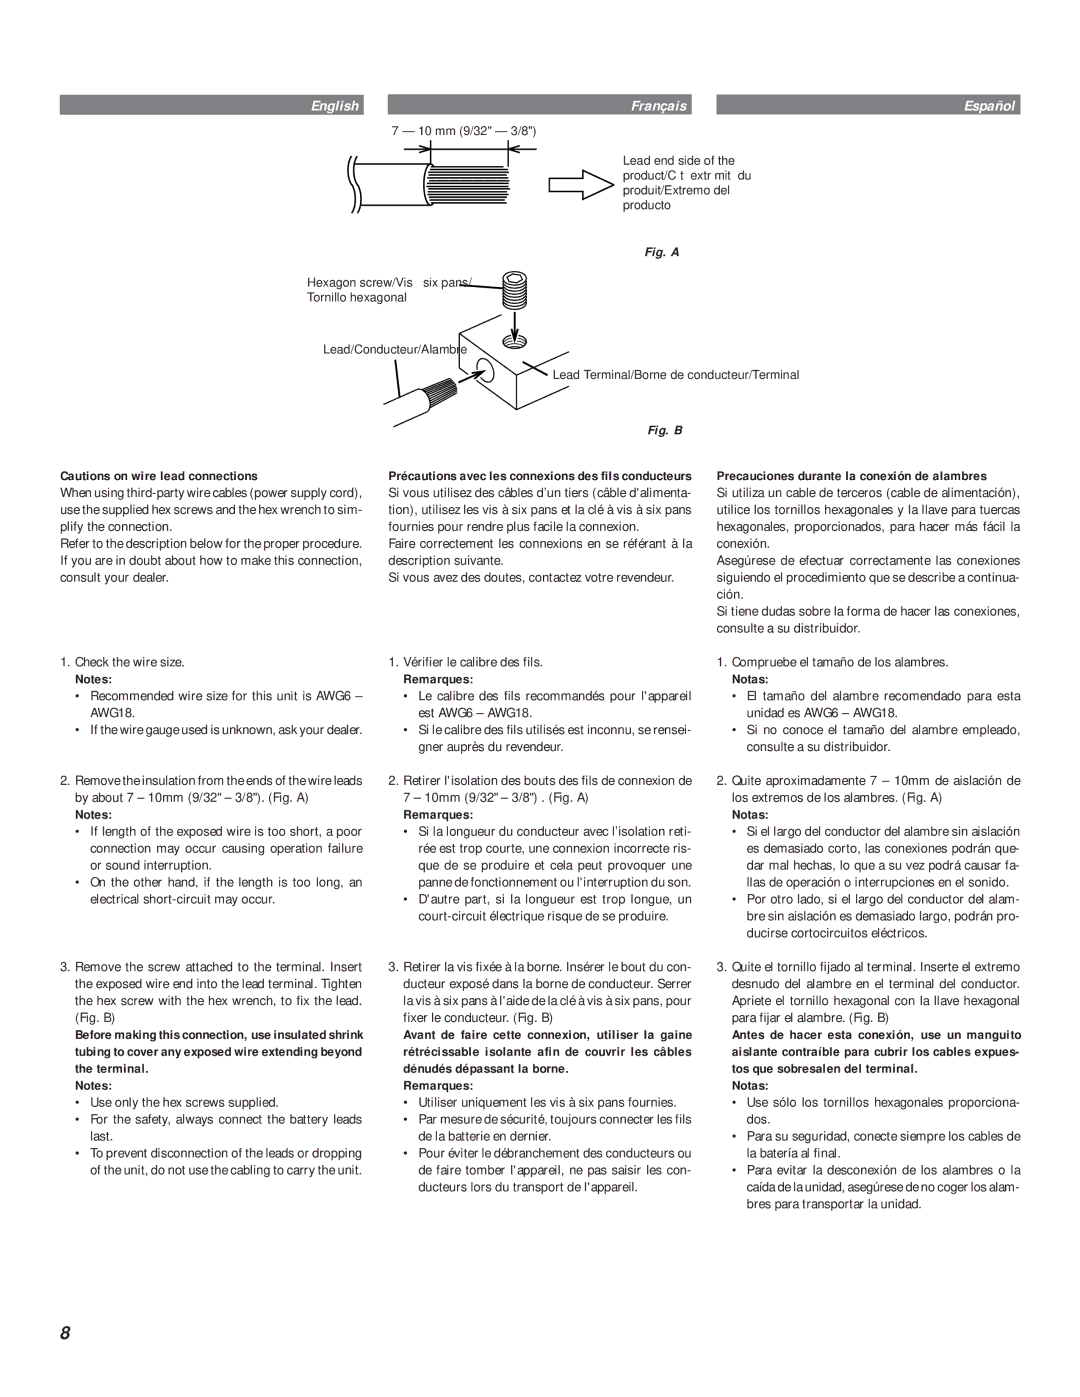
2.Remove the insulation from the ends of the wire leads by about 7 – 10mm (9/32" – 3/8"). (Fig. A)

Notes:

If length of the exposed wire is too short, a poor connection may occur causing operation failure or sound interruption.

On the other hand, if the length is too long, an electrical short-circuit may occur.

3.Remove the screw attached to the terminal. Insert the exposed wire end into the lead terminal. Tighten the hex screw with the hex wrench, to fix the lead. (Fig. B)

Before making this connection, use insulated shrink tubing to cover any exposed wire extending beyond the terminal.

Notes:

Use only the hex screws supplied.

For the safety, always connect the battery leads last.

To prevent disconnection of the leads or dropping of the unit, do not use the cabling to carry the unit.

Fig. B

Précautions avec les connexions des fils conducteurs Si vous utilisez des câbles d’un tiers (câble d'alimenta- tion), utilisez les vis à six pans et la clé à vis à six pans fournies pour rendre plus facile la connexion.

Faire correctement les connexions en se référant à la description suivante.

Si vous avez des doutes, contactez votre revendeur.

1.Vérifier le calibre des fils.

Remarques:

Le calibre des fils recommandés pour l'appareil est AWG6 – AWG18.

Si le calibre des fils utilisés est inconnu, se rensei- gner auprès du revendeur.

2.Retirer l'isolation des bouts des fils de connexion de 7 – 10mm (9/32" – 3/8") . (Fig. A)

Remarques:

Si la longueur du conducteur avec l’isolation reti- rée est trop courte, une connexion incorrecte ris- que de se produire et cela peut provoquer une panne de fonctionnement ou l'interruption du son.

D'autre part, si la longueur est trop longue, un court-circuit électrique risque de se produire.

3.Retirer la vis fixée à la borne. Insérer le bout du con- ducteur exposé dans la borne de conducteur. Serrer la vis à six pans à l'aide de la clé à vis à six pans, pour fixer le conducteur. (Fig. B)

Avant de faire cette connexion, utiliser la gaine rétrécissable isolante afin de couvrir les câbles dénudés dépassant la borne.

Remarques:

Utiliser uniquement les vis à six pans fournies.

Par mesure de sécurité, toujours connecter les fils de la batterie en dernier.

Pour éviter le débranchement des conducteurs ou de faire tomber l'appareil, ne pas saisir les con- ducteurs lors du transport de l'appareil.

Precauciones durante la conexión de alambres

Si utiliza un cable de terceros (cable de alimentación), utilice los tornillos hexagonales y la llave para tuercas hexagonales, proporcionados, para hacer más fácil la conexión.

Asegúrese de efectuar correctamente las conexiones siguiendo el procedimiento que se describe a continua- ción.

Si tiene dudas sobre la forma de hacer las conexiones, consulte a su distribuidor.

1.Compruebe el tamaño de los alambres.

Notas:

El tamaño del alambre recomendado para esta unidad es AWG6 – AWG18.

Si no conoce el tamaño del alambre empleado, consulte a su distribuidor.

2.Quite aproximadamente 7 – 10mm de aislación de los extremos de los alambres. (Fig. A)

Notas:

Si el largo del conductor del alambre sin aislación es demasiado corto, las conexiones podrán que- dar mal hechas, lo que a su vez podrá causar fa- llas de operación o interrupciones en el sonido.

Por otro lado, si el largo del conductor del alam- bre sin aislación es demasiado largo, podrán pro- ducirse cortocircuitos eléctricos.

3.Quite el tornillo fijado al terminal. Inserte el extremo desnudo del alambre en el terminal del conductor. Apriete el tornillo hexagonal con la llave hexagonal para fijar el alambre. (Fig. B)

Antes de hacer esta conexión, use un manguito aislante contraíble para cubrir los cables expues- tos que sobresalen del terminal.

Notas:

Use sólo los tornillos hexagonales proporciona- dos.

Para su seguridad, conecte siempre los cables de la batería al final.

Para evitar la desconexión de los alambres o la caída de la unidad, asegúrese de no coger los alam- bres para transportar la unidad.

8

Page 8
Image 8
Alpine mrv-t707, MRV-F357 Vérifier le calibre des fils, Remarques, Precauciones durante la conexión de alambres, Notas

MRV-T407, MRV-F357, MRV-F307, mrv-t707 specifications

Alpine has long been a pioneer in the world of car audio, and its MRV series amplifiers exemplify the company’s commitment to delivering high-quality sound and robust performance. The MRV-T707, MRV-F307, MRV-F357, and MRV-T407 models showcase cutting-edge technologies and features that make them ideal for both audiophiles and casual listeners alike.

Starting with the MRV-T707, this powerful two-channel amplifier is built to deliver clean and dynamic sound. With an RMS power output of 130 watts per channel at 4 ohms, it can drive both speakers and subwoofers with authority. The compact design allows for easy installation in tight spaces, while the proprietary D-Class technology ensures high efficiency, minimizing heat while maximizing output. The built-in low-pass filter enables precise tuning of subwoofer performance, allowing users to tailor their audio experience.

The MRV-F307 introduces versatility into the mix, functioning as a four-channel amplifier. With an RMS power rating of 75 watts per channel at 4 ohms, it's perfect for driving multiple speakers in a car system. This amplifier also features high-level inputs, which means it can be connected to factory-sound systems without requiring aftermarket head units. This feature, along with its advanced equalization capabilities, allows for customization and enhanced sound reproduction across all frequencies.

Moving on to the MRV-F357, it slightly boosts the power output to 100 watts per channel at 4 ohms. This model stands out with its bridgeable channels, meaning it can be configured to deliver higher power to fewer speakers, offering flexibility in system setup. The thermal protection circuitry ensures the amplifier runs smoothly without risk of overheating, which is essential during long drives or high-volume listening sessions.

Lastly, the MRV-T407 amplifies performance with its impressive power ratings, providing 150 watts per channel at 4 ohms. This model targets serious enthusiasts looking for deep bass and crystal-clear highs. The advanced circuitry lends itself to efficient thermal management, while a sophisticated bass boost feature allows users to adjust low-end frequencies for tailored sound profiles. The aesthetics of each amplifier boast a sleek design, complemented by a rugged build quality to withstand the demands of the automotive environment.

In summary, Alpine's MRV-T707, MRV-F307, MRV-F357, and MRV-T407 amplifiers encapsulate a blend of power, efficiency, and flexibility. With features like D-Class technology, bridgeable channels, and customizable filtering options, these amplifiers set a high bar in car audio performance, making them essential components for any serious audio system. Whether for enhancing everyday listening or creating an immersive sound experience, Aqua amplifiers cater to a range of needs and preferences.