Functions (Cont.)
(12)CUE MIXING CONTROL - Selects the channel for monitoring. The monitor signal comes from Prefader. This means it will not be affected by the channel faders. You can monitor every channel individually and all possible combinations. Connect your headphones to the HEADPHONES jack (14). Turn the CUE MIXING CONTROL to CUE and select the desired channels with the PFL switches (7). When you turn the CUE MIXING CONTROL to PGM (PFL switches without function), you can cue the output signal of the mixer. If the CUE MIXING CONTROL is set to the center position, you can cue both the channel signal you selected and the output signal. With the CUE LEVEL control (I3), you can adjust the phones volume without changing the output signal.
(13)CUE LEVEL CONTROL - Adjusts the headphone output level.
(14)HEADPHONES JACK - Use this jack to connect the headphones. Headphones from 8 Ohms to 600 Ohms can be used. 16 Ohms is recommended.
(15)BOOTH LEVEL CONTROL - The
(16)BALANCE CONTROL - Used to adjust how much of the signal is sent to the left and right MASTER OUT jack (23).
(17)MASTER CONTROL - Adjusts the level of the master output.
Inputs and Outputs
29 | 28 | 27 |
|
|
|
|
|
|
| MIC 2 | MIC 1 | GND |
ACVOLTAGE |
|
|
|
|
|
|
|
| 26 |
SELECTOR |
|
|
|
|
|
|
|
|
|
| AC IN |
|
|
| LINE 3 | PHONO 3 |
|
| |
|
|
|
|
|
|
|
|
| |
| 115 / 230V | L - |
|
|
|
|
|
|
|
115 |
|
|
|
|
|
|
|
| |
|
| R - |
|
|
|
|
|
|
|
| FUSE | MASTER | BOOTH | REC | LINE 4 LINE 3 |
| LINE 2 PHONO 2 | LINE 1 | PHONO 1 |
|
| OUTPUT |
| PHONO 3 | CH 2 | CH 1 | |||
|
|
| CH 3 |
| |||||
25 | 24 | 22 | 21 | 20 | 19 |
| 19 | 18 | |
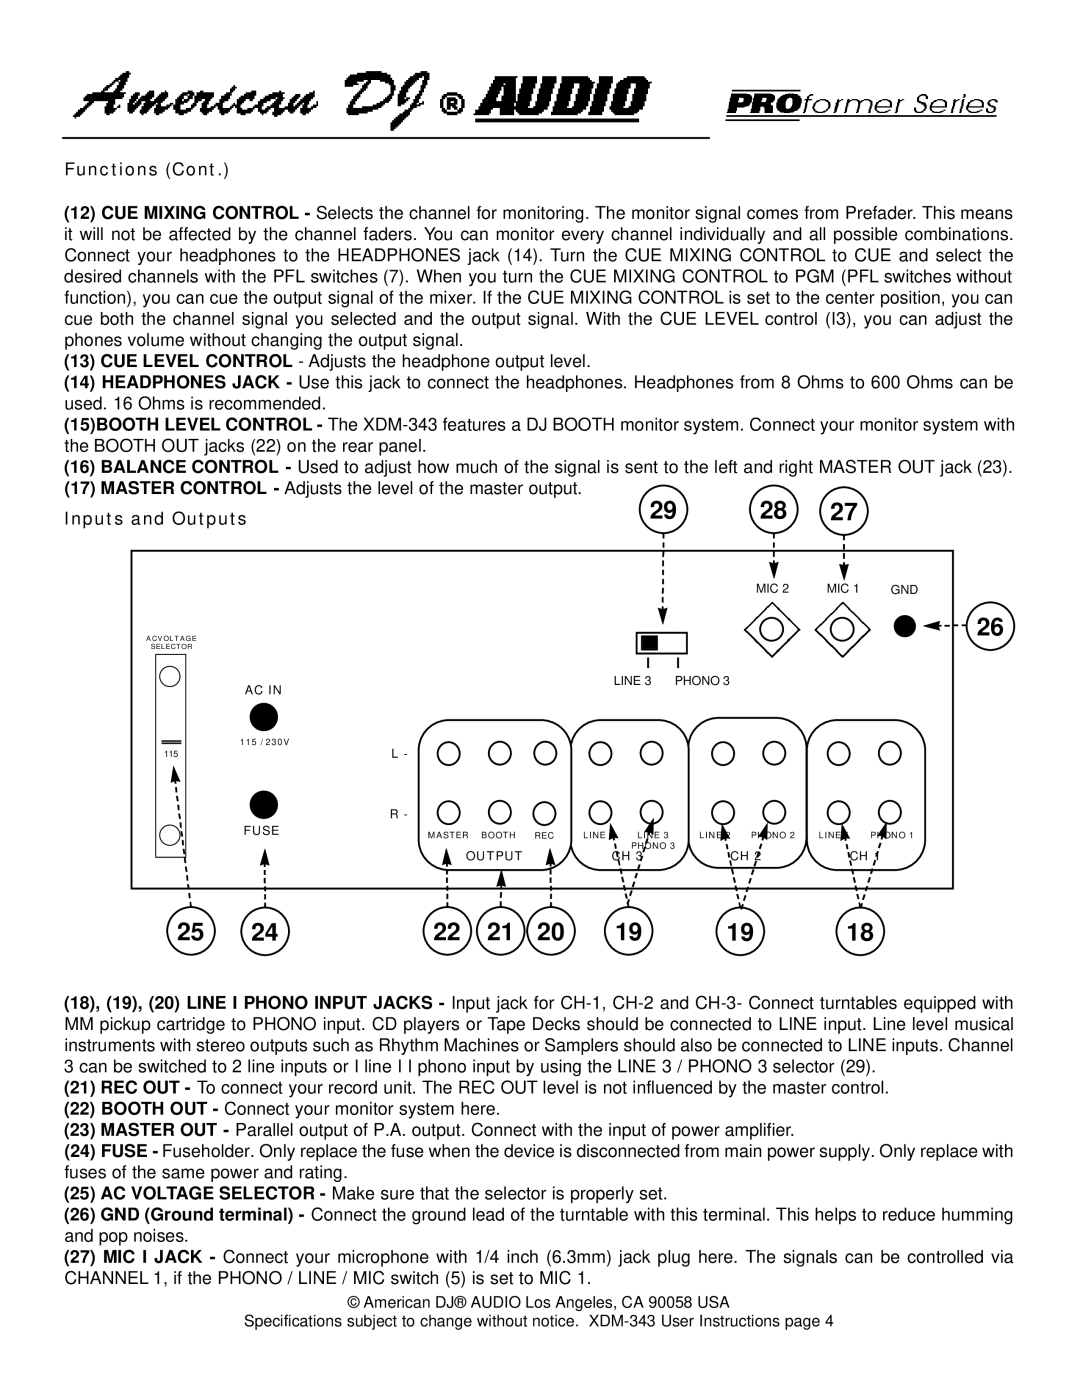
(18), (19), (20) LINE I PHONO INPUT JACKS - Input jack for
MMpickup cartridge to PHONO input. CD players or Tape Decks should be connected to LINE input. Line level musical instruments with stereo outputs such as Rhythm Machines or Samplers should also be connected to LINE inputs. Channel 3 can be switched to 2 line inputs or I line I I phono input by using the LINE 3 / PHONO 3 selector (29).
(21)REC OUT - To connect your record unit. The REC OUT level is not influenced by the master control.
(22)BOOTH OUT - Connect your monitor system here.
(23)MASTER OUT - Parallel output of P.A. output. Connect with the input of power amplifier.
(24)FUSE - Fuseholder. Only replace the fuse when the device is disconnected from main power supply. Only replace with fuses of the same power and rating.
(25)AC VOLTAGE SELECTOR - Make sure that the selector is properly set.
(26)GND (Ground terminal) - Connect the ground lead of the turntable with this terminal. This helps to reduce humming and pop noises.
(27)MIC I JACK - Connect your microphone with 1/4 inch (6.3mm) jack plug here. The signals can be controlled via CHANNEL 1, if the PHONO / LINE / MIC switch (5) is set to MIC 1.
© American DJ® AUDIO Los Angeles, CA 90058 USA
Specifications subject to change without notice.
