Completing the Hardware Installation
Next, you should check to make sure that the hard disk drives have been properly inserted and have not come loose in transit.
Step | Description | ||
1. | Checking the drive | All hard disk drives can be accessed from the front of the server. | |
bays | Verify that the hard disk drive trays are inserted all the way into its | ||
|
| bay. | |
2. | Check the airflow | Airflow is provided by five | |
|
| component layout was carefully designed to promote sufficient | |
|
| airflow through the 3U rack mount space. Verify that all cables in | |
3. | Connect your | your rack are not obstructing the chassis’s airflow. | |
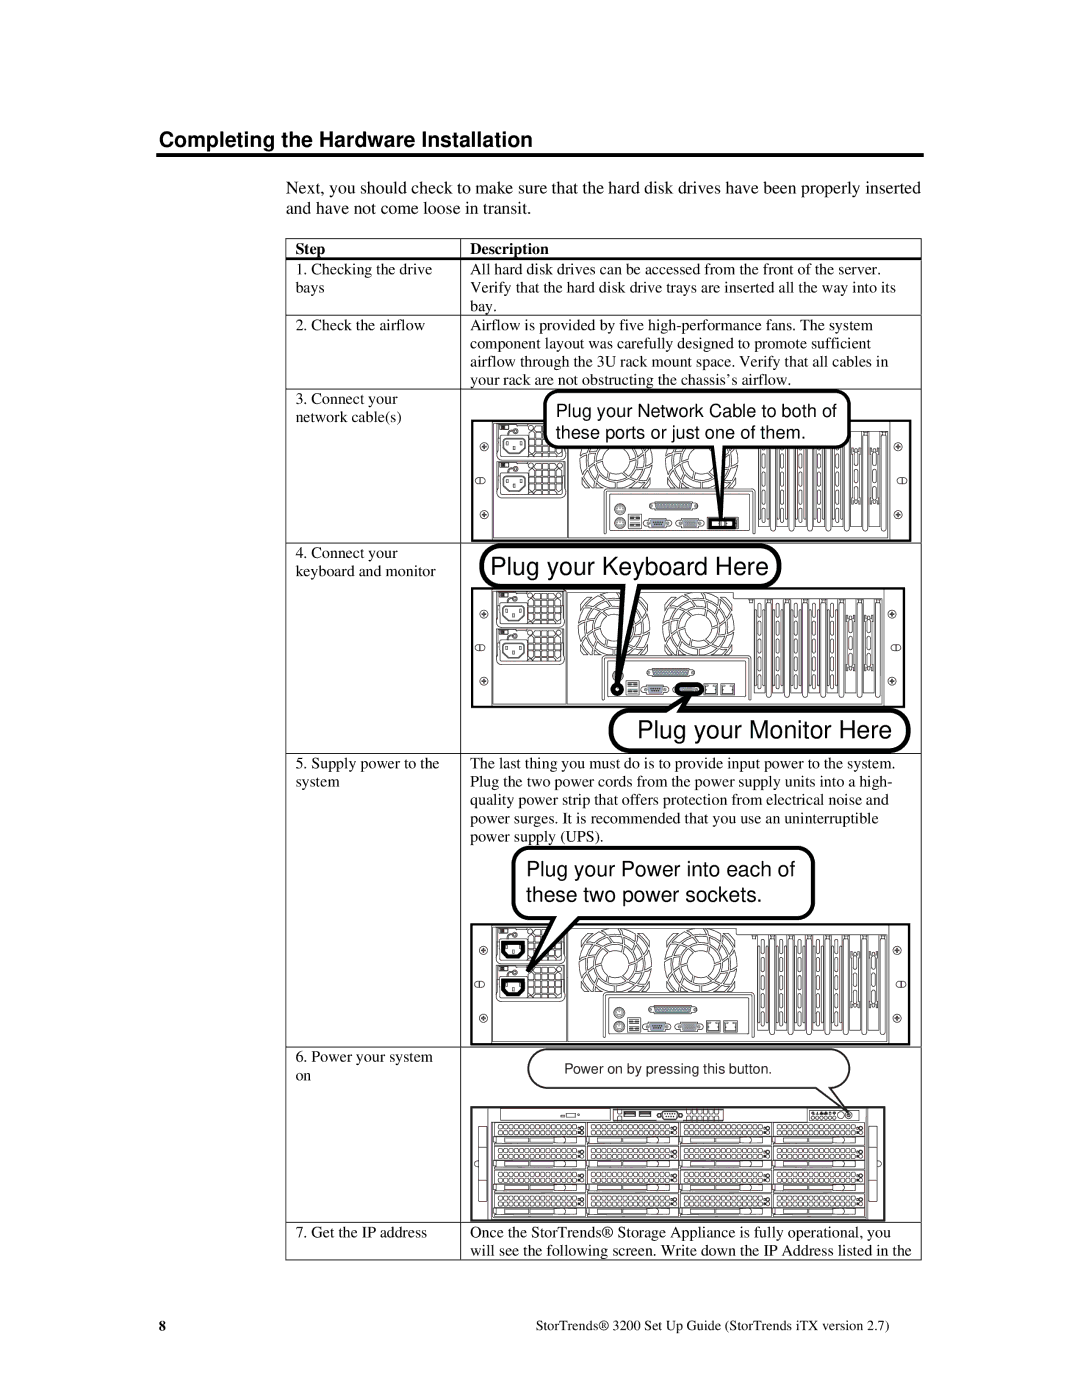
Plug your Network Cable to both of | |||
network cable(s) | |||
|
| these ports or just one of them. | |
4. Connect your | Plug your Keyboard Here |
keyboard and monitor |
|
|
|
|
|
|
|
|
|
|
|
|
|
|
|
| Plug your Monitor Here |
| ||||||||||||||||||||||||
|
|
|
|
|
|
|
|
|
|
|
|
|
|
|
|
|
|
|
|
|
|
|
|
|
|
|
|
|
| ||||||||||||
5. Supply power to the | The last thing you must do is to provide input power to the system. |
| |||||||||||||||||||||||||||||||||||||||
system | Plug the two power cords from the power supply units into a high- |
| |||||||||||||||||||||||||||||||||||||||
| quality power strip that offers protection from electrical noise and |
| |||||||||||||||||||||||||||||||||||||||
| power surges. It is recommended that you use an uninterruptible |
| |||||||||||||||||||||||||||||||||||||||
| power supply (UPS). |
| |||||||||||||||||||||||||||||||||||||||
|
|
|
|
|
|
|
|
|
| Plug your Power into each of |
| ||||||||||||||||||||||||||||||
|
|
|
|
|
|
|
|
|
| these two power sockets. |
| ||||||||||||||||||||||||||||||
|
|
|
|
|
|
|
|
|
|
|
|
|
|
|
|
|
|
|
|
|
|
|
|
|
|
|
|
|
|
|
|
|
|
|
|
|
|
|
|
|
|
|
|
|
|
|
|
|
|
|
|
|
|
|
|
|
|
|
|
|
|
|
|
|
|
|
|
|
|
|
|
|
|
|
|
|
|
|
|
|
|
|
|
|
|
|
|
|
|
|
|
|
|
|
|
|
|
|
|
|
|
|
|
|
|
|
|
|
|
|
|
|
|
|
|
|
|
|
|
|
|
|
|
|
|
|
|
|
|
|
|
|
|
|
|
|
|
|
|
|
|
|
|
|
|
|
|
|
|
|
|
|
|
|
|
|
|
|
|
|
|
|
|
|
|
|
|
|
|
|
|
|
|
|
|
|
|
|
|
|
|
|
|
|
|
|
|
|
|
|
|
|
|
|
|
|
|
|
|
|
|
|
|
|
|
|
|
|
|
|
|
|
|
|
|
|
|
|
|
|
|
|
|
|
|
|
|
|
|
|
|
|
|
|
|
|
|
|
|
|
|
|
|
|
|
|
|
|
|
|
|
|
|
|
|
|
|
|
|
|
|
|
|
|
|
|
|
|
|
|
|
|
|
|
|
|
|
|
|
|
|
|
|
|
|
|
|
|
|
|
|
|
|
|
|
|
|
|
|
|
|
|
|
|
|
|
|
|
|
|
|
|
|
|
|
|
|
|
|
|
|
|
|
|
|
|
|
|
|
|
|
|
|
|
|
|
|
|
|
|
|
|
|
|
|
|
|
|
|
|
|
|
|
|
|
|
|
|
|
|
|
|
|
|
|
|
|
|
|
|
|
|
|
|
|
|
|
|
|
|
|
|
|
|
|
|
|
|
|
|
|
|
|
|
|
|
|
|
|
|
|
|
|
|
|
|
|
|
|
|
|
|
|
|
|
|
|
|
|
|
|
|
|
|
|
|
|
|
|
|
|
|
|
|
|
|
|
|
|
|
|
|
|
|
|
|
|
|
|
|
|
|
|
|
|
|
|
|
|
|
|
|
|
|
|
|
|
|
|
|
|
|
|
|
|
|
|
|
|
|
|
|
|
|
|
|
|
|
|
|
|
|
|
|
|
|
|
|
|
|
|
|
|
6.Power your system
on
Power on by pressing this button.
7. Get the IP address
Once the StorTrends® Storage Appliance is fully operational, you will see the following screen. Write down the IP Address listed in the
8 | StorTrends® 3200 Set Up Guide (StorTrends iTX version 2.7) |
