6.If the admin password was set on the System screen, a prompt appears for the username and password. Enter Admin for the username, and APC for the password. The Mode Configuration screen appears.
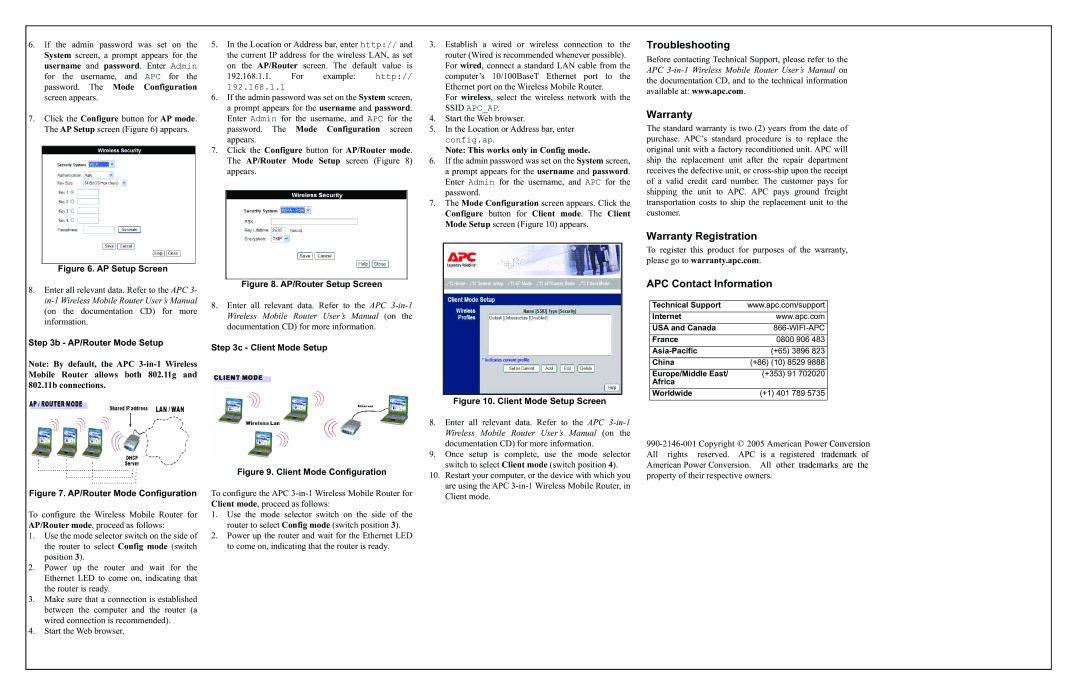
7.Click the Configure button for AP mode. The AP Setup screen (Figure 6) appears.
Figure 6. AP Setup Screen
8.Enter all relevant data. Refer to the APC 3-
Step 3b - AP/Router Mode Setup
Note: By default, the APC
Figure 7. AP/Router Mode Configuration
To configure the Wireless Mobile Router for AP/Router mode, proceed as follows:
1.Use the mode selector switch on the side of the router to select Config mode (switch position 3).
2.Power up the router and wait for the Ethernet LED to come on, indicating that the router is ready.
3.Make sure that a connection is established between the computer and the router (a wired connection is recommended).
4.Start the Web browser.
5.In the Location or Address bar, enter http:// and the current IP address for the wireless LAN, as set on the AP/Router screen. The default value is
192.168.1.1. | For | example: | http:// |
192.168.1.1
6.If the admin password was set on the System screen, a prompt appears for the username and password. Enter Admin for the username, and APC for the password. The Mode Configuration screen appears.
7.Click the Configure button for AP/Router mode. The AP/Router Mode Setup screen (Figure 8) appears.
Figure 8. AP/Router Setup Screen
8.Enter all relevant data. Refer to the APC
Step 3c - Client Mode Setup
Figure 9. Client Mode Configuration
To configure the APC
1.Use the mode selector switch on the side of the router to select Config mode (switch position 3).
2.Power up the router and wait for the Ethernet LED to come on, indicating that the router is ready.
3.Establish a wired or wireless connection to the router (Wired is recommended whenever possible). For wired, connect a standard LAN cable from the computer’s 10/100BaseT Ethernet port to the Ethernet port on the Wireless Mobile Router.
For wireless, select the wireless network with the
SSID APC_AP.
4.Start the Web browser.
5.In the Location or Address bar, enter config.ap.
Note: This works only in Config mode.
6.If the admin password was set on the System screen, a prompt appears for the username and password. Enter Admin for the username, and APC for the password.
7.The Mode Configuration screen appears. Click the Configure button for Client mode. The Client Mode Setup screen (Figure 10) appears.
Figure 10. Client Mode Setup Screen
8.Enter all relevant data. Refer to the APC
9.Once setup is complete, use the mode selector switch to select Client mode (switch position 4).
10.Restart your computer, or the device with which you are using the APC
Troubleshooting
Before contacting Technical Support, please refer to the APC
Warranty
The standard warranty is two (2) years from the date of purchase. APC’s standard procedure is to replace the original unit with a factory reconditioned unit. APC will ship the replacement unit after the repair department receives the defective unit, or
Warranty Registration
To register this product for purposes of the warranty, please go to warranty.apc.com.
APC Contact Information
Technical Support | www.apc.com/support | |
|
| |
Internet | www.apc.com | |
|
| |
USA and Canada | ||
|
| |
France | 0800 906 483 | |
|
| |
(+65) 3896 823 | ||
|
|
|
China | (+86) (10) | 8529 9888 |
|
|
|
Europe/Middle East/ | (+353) | 91 702020 |
Africa |
|
|
|
| |
Worldwide | (+1) 401 789 5735 | |
|
|
|
property of their respective owners.