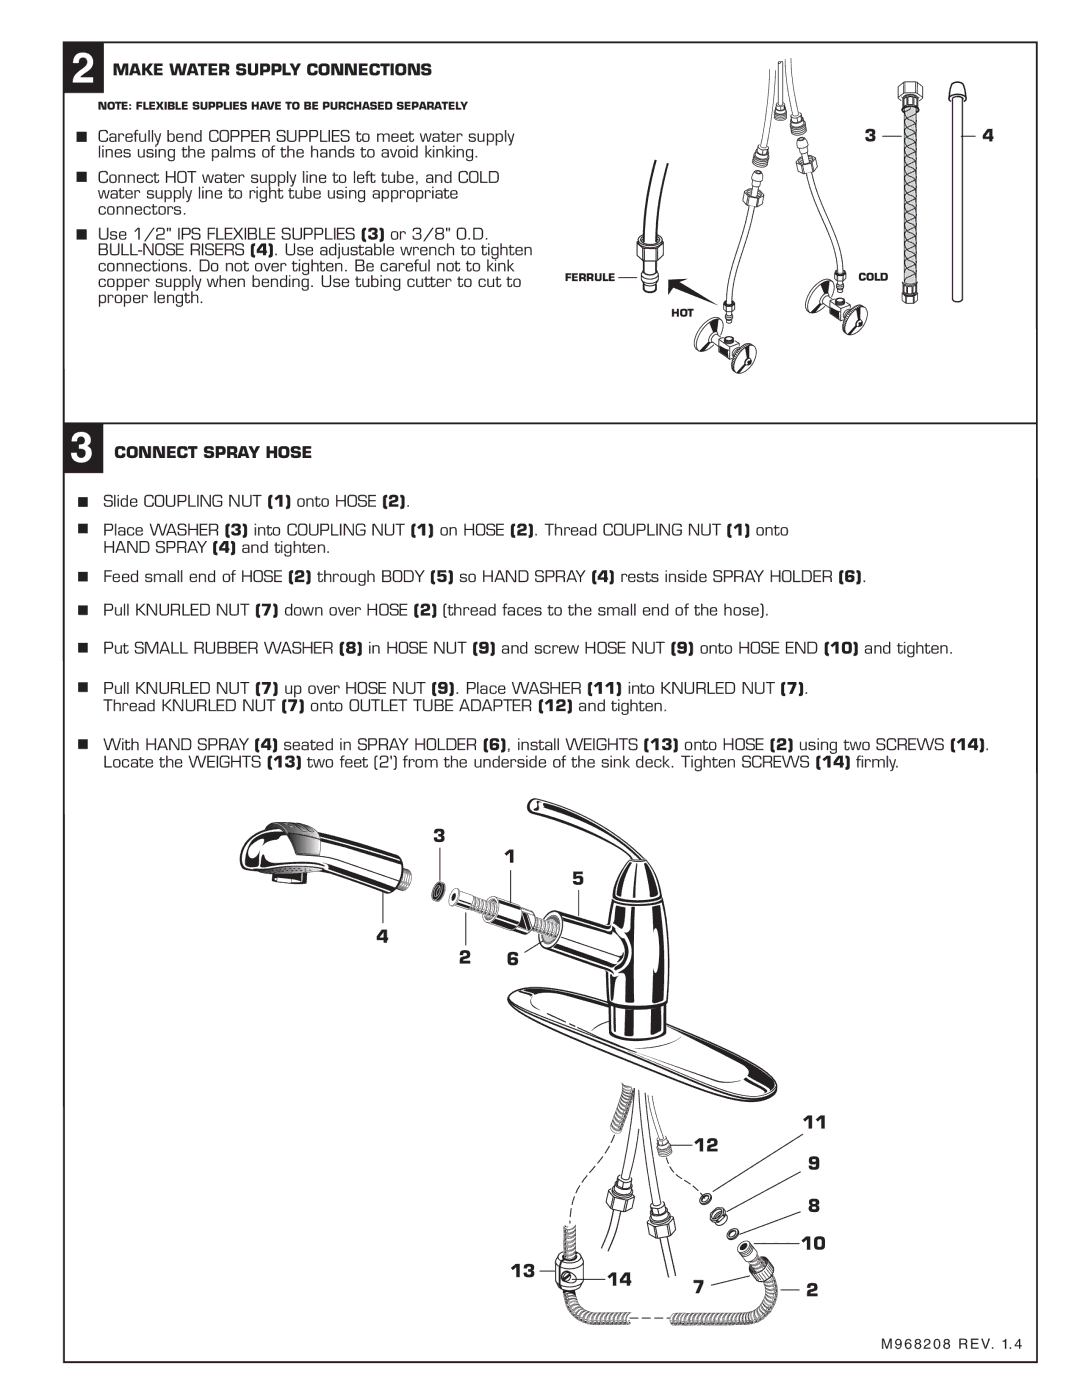
2 MAKE WATER SUPPLY CONNECTIONS |
|
|
NOTE: FLEXIBLE SUPPLIES HAVE TO BE PURCHASED SEPARATELY |
|
|
Carefully bend COPPER SUPPLIES to meet water supply |
| 3 |
lines using the palms of the hands to avoid kinking. |
|
|
Connect HOT water supply line to left tube, and COLD |
|
|
water supply line to right tube using appropriate |
|
|
connectors. |
|
|
Use 1/2" IPS FLEXIBLE SUPPLIES (3) or 3/8" O.D. |
|
|
|
| |
connections. Do not over tighten. Be careful not to kink | FERRULE | COLD |
copper supply when bending. Use tubing cutter to cut to | ||
proper length. |
| HOT |
|
|
4
3 CONNECT SPRAY HOSE
Slide COUPLING NUT (1) onto HOSE (2).
Place WASHER (3) into COUPLING NUT (1) on HOSE (2). Thread COUPLING NUT (1) onto
HAND SPRAY (4) and tighten.
Feed small end of HOSE (2) through BODY (5) so HAND SPRAY (4) rests inside SPRAY HOLDER (6).
Pull KNURLED NUT (7) down over HOSE (2) (thread faces to the small end of the hose).
Put SMALL RUBBER WASHER (8) in HOSE NUT (9) and screw HOSE NUT (9) onto HOSE END (10) and tighten.
Pull KNURLED NUT (7) up over HOSE NUT (9). Place WASHER (11) into KNURLED NUT (7). Thread KNURLED NUT (7) onto OUTLET TUBE ADAPTER (12) and tighten.
With HAND SPRAY (4) seated in SPRAY HOLDER (6), install WEIGHTS (13) onto HOSE (2) using two SCREWS (14). Locate the WEIGHTS (13) two feet (2') from the underside of the sink deck. Tighten SCREWS (14) firmly.
3
1
5
4 ![]()
![]()
![]()
![]()
![]() 2 6
2 6
11
|
| 12 | 9 |
|
|
| |
|
|
| 8 |
|
|
| 10 |
13 | 14 | 7 | 2 |
| |||
|
|
