5.Installez les espaceurs, puis replacez la carte mère dans le panier.

6.Vissez la carte mère aux espaceurs avec les vis cruciformes fournies. La carte mère est à présent installée.

Raccordement des prises d’alimentation/voyants DEL

1.Branchez le connecteur d’alimentation secteur du bloc d’alimentation et le connecteur +12 V à 4 broches, au besoin, sur votre carte mère.

2.Branchez l’interrupteur de réinitialisation (libellé RESET SW) sur la carte mère au niveau du connecteur RST.

3.L’interrupteur de tension (libellé POWER SW) se branche sur le connecteur PWR de la carte mère. Sur toutes les DEL, le fil coloré est positif (+).

4.Le connecteur du voyant d’alimentation (libellé POWER LED) se situe derrière le connecteur de réinitialisation.

5.Connecteurs des voyants I et II des disques durs (libellés HDD I, HDD II) : Ce boîtier est muni de deux voyants de disque dur. Vous pouvez utiliser ces voyants pour deux disques durs.

Branchement des ports USB

Vous trouverez un connecteur simple à 10 broches sur un câble fixé aux ports USB avant. Il s’agit d’un connecteur Intel standard, possédant un détrompeur pour empêcher son inversion accidentelle, à condition qu’il soit raccordé à une barrette de contact de carte mère Intel standard. Branchez le connecteur à 10 broches sur les barrettes de contact de la carte mère afin que la broche avec détrompeur s’ajuste correctement à la broche de barrette de contact manquante.

Remarque : Consultez le guide de la carte mère pour connaître la disposition des broches de barrette de contact USB et assurez-vous qu’elle correspond au tableau ci-joint. Si elle ne satisfait pas à cette norme Intel rendez-vous sur http://www.antec.com/StoreFront.bok et saisissez le numéro de référence 30095 pour acheter un adaptateur USB. Cet adaptateur vous permettra de brancher, broche par broche, le port avant USB à la carte mère.

Disposition des broches de la carte mère

1

2

Broche

Nom du signal

Broche

Nom du signal


1

Alimentation USB 1

2

Alimentation USB 2


3

Signal négatif 1

4

Signal négatif 2


5

Signal positif 1

6

Signal positif 2


7

Masse 1

8

Masse 2

9

10

9

Détrompeur (aucun

10

Broche vide


contact)


Branchement du port IEEE 1394 (FireWire®, i.Link®)

Vous trouverez un connecteur simple à 10 broches sur un câble fixé au raccord avant IEEE 1394. Il s’agit d’un connecteur Intel standard, possédant un détrompeur pour empêcher son inversion accidentelle, à condition qu’il soit raccordé

àune barrette de contact de carte mère Intel standard. Branchez le connecteur

à10 broches sur la barrette de contact de la carte mère afin que la broche avec détrompeur s’ajuste correctement à la broche de barrette de contact manquante.

10

Page 12
Image 12
Antec P182SE, P180 Raccordement des prises d’alimentation/voyants DEL, Branchement des ports USB, Nom du signal Broche

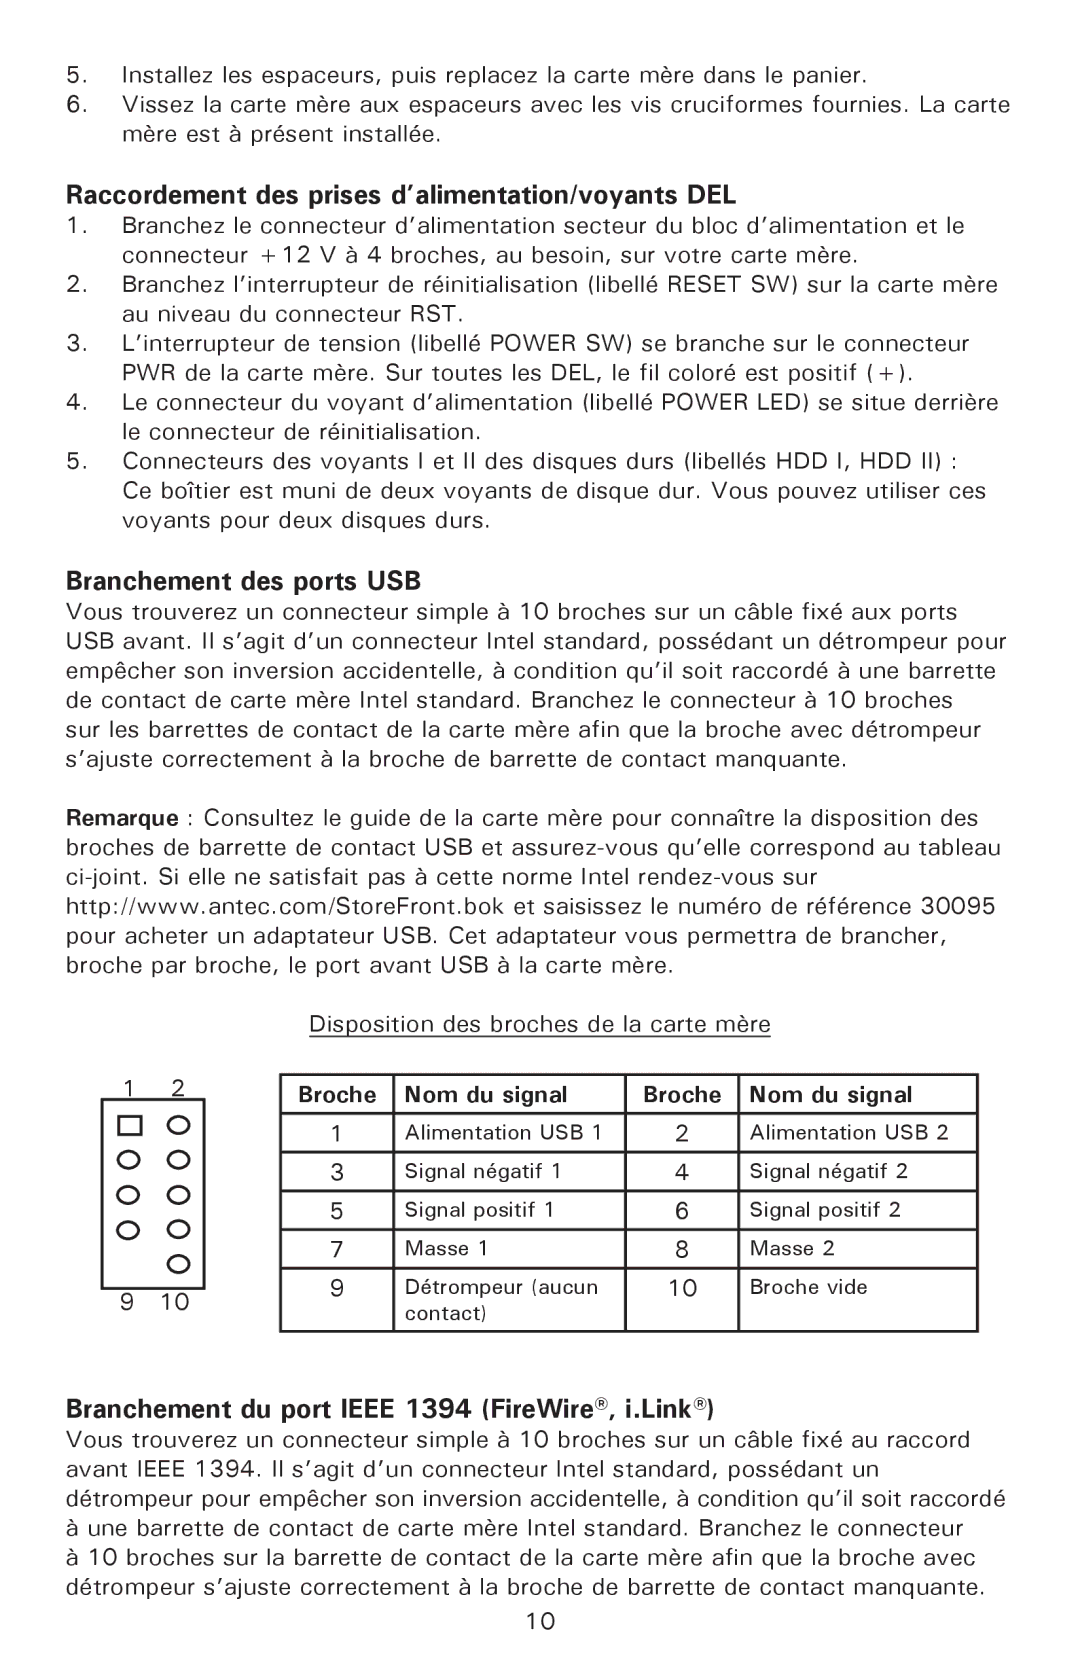
P182, P180, P182SE specifications

The Antec P182SE, P180, and P182 are part of Antec's celebrated Performance One series, which is designed to provide users with an optimal balance of form, functionality, and cooling efficiency. These models have gained a loyal following among PC builders and enthusiasts, thanks to their innovative features and user-friendly designs.

The Antec P180, first introduced in the mid-2000s, set the standard for quiet performance and thermal efficiency. Its layout was groundbreaking, featuring a dual-chamber design that separated the heat-producing components from the cooler regions of the case. This configuration helps to optimize airflow and reduce noise, a hallmark of Antec's commitment to silent computing. The P180 supports multiple cooling options, including space for large CPU coolers and dedicated areas for additional fans—all designed to keep temperatures in check while minimizing acoustic output.

Building on the success of the P180, Antec released the P182, which incorporated a few refinements and enhancements. The P182 features improved cable management with additional routing options, enhancing overall airflow and allowing for a cleaner build aesthetic. Moreover, it includes upgrades to the damping material, enhancing acoustic performance even further. With its ability to accommodate both standard and long graphics cards, the P182 remains a versatile choice for gamers and professionals alike.

The P182SE, or Special Edition, is a variant that doubles down on the original DNA of the P182 while offering a few distinctive upgrades. It retains the dual-chamber architecture but introduces updated fan configurations, allowing for even more efficient airflow. The aesthetic appeal of the P182SE is enhanced with a sleek aluminum front panel and an innovative door design that provides easy access to drive bays, while still offering noise-dampening benefits.

All three models support a variety of cooling solutions, including room for multiple 120mm and 140mm fans, while also being compatible with liquid cooling systems. Their support for larger PSU installations minimizes the need for restrictive sizes, giving builders more flexibility. Each case also allows for ample storage options, with multiple hard drive bays that can be configured to suit a user's storage requirements.

With a focus on performance, efficiency, and user experience, the Antec P182SE, P180, and P182 have established themselves as staples in the realm of PC building. Their combination of innovative design, robust construction, and thermal capabilities make them ideal choices for anyone looking to assemble a high-performance, silent system.