User’s Guide
Simultaneously published in the United States and Canada
Contents
Software Problems
Installing an AirPort Extreme Card
Replacing the Battery
Troubleshooting
Positioning the Computer and Display
1Setting Up
Plugging In the Computer
Display ports USB ports
Ethernet port Modem port
Keyboard
Need Help?
Using a Wireless Keyboard and Mouse
Adjusting Your Display
What’s Next?
Transferring Information to Your Power Mac G5
Setting up Your Power Mac G5 for the Internet
To wake your computer from sleep
What to Do When You Have Finished Working
Putting Your Power Mac G5 to Sleep
To turn off your computer
Shutting Down Your Power Mac G5
Getting to Know Your Computer
Optical drive
Ports and Connectors-Expanding Your Computer’s Capabilities
Power socket
Slot 1 AGP 8X Pro slot
Battery
If you would like additional information, see the following
Additional Information
2Using Your Computer
For More Information About Your Keyboard
Using Your Apple Keyboard
To use multiple displays
Using Your Apple Mouse
Connecting a Second Display
For More Information About Your Mouse
To connect a video device
Connecting a Television, VCR, or Other Video Device
For More Information on Displays
Using USB Devices
Using Universal Serial Bus USB
For More Information on USB
Connecting Multiple USB Devices
Using FireWire
To connect your Power Mac G5 in FireWire Target Disk Mode
Using FireWire Devices
FireWire Target Disk Mode
Optical Digital Audio Ports
Using Audio Devices
For More Information on FireWire
Analog Audio Ports
Using Bluetooth Devices
Headphone Jack
For More Information on Bluetooth Wireless Technology
Ejecting a Disc
Using Your Optical Drive
To install or use programs from a CD or DVD
Inserting a Disc
To burn a disc with iDVD
Recording Information on a DVD
To record music on a CD-R disc from your iTunes library
To record data on a CD-R disc from the Finder
Connecting to an Ethernet Network
Using Your Modem
To configure your network settings
Connecting to a Twisted-Pair Ethernet Network
Wireless Network Connections
AirPort Wireless Internet and Networking
For More Information on Using Ethernet
For More Information on AirPort
How AirPort Provides Wireless Internet Access
First, turn on file sharing on both computers
Putting the Computer to Sleep to Save Energy
Transferring Information Between Two Macintosh Computers
Next, follow these steps on one computer
Page
3Working Inside Your Computer
Opening the Computer
While holding the side panel, lift the latch
Important When you remove the side panel, hold it securely
Computer
Pull the fan assembly completely out of the computer
Installing Memory
To install memory
DDR Sdram Dimm
Working Inside Your Computer
Replace the air deflector
Working Inside Your Computer
Push the latch down to close and secure the side panel
Height 1.0 inch
Installing Internal Storage Devices
Installing Serial ATA Drives
Drive guides
Working Inside Your Computer
Replacing the Optical Drive
Remove the four metal Remove the power
Working Inside Your Computer
Working Inside Your Computer
About PCI Expansion Cards
Installing a PCI Expansion Card or Replacing the AGP Card
About AGP Cards
PCI slots
Installing Your Card
Port access opening PCI slot
Installing an AirPort Extreme Card
Replacing the Battery
To replace the battery
Computer won’t respond or the pointer won’t move
4Troubleshooting
You are unable to eject a disc
Computer won’t turn on or start up
Status light flashes and the computer won’t start up
You have trouble using AirPort wireless communication
Software Problems
You have a problem with a software program
Screen image appears dim or flickers
Problems With Your Display
After you change the screen resolution, desktop icons move
No image appears on the screen
To use Apple Hardware Test
Using Apple Hardware Test
Screen freezes
Light on the front of the display is flashing
Installing Applications
Installing Software on Your Computer
Installing Mac OS X and Applications
Locating Your Product Serial Number
Installing Classic Support and Other Applications
Maximizing Ethernet Performance
Page
Video Display Modes
Processor and Memory Specifications
Random-access memory RAM
Graphics Controller
Data formats
Combo Drive DVD-ROM/CD-RW Specifications
SuperDrive DVD-R/CD-RW Specifications
Modem Specifications
USB Specifications
FireWire Specifications
Ethernet Specifications
Optical digital audio out
AirPort Extreme Card Optional Specifications
Optical Digital Audio Specifications
Compatibility
Power Supply
Analog Audio Specifications
Dimensions and Operating Environment
Power Requirements for Devices You Can Connect
System Clock and Battery
Important Safety Information
BSafety, Maintenance
Liquid Cooling System
Apple and the Environment
General Maintenance
To keep your optical drive working properly
Important Ergonomic and Health-Related Information
Protecting Your Optical Drive
Maintaining Your Display
Shoulders relaxed
Page
Before you connect to the Internet
There are four kinds of Internet connections
To find the settings on a Windows PC
To find the settings on a Mac OS X computer
To find the settings on a Mac OS 9 computer
PPP
Gathering the Information You Need
Dial-Up Modem With Point-to-Point Protocol PPP Connections
Entering Your Information
Appendix C Connecting to the Internet
DSL, Cable Modem, or LAN Internet Connections
To test your Internet configuration
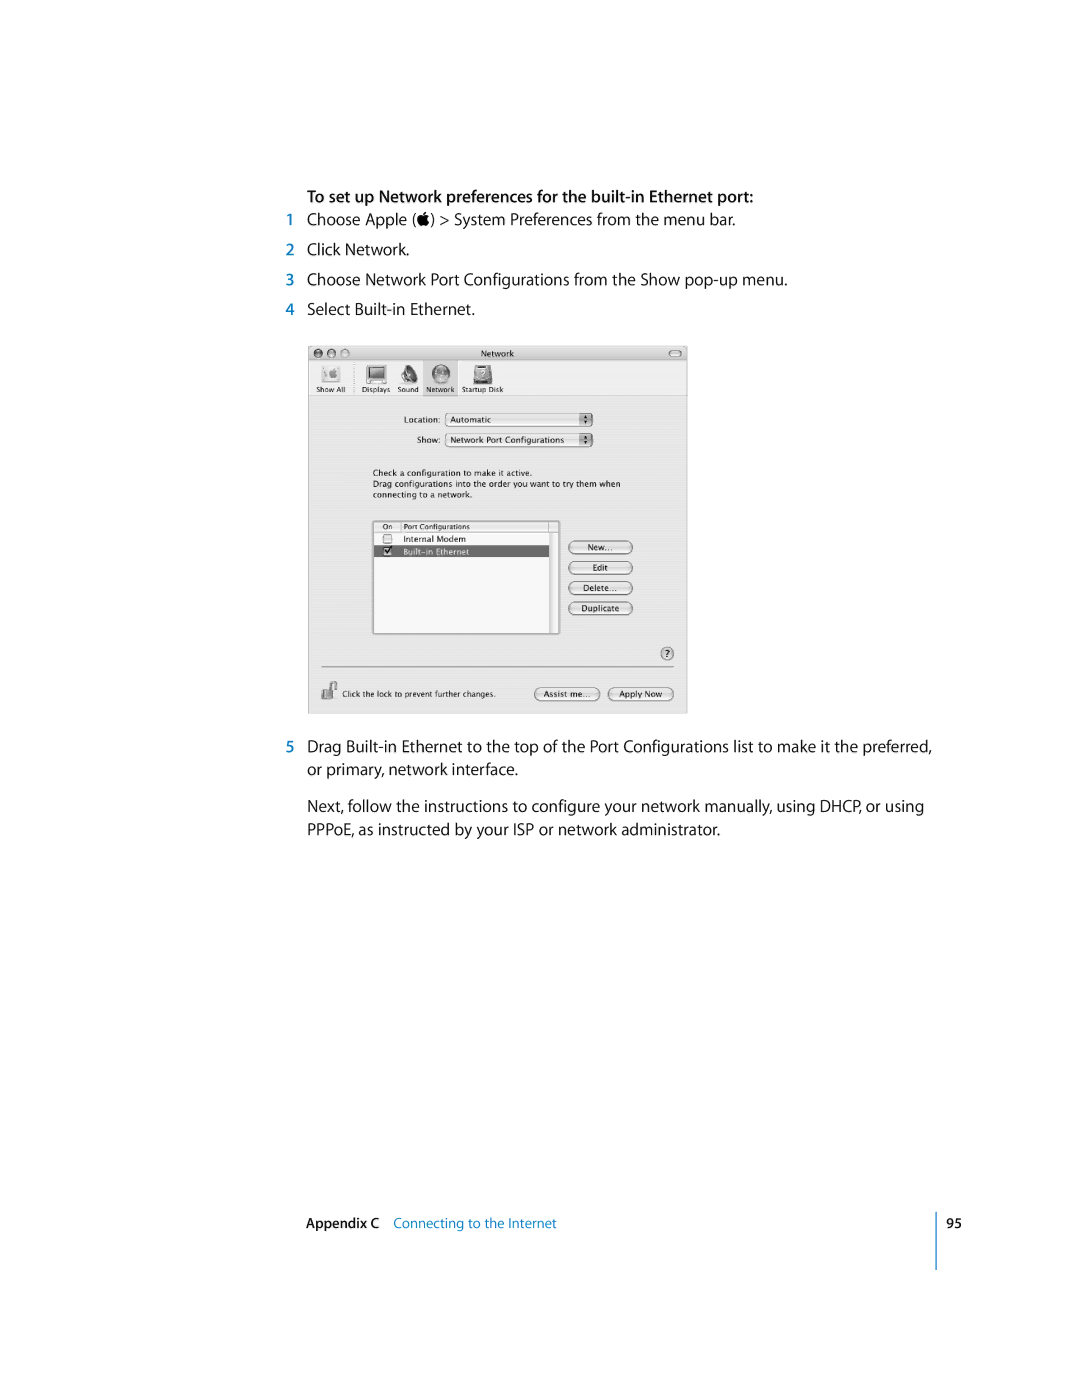
To set up Network preferences for the built-in Ethernet port
To set up a manual configuration
Manual Configuration
To set up a Dhcp configuration
Dhcp Configuration
To set up a PPPoE connection
PPPoE Configuration
Appendix C Connecting to the Internet
To check if you have access to an AirPort Extreme network
AirPort Extreme Wireless Connection
Setting Up an AirPort Extreme Connection Manually
101
To test your AirPort Extreme connection
PPPoE Connections
Troubleshooting Your Connection
Cable Modem, DSL, and LAN Internet Connections
Network Connections
Laser Information
FCC Compliance Statement
Industry Canada Statement
Vcci Class B Statement European Community
High-Risk Activities Warning
Battery Disposal Information
Exposure to Radio Frequency Energy
Mouse and Keyboard Information
Telephone Consumer Protection Act
Information You Need in the United Kingdom
109
Page
Index
112