INSTALLATION INSTRUCTIONS
STRUCTURAL PREPARATION:
Note: The bath should remain in its shipping carton until time of installation.
1.Literature dimensions are for reference only. Installation dimensions should be taken directly from the tub. An access panel of 30”w x 20”h minimum must be provided at the pump end of the whirlpool allowing sufficient clearance to make final connections and for servicing the pump, blower, heater and control units. A minimum ventilation opening of 2” x 4” for the blower is required and should be designed to draw in ambient air at a minimum of 72°F. Access may be through the wall or platform apron at the end of the unit. In the case of sunken installations, access should be made through the ceiling below.
It is the installer’s responsibility to provide sufficient service access.
Make absolutely certain that access panels and/or service openings are properly placed and that all possible areas where service may be required are accessible.
2.Install the drain fitting to the bath. Clearance may be needed for the drain by cutting away the subfloor (where possible) or by blocking below the tub as may be required.
WARNING: FACTORY SKIRTS DO NOT ALLOW FOR BLOCKING UP OF THE TUB BASE. All blocking must be solid and provide uniform support to the tub base.
Please note: LuxeAir versions with the black ABS support bases need to be set in a bed of mortar. This will help in leveling the tub on uneven floors and will help in reducing vibrations and noise.
3.Tub must rest entirely on all leveling feet or ABS Support Base. DO NOT SUPPORT THE WEIGHT OF THE TUB BY THE RIM. Lift unit and place into framework. If necessary, adjust feet until unit is completely touching on the leveled sub floor. Secure the unit by fastening the bottom feet to the sub floor with any construction adhesive caulk.
For quieter operation and heat conservation, the walls surrounding the whirlpool may be insulated.
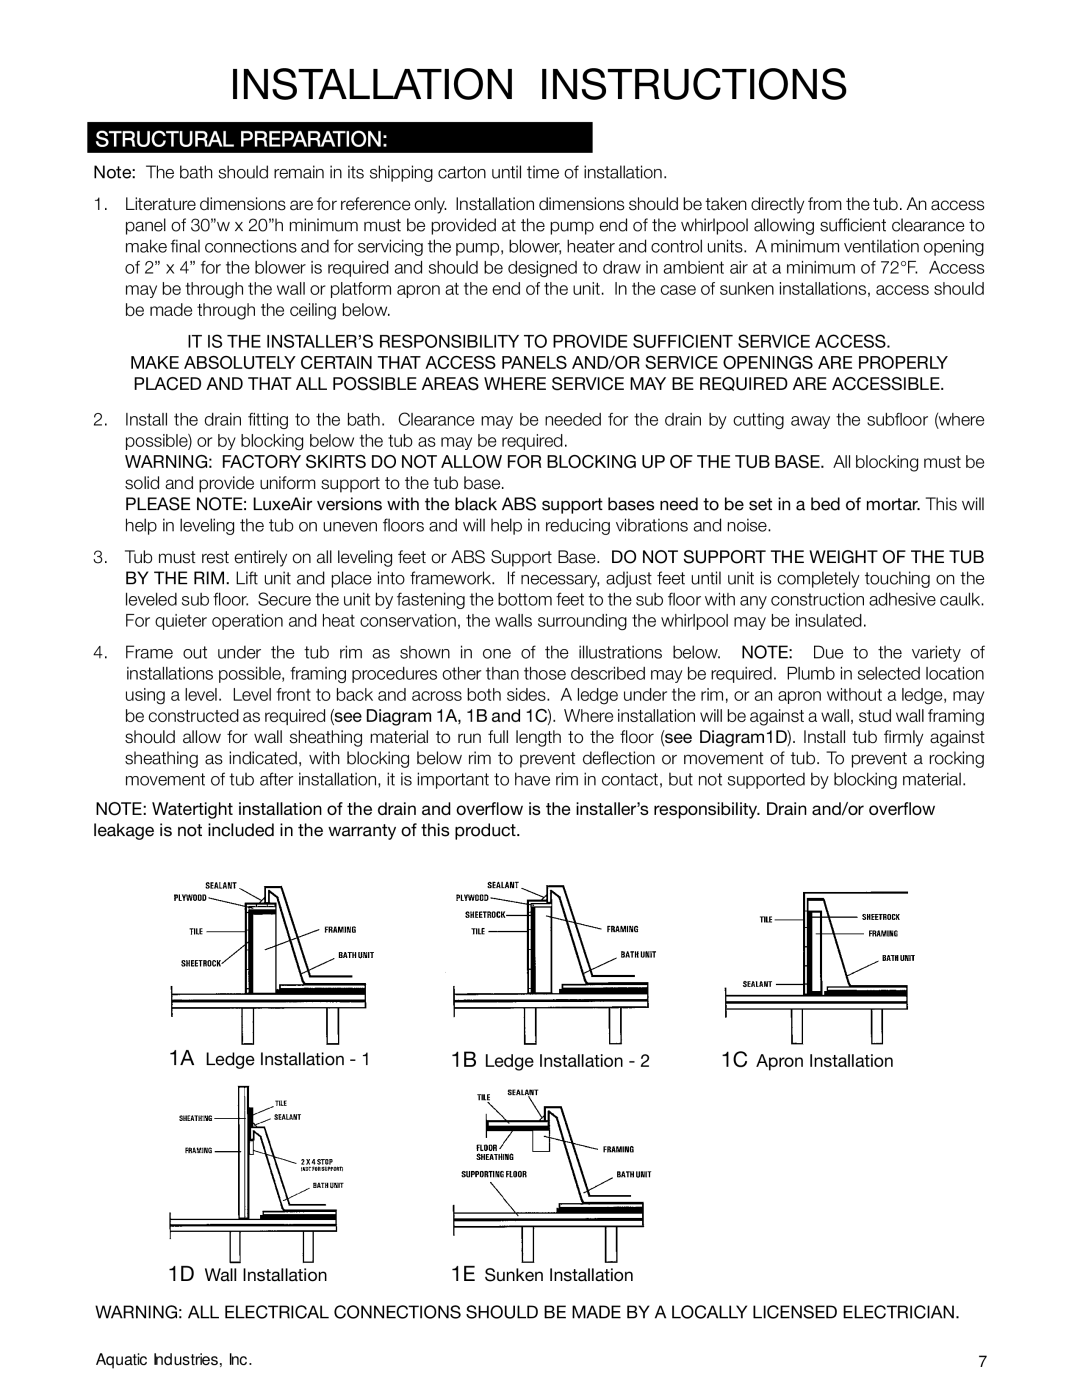
4.Frame out under the tub rim as shown in one of the illustrations below. NOTE: Due to the variety of installations possible, framing procedures other than those described may be required. Plumb in selected location using a level. Level front to back and across both sides. A ledge under the rim, or an apron without a ledge, may be constructed as required (see Diagram 1A, 1B and 1C). Where installation will be against a wall, stud wall framing should allow for wall sheathing material to run full length to the floor (see Diagram1D). Install tub firmly against sheathing as indicated, with blocking below rim to prevent deflection or movement of tub. To prevent a rocking movement of tub after installation, it is important to have rim in contact, but not supported by blocking material.
NOTE: Watertight installation of the drain and overflow is the installer’s responsibility. Drain and/or overflow leakage is not included in the warranty of this product.
1A Ledge Installation - 1 | 1B |
1D Wall Installation | 1E |
Ledge Installation - 2 | 1C Apron Installation |
Sunken Installation
WARNING: ALL ELECTRICAL CONNECTIONS SHOULD BE MADE BY A LOCALLY LICENSED ELECTRICIAN.
Aquatic Industries, Inc. | 7 |