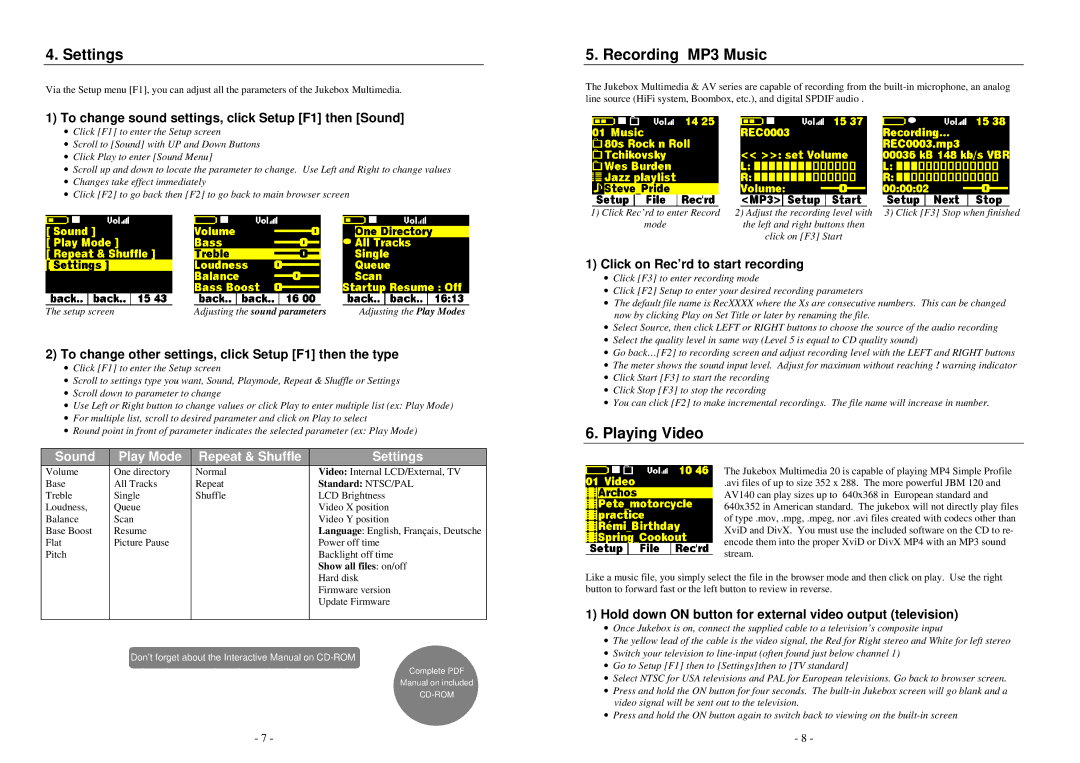
4. Settings
Via the Setup menu [F1], you can adjust all the parameters of the Jukebox Multimedia.
1)To change sound settings, click Setup [F1] then [Sound]
•Click [F1] to enter the Setup screen
•Scroll to [Sound] with UP and Down Buttons
•Click Play to enter [Sound Menu]
•Scroll up and down to locate the parameter to change. Use Left and Right to change values
•Changes take effect immediately
•Click [F2] to go back then [F2] to go back to main browser screen
|
|
|
|
|
The setup screen | Adjusting the sound parameters | Adjusting the Play Modes | ||
2)To change other settings, click Setup [F1] then the type
•Click [F1] to enter the Setup screen
•Scroll to settings type you want, Sound, Playmode, Repeat & Shuffle or Settings
•Scroll down to parameter to change
•Use Left or Right button to change values or click Play to enter multiple list (ex: Play Mode)
•For multiple list, scroll to desired parameter and click on Play to select
•Round point in front of parameter indicates the selected parameter (ex: Play Mode)
Sound | Play Mode | Repeat & Shuffle | Settings |
Volume | One directory | Normal | Video: Internal LCD/External, TV |
Base | All Tracks | Repeat | Standard: NTSC/PAL |
Treble | Single | Shuffle | LCD Brightness |
Loudness, | Queue |
| Video X position |
Balance | Scan |
| Video Y position |
Base Boost | Resume |
| Language: English, Français, Deutsche |
Flat | Picture Pause |
| Power off time |
Pitch |
|
| Backlight off time |
|
|
| Show all files: on/off |
|
|
| Hard disk |
|
|
| Firmware version |
|
|
| Update Firmware |
|
|
|
|
Don’t forget about the Interactive Manual on CD-ROM
Complete PDF
Manual on included
- 7 -
5. Recording MP3 Music
The Jukebox Multimedia & AV series are capable of recording from the
|
|
|
|
|
|
|
|
1) Click Rec’rd to enter Record | 2) Adjust the recording level with 3) Click [F3] Stop when finished | ||||||
| mode |
| the left and right buttons then | ||||
|
|
|
| click on [F3] Start | |||
1)Click on Rec’rd to start recording
•Click [F3] to enter recording mode
•Click [F2] Setup to enter your desired recording parameters
•The default file name is RecXXXX where the Xs are consecutive numbers. This can be changed now by clicking Play on Set Title or later by renaming the file.
•Select Source, then click LEFT or RIGHT buttons to choose the source of the audio recording
•Select the quality level in same way (Level 5 is equal to CD quality sound)
•Go back…[F2] to recording screen and adjust recording level with the LEFT and RIGHT buttons
•The meter shows the sound input level. Adjust for maximum without reaching ! warning indicator
•Click Start [F3] to start the recording
•Click Stop [F3] to stop the recording
•You can click [F2] to make incremental recordings. The file name will increase in number.
6. Playing Video
The Jukebox Multimedia 20 is capable of playing MP4 Simple Profile
.avi files of up to size 352 x 288. The more powerful JBM 120 and AV140 can play sizes up to 640x368 in European standard and 640x352 in American standard. The jukebox will not directly play files of type .mov, .mpg, .mpeg, nor .avi files created with codecs other than XviD and DivX. You must use the included software on the CD to re- encode them into the proper XviD or DivX MP4 with an MP3 sound stream.
Like a music file, you simply select the file in the browser mode and then click on play. Use the right button to forward fast or the left button to review in reverse.
1)Hold down ON button for external video output (television)
•Once Jukebox is on, connect the supplied cable to a television’s composite input
•The yellow lead of the cable is the video signal, the Red for Right stereo and White for left stereo
•Switch your television to
•Go to Setup [F1] then to [Settings]then to [TV standard]
•Select NTSC for USA televisions and PAL for European televisions. Go back to browser screen.
•Press and hold the ON button for four seconds. The
•Press and hold the ON button again to switch back to viewing on the
-8 -