4 Engineer Programming
Once the engineers access code (9999) has been entered from within DAY mode, the Day LED will be extinguished, and all 8 Zone LED’s will flash to prompt for the selection of the menu setting to be changed.
The following is a list of configurable menus available within the engineers menu.
•Press 1 to Set up the Programs.
•Press 2 to Set up Zone Attributes.
•Press 3 to Set up the Exit timer.
•Press 4 to Set up the Entry timer.
•Press 5 to Set up Bell Active time.
•Press 6 to Set up Bell Delay time.
•Press 7 to Set up Access codes.
•Press 8 to Set up the Service Timer.
•Press 9 to Enter the Test Menu.
•Press 0 to Set up the System Flags.
•Press Z to Exit back to DAY mode.
•Press * twice within 2 sec’s for Factory Reset.
• | Press | to View the Event Log. |
Once a change has been made you need to accept or abort the changes. Pressing Key A accepts the change and returns you to the main engineer menu. Pressing Key B aborts the change and returns you to the main engineer menu. Within some menus Pressing A or B will only return you to the top of that menu and Key Z needs to be selected to return to engineers menu (this is identified throughout programming guide).
4.1Setting Up Programs.
When the
Press A To Set program A. Press B To Set program B. Press * To Set program *.
Once the program that needs to be altered has been selected, the following status LED’s will light.
4.1.2Setting Up Timed Zones
On entering
Whether a zone is a timed zone or not is carried out in the same way as immediate zones, by pressing the key number for the zone that needs to be toggled to become a timed zone or not.
Press A To Accept / Press B To Abort the changes.
4.1.3Setting Up Time Inhibited Zones
On entering
Whether a zone is a time inhibited zone or not is carried out in the same way as immediate zones, by pressing the key number for the zone that needs to be toggled to become a time inhibited zone or not.
Press A To Accept / Press B To Abort the changes.
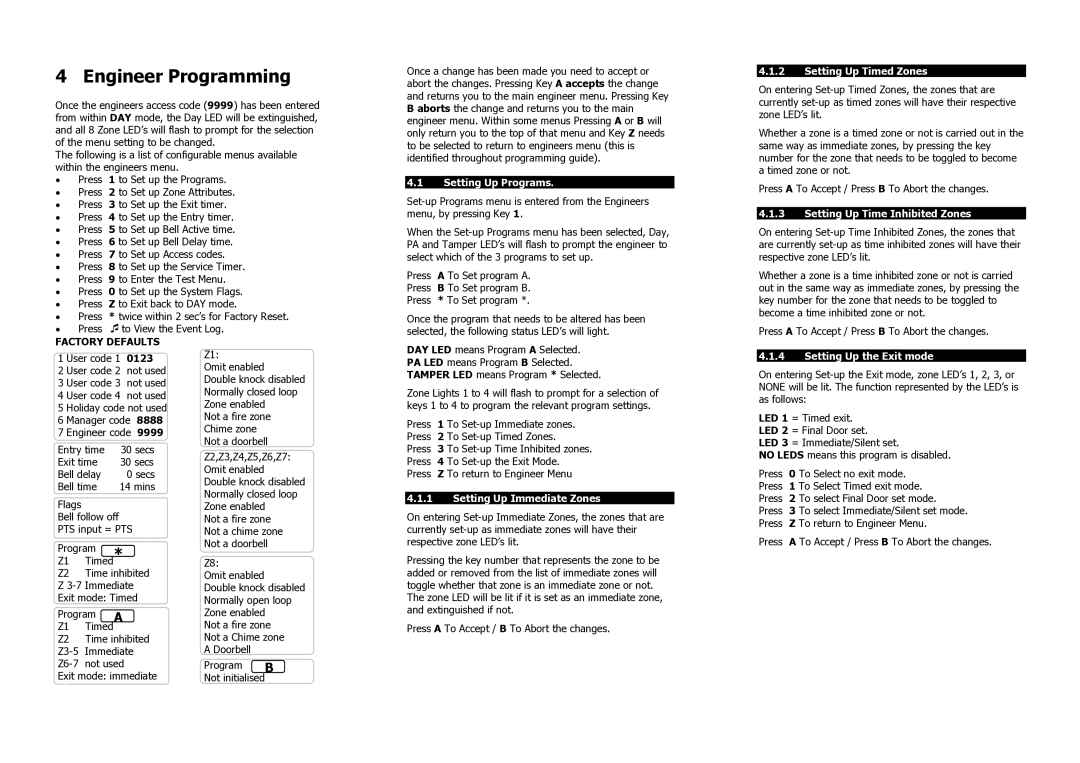
FACTORY DEFAULTS
1 | User code 1 | 0123 | |
2 | User code 2 | not used | |
3 | User code 3 | not used | |
4 | User code 4 | not used | |
5 | Holiday code not used | ||
6 | Manager code | 8888 | |
7 | Engineer code | 9999 | |
Entry time | 30 secs | ||
Exit time | 30 secs | ||
Bell delay | 0 secs | ||
Bell time | 14 mins | ||
Flags |
|
| |
Bell follow off |
|
| |
PTS input = PTS
Program *
Z1 Timed
Z2 Time inhibited
Z
Program A
Z1 Timed
Z2 Time inhibited
Exit mode: immediate silent set
Z1:
Omit enabled
Double knock disabled Normally closed loop Zone enabled
Not a fire zone Chime zone Not a doorbell
Z2,Z3,Z4,Z5,Z6,Z7: Omit enabled Double knock disabled Normally closed loop Zone enabled
Not a fire zone Not a chime zone Not a doorbell
Z8:
Omit enabled
Double knock disabled Normally open loop Zone enabled
Not a fire zone Not a Chime zone A Doorbell
Program B Not initialised
DAY LED means Program A Selected. PA LED means Program B Selected. TAMPER LED means Program * Selected.
Zone Lights 1 to 4 will flash to prompt for a selection of keys 1 to 4 to program the relevant program settings.
Press 1 To
Press 3 To
Press Z To return to Engineer Menu
4.1.1Setting Up Immediate Zones
On entering
Pressing the key number that represents the zone to be added or removed from the list of immediate zones will toggle whether that zone is an immediate zone or not.
The zone LED will be lit if it is set as an immediate zone, and extinguished if not.
Press A To Accept / B To Abort the changes.
4.1.4Setting Up the Exit mode
On entering
LED 1 = Timed exit. LED 2 = Final Door set.
LED 3 = Immediate/Silent set.
NO LEDS means this program is disabled.
Press 0 To Select no exit mode. Press 1 To Select Timed exit mode. Press 2 To select Final Door set mode.
Press 3 To select Immediate/Silent set mode. Press Z To return to Engineer Menu.
Press A To Accept / Press B To Abort the changes.
