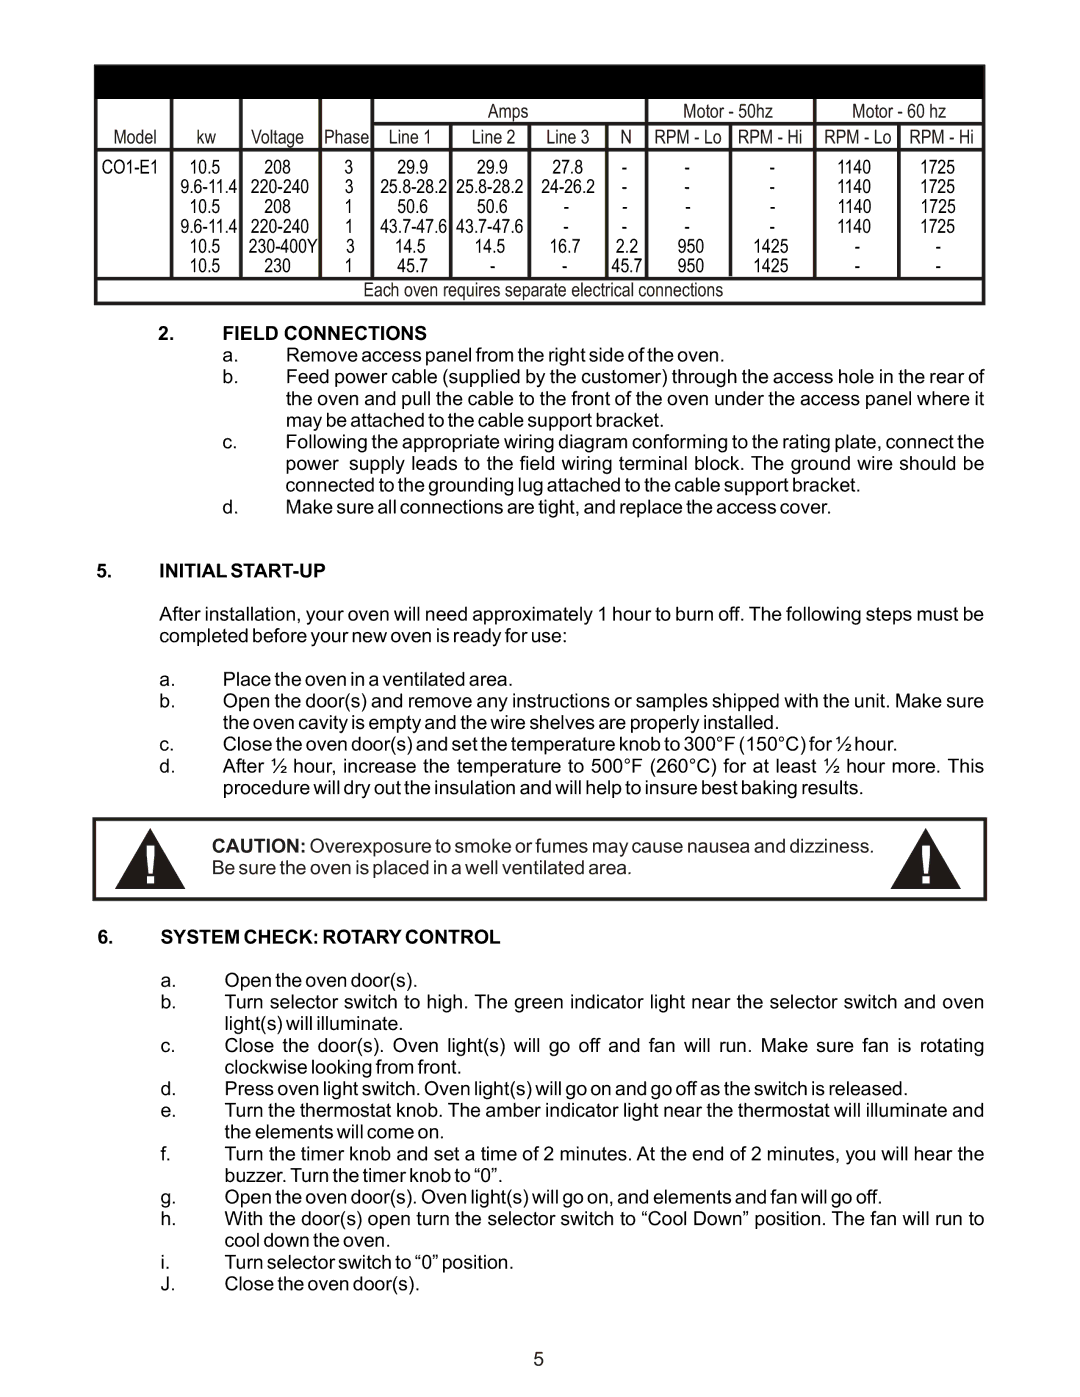
CO1-E: POWER SUPPLY
| Model | kw | Voltage | Phase |
| Amps |
|
| Motor - 50hz | Motor - 60 hz | |||
| Line 1 | Line 2 | Line 3 | N | RPM - Lo | RPM - Hi | RPM - Lo | RPM - Hi | |||||
|
|
| 10.5 | 208 | 3 | 29.9 | 29.9 | 27.8 | - | - | - | 1140 | 1725 |
|
|
| 3 | - | - | - | 1140 | 1725 | |||||
|
|
| 10.5 | 208 | 1 | 50.6 | 50.6 | - | - | - | - | 1140 | 1725 |
|
|
| 1 | - | - | - | - | 1140 | 1725 | ||||
|
|
| 10.5 | 3 | 14.5 | 14.5 | 16.7 | 2.2 | 950 | 1425 | - | - | |
|
|
| 10.5 | 230 | 1 | 45.7 | - | - | 45.7 | 950 | 1425 | - | - |
Each oven requires separate electrical connections
2.FIELD CONNECTIONS
a.Remove access panel from the right side of the oven.
b.Feed power cable (supplied by the customer) through the access hole in the rear of the oven and pull the cable to the front of the oven under the access panel where it may be attached to the cable support bracket.
c.Following the appropriate wiring diagram conforming to the rating plate, connect the power supply leads to the field wiring terminal block. The ground wire should be connected to the grounding lug attached to the cable support bracket.
d.Make sure all connections are tight, and replace the access cover.
5.INITIAL START-UP
After installation, your oven will need approximately 1 hour to burn off. The following steps must be completed before your new oven is ready for use:
a.Place the oven in a ventilated area.
b.Open the door(s) and remove any instructions or samples shipped with the unit. Make sure the oven cavity is empty and the wire shelves are properly installed.
c.Close the oven door(s) and set the temperature knob to 300°F (150°C) for ½ hour.
d.After ½ hour, increase the temperature to 500°F (260°C) for at least ½ hour more. This procedure will dry out the insulation and will help to insure best baking results.
! | CAUTION: Overexposure to smoke or fumes may cause nausea and dizziness. | ! |
Be sure the oven is placed in a well ventilated area. |
6.SYSTEM CHECK: ROTARY CONTROL
a.Open the oven door(s).
b.Turn selector switch to high. The green indicator light near the selector switch and oven light(s) will illuminate.
c.Close the door(s). Oven light(s) will go off and fan will run. Make sure fan is rotating clockwise looking from front.
d.Press oven light switch. Oven light(s) will go on and go off as the switch is released.
e.Turn the thermostat knob. The amber indicator light near the thermostat will illuminate and the elements will come on.
f.Turn the timer knob and set a time of 2 minutes. At the end of 2 minutes, you will hear the buzzer. Turn the timer knob to “0”.
g.Open the oven door(s). Oven light(s) will go on, and elements and fan will go off.
h.With the door(s) open turn the selector switch to “Cool Down” position. The fan will run to cool down the oven.
i.Turn selector switch to “0” position.
J. Close the oven door(s).
5
