PRO MIXER DX1000
3.4 Equalizer
The mic channel EQ section comprises three control knobs and one switch. Depressing the LOW CUT
switch ![]()
![]()
![]() rolls off the bass end
rolls off the bass end
feedback. Separate controls cut and boost TREBLE ![]()
![]()
![]() , MID
, MID ![]()
![]()
![]() and BASS
and BASS ![]()
![]()
![]() frequencies respectively. Use EQ creatively to sweeten the sound of your microphone, or defensively to help cut feedback (see below for EQ specifications).
frequencies respectively. Use EQ creatively to sweeten the sound of your microphone, or defensively to help cut feedback (see below for EQ specifications).
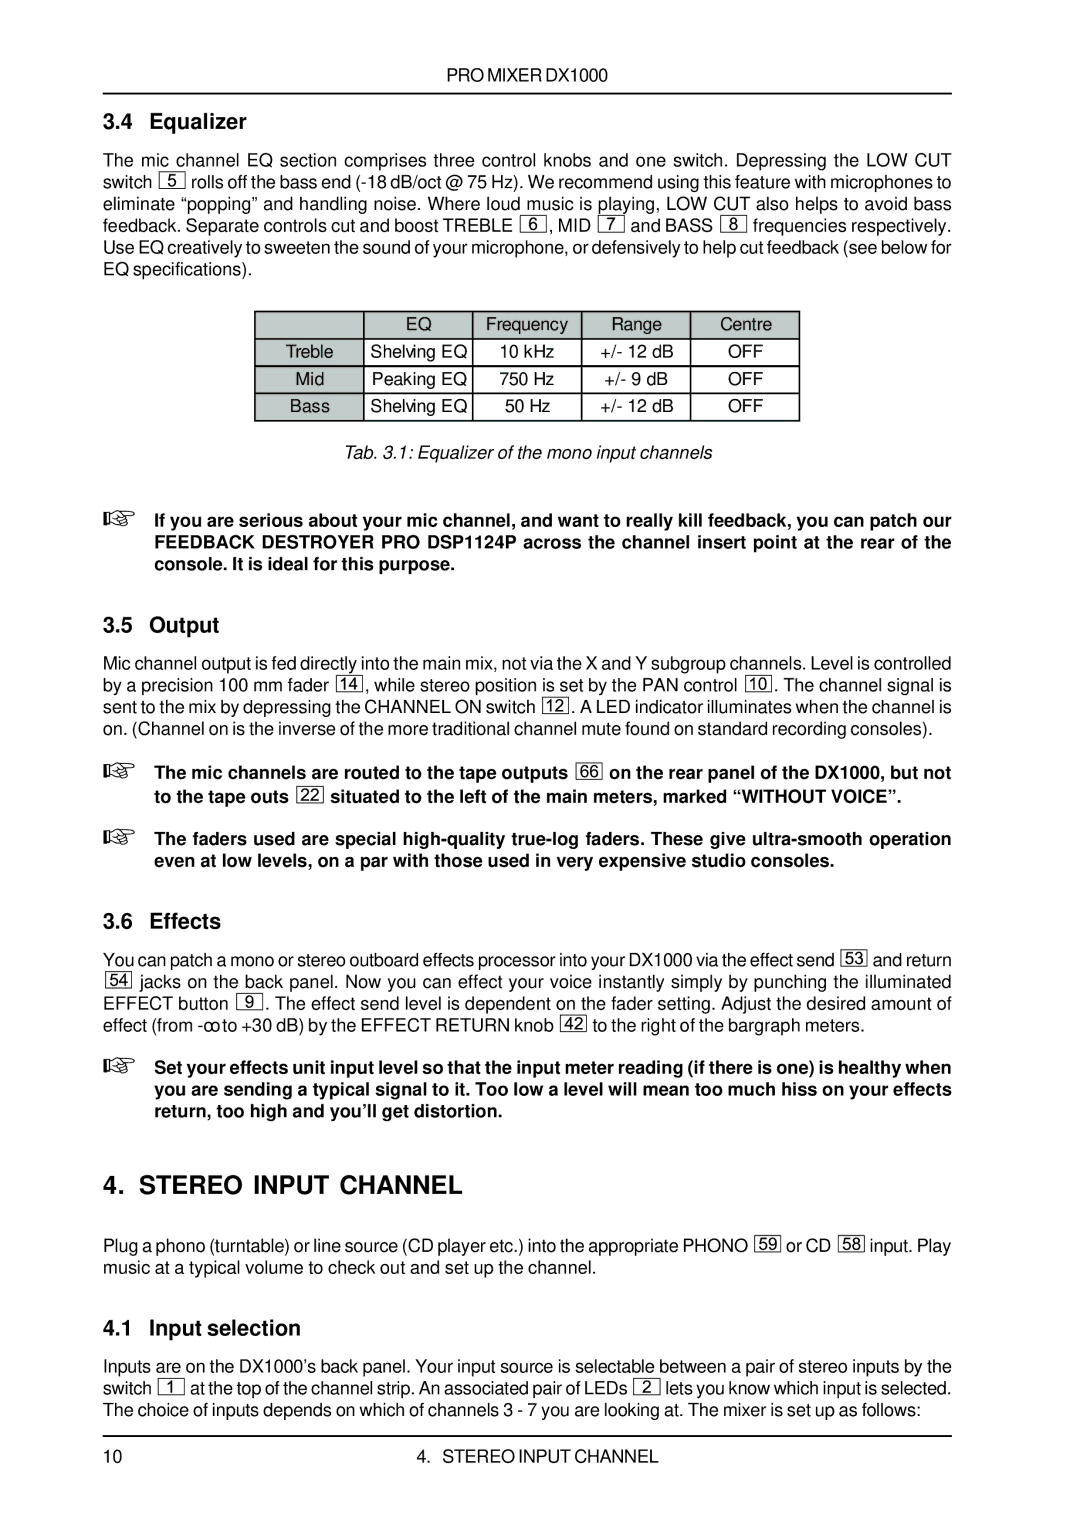
| EQ | Frequency | Range | Centre |
Treble | Shelving EQ | 10 kHz | +/- 12 dB | OFF |
Mid | Peaking EQ | 750 Hz | +/- 9 dB | OFF |
Bass | Shelving EQ | 50 Hz | +/- 12 dB | OFF |
|
|
|
|
|
Tab. 3.1: Equalizer of the mono input channels
+If you are serious about your mic channel, and want to really kill feedback, you can patch our FEEDBACK DESTROYER PRO DSP1124P across the channel insert point at the rear of the console. It is ideal for this purpose.
3.5 Output
Mic channel output is fed directly into the main mix, not via the X and Y subgroup channels. Level is controlled by a precision 100 mm fader ![]()
![]()
![]() , while stereo position is set by the PAN control
, while stereo position is set by the PAN control ![]()
![]()
![]()
![]() . The channel signal is sent to the mix by depressing the CHANNEL ON switch
. The channel signal is sent to the mix by depressing the CHANNEL ON switch ![]()
![]()
![]()
![]() . A LED indicator illuminates when the channel is on. (Channel on is the inverse of the more traditional channel mute found on standard recording consoles).
. A LED indicator illuminates when the channel is on. (Channel on is the inverse of the more traditional channel mute found on standard recording consoles).
+The mic channels are routed to the tape outputs ![]()
![]()
![]() on the rear panel of the DX1000, but not
on the rear panel of the DX1000, but not
to the tape outs ![]()
![]()
![]() situated to the left of the main meters, marked “WITHOUT VOICE”.
situated to the left of the main meters, marked “WITHOUT VOICE”.
+The faders used are special
3.6 Effects
You can patch a mono or stereo outboard effects processor into your DX1000 via the effect send ![]()
![]()
![]() and return
and return
![]()
![]()
![]() jacks on the back panel. Now you can effect your voice instantly simply by punching the illuminated EFFECT button
jacks on the back panel. Now you can effect your voice instantly simply by punching the illuminated EFFECT button ![]()
![]()
![]() . The effect send level is dependent on the fader setting. Adjust the desired amount of
. The effect send level is dependent on the fader setting. Adjust the desired amount of
effect (from ![]()
![]()
![]() to the right of the bargraph meters.
to the right of the bargraph meters.
+Set your effects unit input level so that the input meter reading (if there is one) is healthy when you are sending a typical signal to it. Too low a level will mean too much hiss on your effects return, too high and you’ll get distortion.
4. STEREO INPUT CHANNEL
Plug a phono (turntable) or line source (CD player etc.) into the appropriate PHONO ![]()
![]()
![]() or CD
or CD ![]()
![]()
![]() input. Play music at a typical volume to check out and set up the channel.
input. Play music at a typical volume to check out and set up the channel.
4.1 Input selection
Inputs are on the DX1000’s back panel. Your input source is selectable between a pair of stereo inputs by the switch ![]()
![]()
![]() at the top of the channel strip. An associated pair of LEDs
at the top of the channel strip. An associated pair of LEDs ![]()
![]()
![]() lets you know which input is selected. The choice of inputs depends on which of channels 3 - 7 you are looking at. The mixer is set up as follows:
lets you know which input is selected. The choice of inputs depends on which of channels 3 - 7 you are looking at. The mixer is set up as follows:
10 | 4. STEREO INPUT CHANNEL |