Using the KVM Switch
To modify the
or
You can use another method: Press and hold the last button to enter the
Step 1. Press and hold the last button (i.e., the second button on the
Step 2. Within two seconds, you should hit any of the selectable
For example, if you hit CAPS after hearing the two beeps, then the hot key will be: CAPS – CAPS – command key.
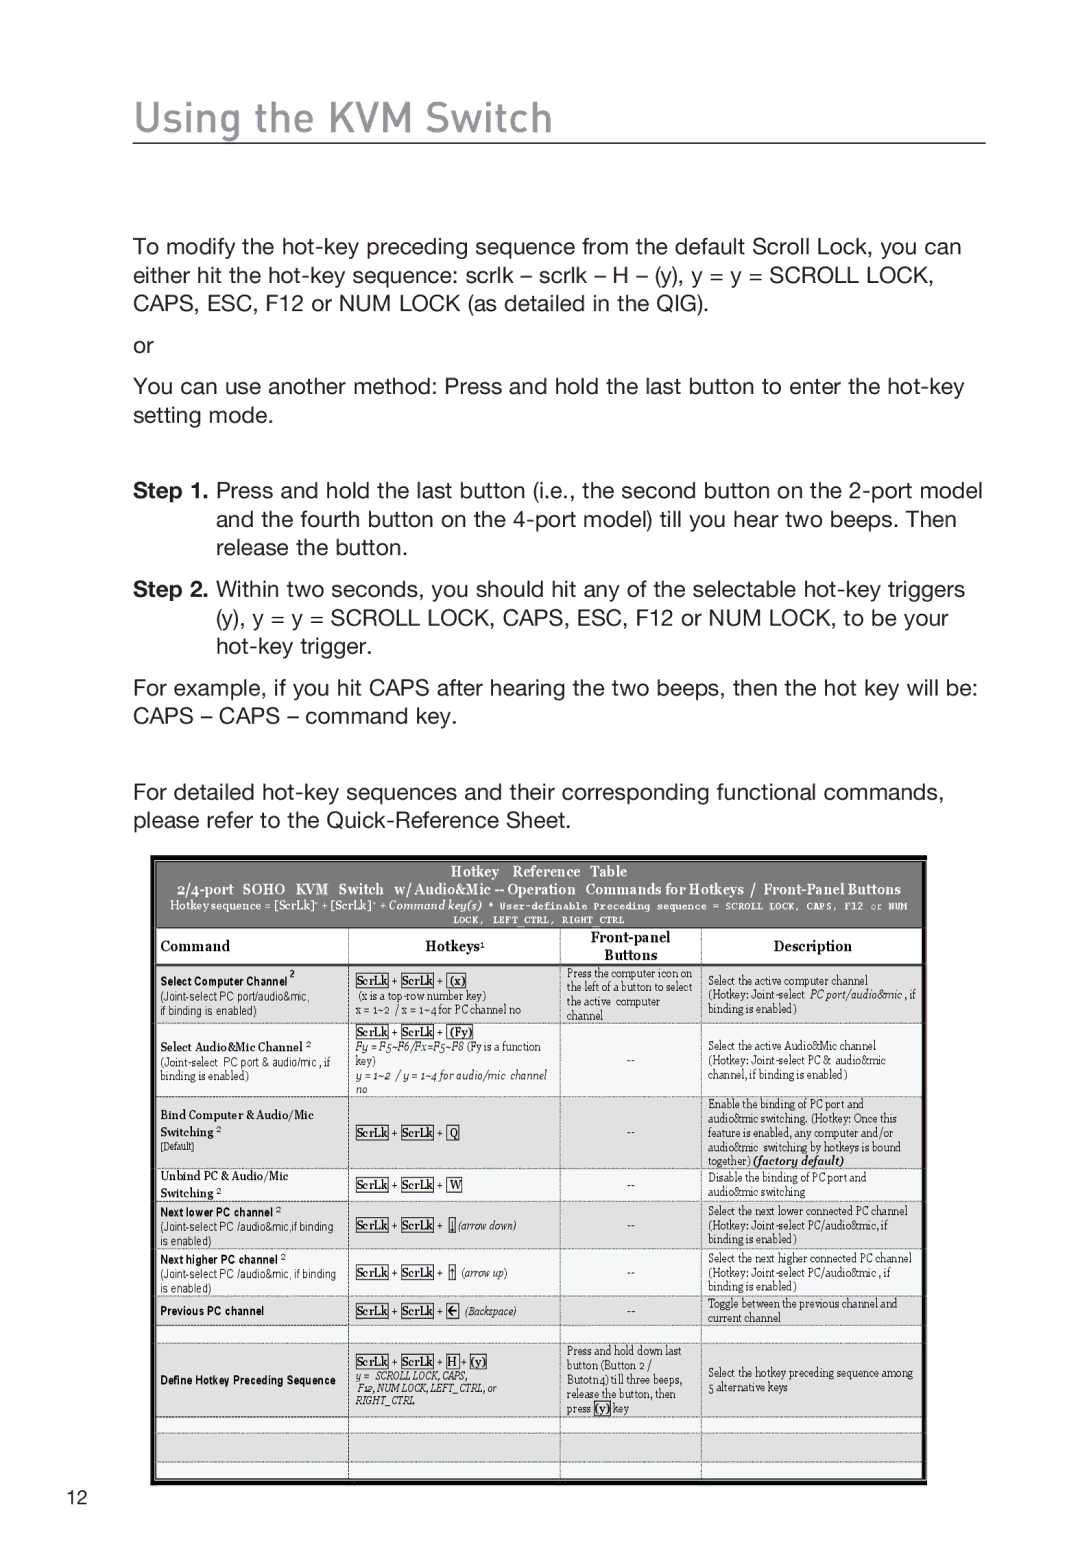
For detailed
Hotkey Reference Table
Hotkey sequence = [ScrLk]* + [ScrLk] * + Command key(s) *
LOCK, LEFT_CTRL, RIGHT_CTRL
Command | Hotkeys1 | Description | ||
Buttons | ||||
|
|
|
Select Computer Channel 2
Select Audio&Mic Channel 2
Bind Computer & Audio/Mic
Switching 2
[Default]
Unbind PC & Audio/Mic
Switching 2
Next lower PC channel 2
Next higher PC channel 2
Previous PC channel
Define Hotkey Preceding Sequence
![]() ScrLk + ScrLk + (x)
ScrLk + ScrLk + (x)
(x is a
x = 1~2 / x = 1~4 for PC channel no
![]() ScrLk + ScrLk + (Fy)
ScrLk + ScrLk + (Fy)
![]() Fy = F5~F6/Fx=F5~F8 (Fy is a function
Fy = F5~F6/Fx=F5~F8 (Fy is a function
key)
![]() y = 1~2 / y = 1~4 for audio/mic channel
y = 1~2 / y = 1~4 for audio/mic channel
![]() no
no
![]()
![]() ScrLk + ScrLk + Q
ScrLk + ScrLk + Q
![]()
![]() ScrLk + ScrLk + W
ScrLk + ScrLk + W
![]()
![]() ScrLk + ScrLk +
ScrLk + ScrLk + ![]()
![]()
![]() (arrow down)
(arrow down)
![]()
![]() ScrLk + ScrLk +
ScrLk + ScrLk + ![]()
![]()
![]() (arrow up)
(arrow up)
![]()
![]() ScrLk + ScrLk +
ScrLk + ScrLk + ![]()
![]()
![]() (Backspace)
(Backspace)
![]()
![]() ScrLk + ScrLk + H + (y)
ScrLk + ScrLk + H + (y)
y = SCROLL LOCK, CAPS,
F12, NUM LOCK, LEFT_CTRL, or
RIGHT_CTRL
Press the computer icon on the left of a button to select the active computer channel
Press and hold down last button (Button 2 / Butotn4) till three beeps, release the button, then press (y) key
Select the active computer channel
(Hotkey:
Select the active Audio&Mic channel (Hotkey:
Enable the binding of PC port and audio&mic switching. (Hotkey: Once this feature is enabled, any computer and/or audio&mic switching by hotkeys is bound together) (factory default)
Disable the binding of PC port and audio&mic switching
Select the next lower connected PC channel (Hotkey:
Select the next higher connected PC channel (Hotkey:
Toggle between the previous channel and current channel
Select the hotkey preceding sequence among 5 alternative keys
12