wires used for this purpose as an example of what to look for. Generally, it is best to splice in the new wires as close to the data connector as possible.
For Vehicles with 9-pin Diagnostic Connectors
Pin | Signal | Description |
|
Location |
|
|
|
C | CAN_H | CAN Bus, High |
|
D | CAN_L | CAN Bus, Low |
|
E | CAN_GND | CAN Ground |
|
H & J | This is a different CAN Bus - |
| |
| DO NOT USE! | View Looking Into the Connector | |
|
|
| |
FIGURE 5 - 9-PIN DEUTSCH CONNECTOR: J1939 CAN BUS TERMINALS
On vehicles with
Some vehicles with
CAUTION: If a second set of yellow and green wires is presently connected to Pins H and J be aware that this is a different CAN Bus - DO NOT USE THIS BUS for this kit.
INCORRECT CONNECTION MAY CAUSE UNEXPECTED VEHICLE PERFORMANCE PROBLEMS.
For Vehicles with 6-pin Diagnostic Connectors
Pin | Signal | Description |
Location |
|
|
|
|
|
D | CAN_H | CAN Bus, High |
|
|
|
F | CAN_L | CAN Bus, Low |
|
|
|
View Looking Into
the Connector
FIGURE 6 - 6-PIN DEUTSCH CONNECTOR: J1939 CAN BUS TERMINALS
On vehicles with
ALERT: With either connector, IF FOUND, do not attempt to use sets of orange and green wires; these are J1708 Bus wires and this kit is not designed to use the J1708 Bus.
ENABLE/DISABLE SWITCH
Select a suitable location for the Enable/Disable switch, keeping in mind how much room will be needed for the switch and access to its wiring connections. A typical site is next to existing switches of the same size; use a spare switch location if available. Otherwise, use hand tools and/
or a
FIGURE 7 - EXAMPLE ENABLE/DISABLE SWITCH INSTALLATION
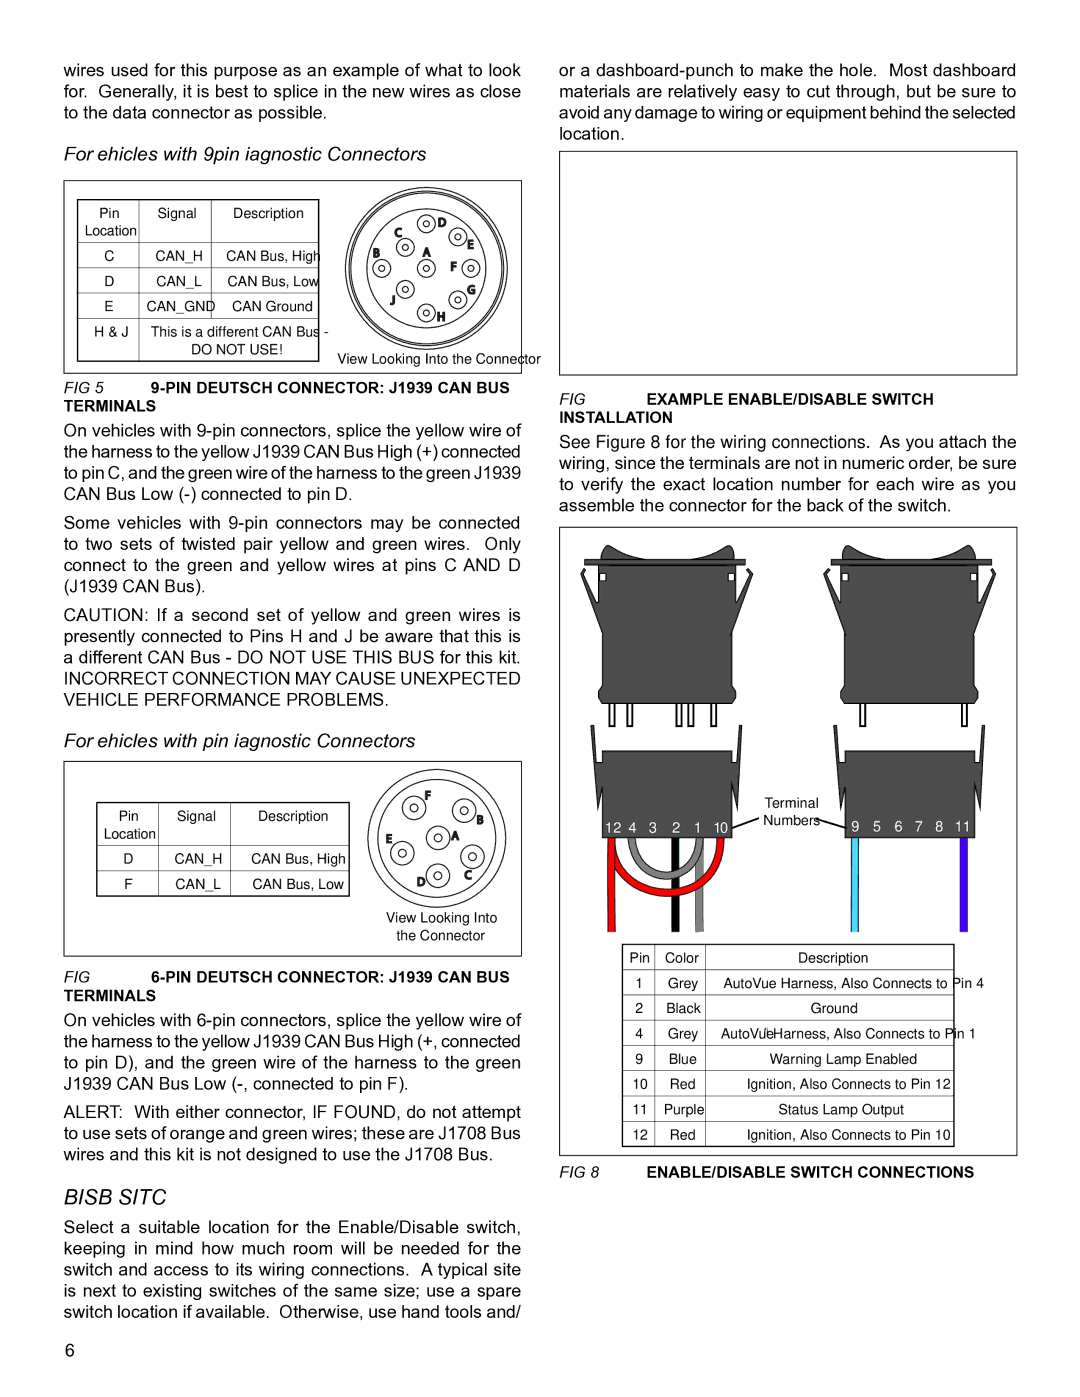
See Figure 8 for the wiring connections. As you attach the wiring, since the terminals are not in numeric order, be sure to verify the exact location number for each wire as you assemble the connector for the back of the switch.
|
|
|
|
|
| Terminal |
|
|
|
|
|
|
|
12 | 4 | 3 | 2 | 1 | 10 | Numbers | 9 | 5 | 6 | 7 | 8 | 11 | |
| |||||||||||||
|
|
|
|
|
|
|
|
|
|
|
|
|
|
Pin | Color | Description |
|
|
|
1 | Grey | AutoVue Harness, Also Connects to Pin 4 |
|
|
|
2 | Black | Ground |
|
|
|
4 | Grey | AutoVue® Harness, Also Connects to Pin 1 |
|
|
|
9 | Blue | Warning Lamp Enabled |
|
|
|
10 | Red | Ignition, Also Connects to Pin 12 |
|
|
|
11 | Purple | Status Lamp Output |
|
|
|
12 | Red | Ignition, Also Connects to Pin 10 |
|
|
|
FIGURE 8 - ENABLE/DISABLE SWITCH CONNECTIONS
6
