Instructionmanual
To Reduce Risk of Injury
Inserting safety key
Skid footwear are recommended when working outdoors
Dry,clean,and freefromoil and grease
Interference by one or more of the following measures
USE of Extension Cords
Functional Description
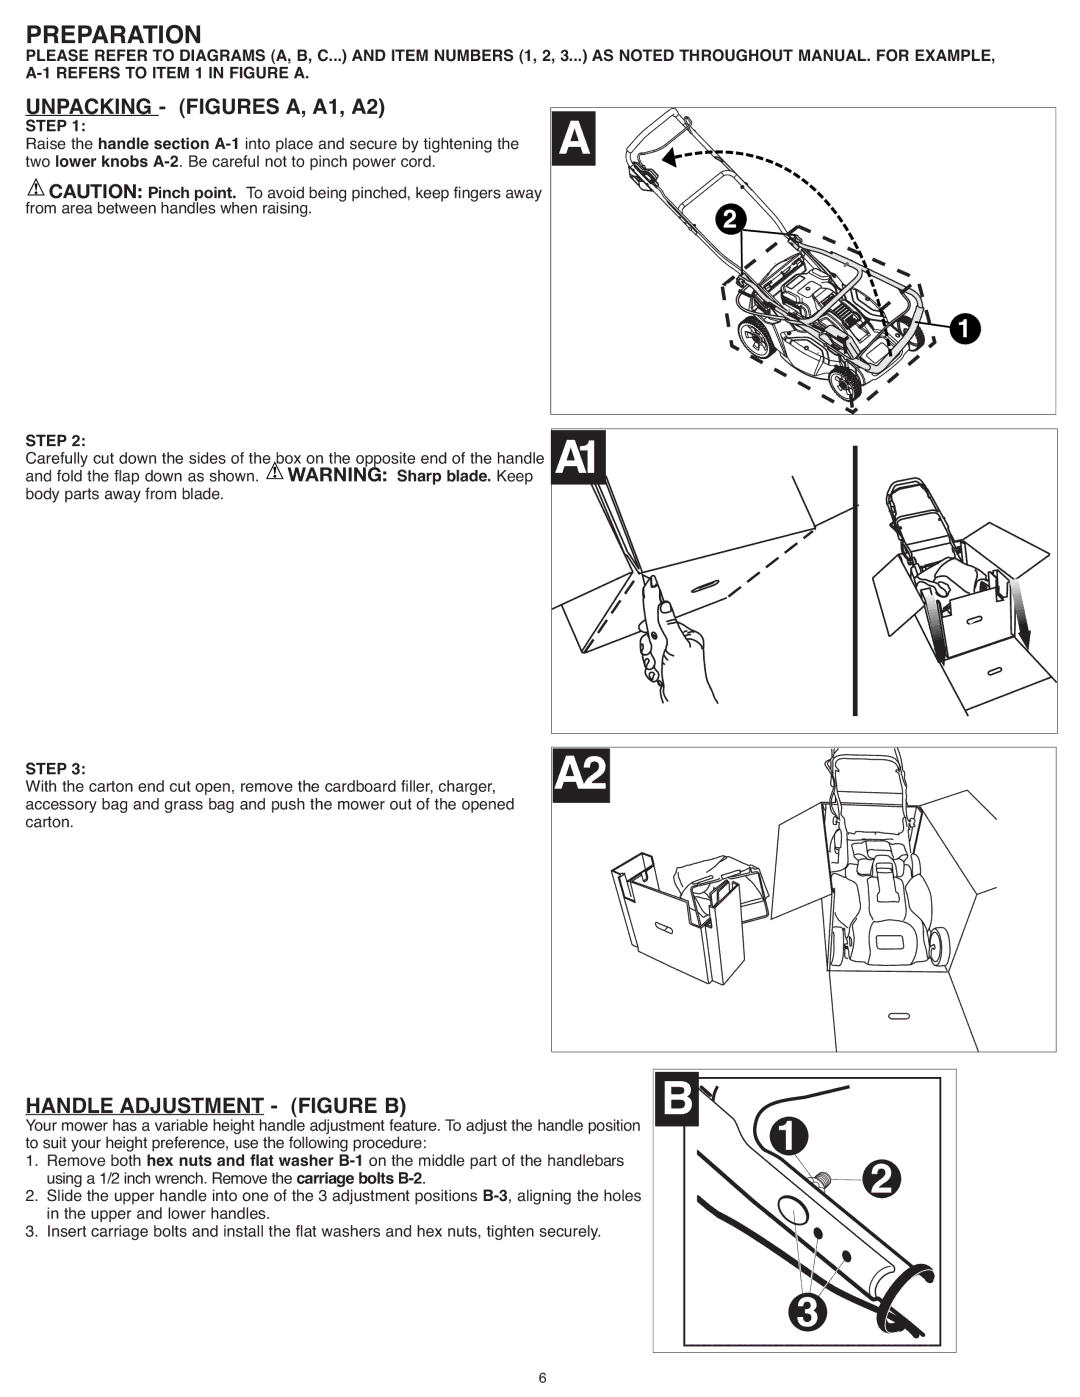
Unpacking Figures A, A1, A2
Handle Adjustment Figure B
Preparation
Handle section A-1
Completely assembled grass catcher is shown in figure C4
Assembling the Grass Catcher Figures C1, C2, C3, C4
Slide the grass bag onto the frame as shown in figure C2
C1. last
Charger Safety Rules
Battery
Removing Battery from Mower Figure F
Charging PROCEDURE- Figure G, H
Operation
Installing Grass Catcher Figure L & M
Safety Shield and Rear Door Figure K
Installing Mulch Insert
Removing Mulch Insert Figure K
Maintenance
Mowing Tips
Mulching Mowing Tips
Blade Sharpening
Removing and Installing Blade Figure N
When Sharpening the Blade
To Sharpen Blade in a Vise
Blade Balancing
Cleaning
Battery Service and Installation
Lubrication
Accessories
Battery and mower perform much better if charged fully
Trouble Shooting Guide
Problem
Guide D’UTILISATION
Lire Toutes CES Directives
Réduction DES Risques ET DES Blessures
Conserver CES Mesures
Bon calibre à utiliser, consulter le tableau suivant
Autre pièce, est endommagé, il faut faire
Chimiques
Description Fonctionnelle
Réglage DE LA Poignée Illustration B
Préparation
Déballage Illustrations A, A1, A2
Étape 1 section A-1 de la poignée
Montage DU Collecteur Dherbe Illustrations C1, C2, C3 ET C4
Règles DE Sécurité Pour LE Chargeur
Pile
Retrait DE LA Pile DE LA Tondeuse
Avertissement Risque Dincendie
Fonctionnement
Écran Protecteur ET Panneau Arrière Illustration K
Installation DE Linsert DE Déchiquetage
Installation DU Collecteur Dherbe Illustrations L ET M
Retrait DE Linsert DE Déchiquetage Illustration K
Conseils Pour LE Déchiquetage
Entretien
Conseils Pour Tondre LA Pelouse
Toujours Sassurer QUE LA Lame EST Affûtée
Lors DE Laffûtage DE LA Lame
Retrait ET Installation DE LA Lame Illustration N
Affûtage DE LA Lame
Affûtage DE LA Lame Dans UN Étau
Nettoyage
Entretien ET Installation DE LA Pile
Équilibrage DE LA Lame
Prévention DE LA Corrosion
Garanties
Obtenir UNE Pelouse DE Rêve
Problème Solution
Remarque
Manual DE Instrucciones
Información Clave QUE Debe Conocer
Desde el área de funcionamiento de la podadora
LEA Todas LAS Instrucciones
Pautas DE SEGURIDAD/DEFINICIONES
Atención a lo que hace y use el sentido común
Page
Conserve Estas Instrucciones
Deterioro
USO DE Cables Prolongadores
Descripción DE LAS Funciones
Ajuste DEL Mango Figura B
Preparación
Desembalaje Figuras A, A1, A2
Paso
Ensamblado DEL Recolector DE Césped Figuras C1, C2, C3, C4
Sujetador inferior
Normas DE Seguridad DEL Cargador
Batería
Retiro DE LA Batería DE LA Podadora Figura
Procedimiento DE Carga Figura G, H
Llave DE Seguridad
Operación
Conozca LA Podadora
Para Encender LA Podadora
Instalación DE LA Pieza Para Mantillo
Protector DE Seguridad Y Puerta Trasera Figura K
Retiro DE LA Pieza Para Mantillo Figura K
Instalación DEL Recolector DE Césped
Mantenimiento
Consejos Para EL Corte DE Césped
Consejos Para EL Corte DE Césped Para Formar Mantillo
AL Afilar LA Hoja
Retiro E Instalación DE LA Hoja Figura N
Afilado DE LA Hoja
Para Afilar LA Hoja EN UNA Prensa
Limpieza
Simetría DE LA Hoja
Lubricación
Prevención DE LA Corrosión
Accesorios
Garantía en la cubierta
Problema Solución
Nota
Años DE Garantia
Esta Garantia no Aplica Cuando
Solamente Para Propositos DE Mexico