DCME10.Pub178918RV01 3/16/05 12:08 PM Page 4

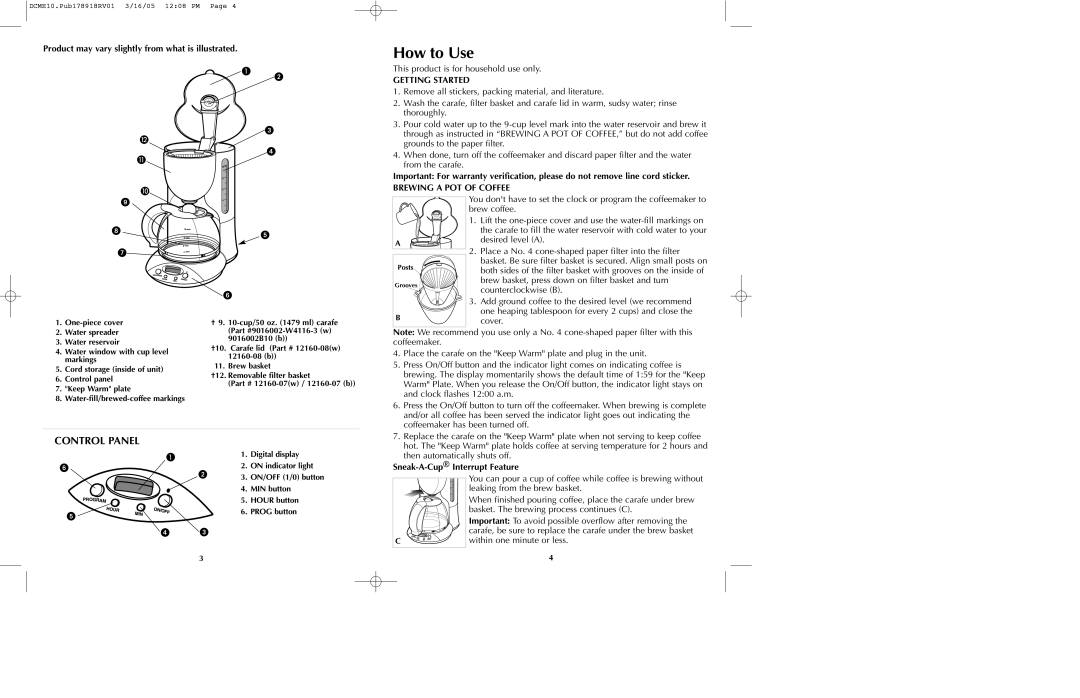
Product may vary slightly from what is illustrated.

How to Use

This product is for household use only.

GETTING STARTED

1.Remove all stickers, packing material, and literature.

2.Wash the carafe, filter basket and carafe lid in warm, sudsy water; rinse thoroughly.

3.Pour cold water up to the 9-cup level mark into the water reservoir and brew it through as instructed in “BREWING A POT OF COFFEE,” but do not add coffee grounds to the paper filter.

4.When done, turn off the coffeemaker and discard paper filter and the water from the carafe.

Important: For warranty verification, please do not remove line cord sticker.

BREWING A POT OF COFFEE

A

Posts

Grooves

You don't have to set the clock or program the coffeemaker to brew coffee.

1.

Lift the one-piece cover and use the water-fill markings on


the carafe to fill the water reservoir with cold water to your


desired level (A).

2.

Place a No. 4 cone-shaped paper filter into the filter


basket. Be sure filter basket is secured. Align small posts on


both sides of the filter basket with grooves on the inside of


brew basket, press down on filter basket and turn


counterclockwise (B).

3.

Add ground coffee to the desired level (we recommend


one heaping tablespoon for every 2 cups) and close the

1. One-piece cover

† 9. 10-cup/50 oz. (1479 ml) carafe

B

cover.

2.

Water spreader

3.

Water reservoir

4.

Water window with cup level


markings

5.

Cord storage (inside of unit)

6.

Control panel

7.

"Keep Warm" plate

8.

Water-fill/brewed-coffee markings

(Part #9016002-W4116-3 (w)

9016002B10 (b))

†10. Carafe lid (Part # 12160-08(w) 12160-08 (b))

11. Brew basket

†12. Removable filter basket

(Part # 12160-07(w) / 12160-07 (b))

Note: We recommend you use only a No. 4 cone-shaped paper filter with this coffeemaker.

4.

Place the carafe on the "Keep Warm" plate and plug in the unit.

5.

Press On/Off button and the indicator light comes on indicating coffee is


brewing. The display momentarily shows the default time of 1:59 for the "Keep


Warm" Plate. When you release the On/Off button, the indicator light stays on


and clock flashes 12:00 a.m.

6.

Press the On/Off button to turn off the coffeemaker. When brewing is complete


and/or all coffee has been served the indicator light goes out indicating the


coffeemaker has been turned off.

7.

Replace the carafe on the "Keep Warm" plate when not serving to keep coffee

CONTROL PANEL

1. Digital display

2. ON indicator light

3. ON/OFF (1/0) button

4. MIN button

5. HOUR button

6. PROG button

3

hot. The "Keep Warm" plate holds coffee at serving temperature for 2 hours and

then automatically shuts off.

Sneak-A-Cup®Interrupt Feature

You can pour a cup of coffee while coffee is brewing without leaking from the brew basket.

When finished pouring coffee, place the carafe under brew basket. The brewing process continues (C).


Important: To avoid possible overflow after removing the


carafe, be sure to replace the carafe under the brew basket

C

within one minute or less.


4

Page 3
Image 3
Black & Decker DCME10B manual How to Use, Control Panel, Getting Started, Brewing a POT of Coffee

DCME10B, DCME10 specifications

The Black & Decker DCME10 and DCME10B are advanced cordless yard maintenance tools designed to make yard care more efficient and user-friendly. These models serve as a hedge trimmer and offer a blend of power, precision, and portability, catering to both casual gardeners and professional landscapers.

One of the standout features of the DCME10 and DCME10B is their lightweight design, which ensures ease of use during longer operations. Weighing significantly less than traditional corded models, these trimmers reduce strain on the user, allowing for extended periods of trimming without fatigue. The ergonomic handle further enhances comfort, providing a secure grip and reducing vibrations during use.

The trimmer is powered by a powerful lithium-ion battery that delivers consistent performance throughout its life cycle. The battery technology is a key feature, as it allows for quick charging and offers a longer run time compared to older nickel-cadmium batteries. This means users can tackle a considerable amount of trimming before needing to recharge, making these models ideal for larger gardens or extended projects.

Another notable characteristic of the DCME10 and DCME10B is their precision cutting capability. Equipped with sharp, dual-action blades, these trimmers make clean cuts through thick branches, enhancing the health of the plants by reducing damage. The blade length is optimized for both small and medium-sized hedges, making it versatile for various trimming tasks.

Safety features are also a priority in these models. They come equipped with safety locks to prevent accidental starts and an automatic shut-off feature that engages when the tool is laid down, ensuring that the device remains safe during breaks or when not in use.

Moreover, the trimmers are designed for easy maintenance. The blades are easily removable for cleaning and sharpening, ensuring that users can keep their tools in top condition without hassle.

In summary, the Black & Decker DCME10 and DCME10B offer a combination of power, safety, and user-friendliness, making them excellent choices for anyone looking to maintain their yard efficiently. Whether you're trimming hedges, shaping bushes, or tidying up your garden, these cordless trimmers bring the convenience and performance needed to get the job done effectively.