Black & Decker GH2000 Save These Instructions, Safety Warnings And Instructions Extension Cords

Models: GH1100 GH2000

1 6
Download 6 pages 25.68 Kb
Page 2
Image 2
SAFETY WARNINGS AND INSTRUCTIONS: EXTENSION CORDS
See ‘Tools-Electric’
– Yellow Pages –
for Service & Sales

7

9

8

10


Cutting line will wear faster and require more feeding if the cutting or edging is done


along sidewalks or other abrasive surfaces or heavier weeds are being cut. T he


advanced automatic line feeding mechanism senses when more cutting line is needed


and feeds and trims the correct length of line whenever its required. DO NOT BUMP unit


on ground in attempt to feed line or for any other purposes.

CLEARING JAMS AND TANGLED LINES


From time to time, especially when cutting thick or stalky weeds, the line feeding hub


may become clogged with sap or other material and the line will become jammed as a

1.

result. To clear the jam, follow the steps listed below.

Unplug the trimmer.

2.

Press the release tabs on the line hub cap, as shown in Figure 9 and remove the cap by

3.

pulling it straight off.

Pull the nylon line spool out and clear any broken line or cutting debris from the spool area.

4.

(YOU DO NOT HAVE TO REMOVE THE CENTER SCREW TO REMOVE THE SPOOL).

Place spool and line into spool housing with lines “parked” in slots provided as shown in

5.

figure 10.

Insert the line end through the appropriate holes in the spool hub. Pull slack line through

6.

until it pulls out of the holding slots as shown in Figure 11.

Press the spool down GENTLY and rotate it until you feel it drop into place and then push


to snap into place. (When in place, the spool will turn a few degrees left and right freely).

7.

Take care to keep the line from becoming trapped under the spool.

Snap the hub cap back on as shown in figure 12 by depressing lugs and pressing into


spool housing. NOTE: Make sure that cover is fully positioned, listen for two audible


clicks to ensure both lugs are correctly located. Power the tool on. In a few seconds or


less youʼll hear the nylon line being cut automatically to the proper length.

SPOOL OR LINE REPLACEMENT (Use .080 in. diameter ROUND line only)

1.

Unplug the trimmer. Press the release tabs on the line hub cap, as shown in Figure 9

2.

and remove the cap by pulling it straight off.

Remove the spool from the tool and remove and discard all line on the spool.

3.

Choose either OPTION 1 or OPTION 2.

OPTION 1: ACCESSORY REPLACEMENT SPOOL

Use Black & Decker replacement spool Model No. DF-080. Install following instructions

under “ SPOOL OR LINE REPLACEMENT“ #1 through #6, discarding old spool for Step 3

and using new spool in subsequent steps.

OPTION 2: REWINDING SPOOL USING BULK LINE

Bulk line for your trimmer/edger is available at extra cost from your local dealer or

Black & Decker Service Center. Install following instructions under “SPOOL OR LINE

11

12

13

14


SAFETY WARNINGS AND INSTRUCTIONS: EXTENSION CORDS

Make sure your extension cord is in good condition. When using an extension cord, be sure

to use one heavy enough to carry the current your product will draw. An undersized cord will

cause a drop in line voltage resulting in loss of power and overheating. The table shows the

correct size to use depending on cord length and nameplate ampere rating. If in doubt, use

the next heavier gauge. The smaller the gauge number, the heavier the cord. If the

extension will be used outside, the cord must be suitable for outdoor work. The letters “WA”

on the cord jacket indicate that the cord is suitable for outdoor use.


Volts


Minimum Gauge for Cord Sets


0-25

Total Length of Cord in Feet


120V


26-50


51-100

101-150


240V


(0-7,6m)

(7,6-15,2m) (15,2-30,4m)(30,4-45,7m)


0-50


51-100

101-200 201-300


Ampere Rating

(0-15,2m)(15,2-30,4m) (30,4-60,9m)(60,9-91,4m)


More


Not more


American Wire Gauge


Than

-

Than

18


16


16

14


0

6


6

-

10

18


16


14

12


10

-

12

16


16


14

12


12

-

16

14


12


Not Recommended


SAVE THESE INSTRUCTIONS


ASSEMBLY / ADJUSTMENT SET-UP


WARNING: The guard must always be on the tool to protect the user.

NEVER OPERATE TOOL WITHOUT GUARD FIRMLY IN PLACE.

UNPLUG THE TOOL BEFORE ATTEMPTING TO ATTACH THE GUARD.

1. Position the open center of the guard over the line feed head (Figure 1).

2. Slide the guard into slot provided and tighten hex head screws with hex wrench included


(Figure 2).


3. The guard is not intended to be removed once installed.


4. Once the guard is installed, remove the covering from the line cut-off blade, located on the


edge of the guard.


5. Adjust the length of the tube by pushing the button and moving the tube up or down as


shown in Figure 8.


6. Secure the extension cord with the cord retainer as shown in Figure 3.

OPERATING INSTRUCTIONS


CAUTION:

ALWAYS WEAR EYE PROTECTION


CAUTION:

Inspect area to be trimmed and remove any wire, cord, or string-like objects

which could become entangled in the rotating line or spool. Be particularlycareful to avoid any

wire which might be bent outwardly into the path of the tool, such as barbs at the base of a

chain link fence.


• With the unit on, slowly swing the trimmer side to side as shown in Figure 5.

To convert for maintenance edging, unplug the unit from the power source. Gently pull the


wire edge guide down into place as shown in

Figure 7. Push the button and rotate the


tube 180° as shown in Figure 6. The tool will lock in the edger position. Unit is shipped in

the edging position.


To operate as a maintenance edger, position the trimmer above the surface as shown in

Figure 7.


Return to the trimming position by unplugging the unit from the power source, pushing the


button and rotating the tube back 180°. The tool will lock in the trimmer position. When


using the tool put up the wire edge guide to the original position, out of the way.

CUTTING LINE

LINE FEEDINGROUND

Your trimmer uses .080 in. (2mm) diameter, nylon line to cut grass and weeds quickly and easily. During use, the tips of the nylon lines will become frayed and worn and the special self feeding line hub will automatically feed and trim a fresh length of line.

REPLACEMENT” #1 through #6, performing the following steps for Step 3.

(Use .080 in. diameter ROUND line only)


a. Your line spool for this product has two (2) wind areas for line. Wind line in one areafirst


and then in the other. NOTE: For best results, windline onto the outer portion of the spool


(side with arrows) first.


b. Fold over nylon line about 3/4 in. (19mm) from the end to form a “hook” as shown in


Figure 13. Insert the hooked end of the line into the slot on the inside of the spool.


c. Snugly and evenly wind the bulk line onto the spool in the directionof the arrow on the


spool until the line builds up to the notches in the spool rim. Donot overfill spool. Repeat


for the other wind area.


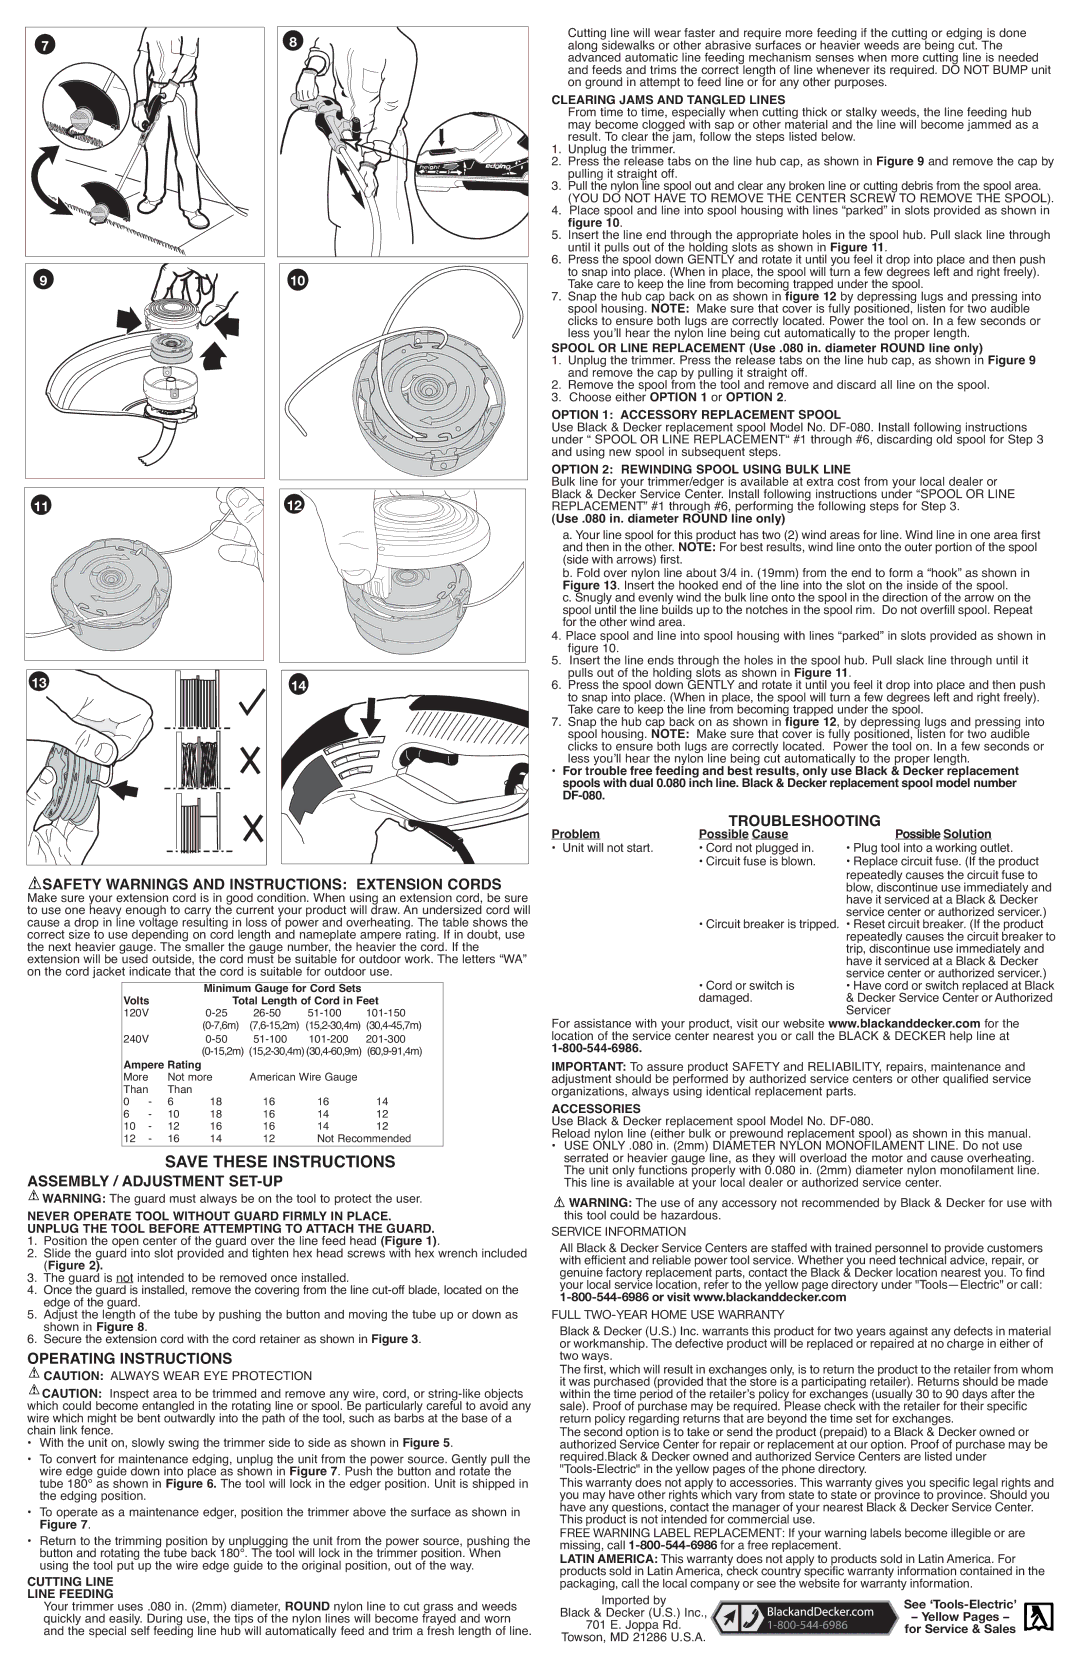
4. Place spool and line into spool housing with lines “parked” in slots provided as shown in

5.

figure 10.


Insert the line ends through the holes in the spool hub. Pull slack line through until it


pulls out of the holding slots as shown in Figure 11.


6. Press the spool down GENTLY and rotate it until you feel it drop into place and then push


to snap into place. (When in place, the spool will turn a few degrees left and right freely).


Take care to keep the line from becoming trapped under the spool.

7. Snap the hub cap back on as shown in figure 12, by depressing lugs and pressing into


spool housing. NOTE:

Make sure that cover is fully positioned, listen for two audible


clicks to ensure both lugs are correctly located. Power the tool on. In a few seconds or

less youʼll hear the nylon line being cut automatically to the proper length.

For trouble free feeding and best results, only use Black & Decker replacement


spools with dual 0.080 inch line. Black & Decker replacement spool model number


DF-080.

TROUBLESHOOTING


Problem

Possible Solution

Possible Cause


Unit will not start.

• Cord not plugged in.

• Plug tool into a working outlet.


• Circuit fuse is blown.

• Replace circuit fuse. (If the product


repeatedly causes the circuit fuse to


blow, discontinue use immediately and


have it serviced at a Black & Decker


service center or authorized servicer.)


• Circuit breaker is tripped. • Reset circuit breaker. (If theproduct


repeatedly causes the circuit breaker to


trip, discontinue use immediately and


have it serviced at a Black & Decker


• Cord or switch is

service center or authorized servicer.)


• Have cord or switch replaced atBlack


damaged.

& Decker Service Center or Authorized


Servicer


For assistance with your product, visit our website www.blackanddecker.com for the location of the service center nearest you or call the BLACK & DECKER help line at

1-800-544-6986.

IMPORTANT: To assure product SAFETY and RELIABILITY, repairs, maintenance and adjustment should be performed by authorized service centers or other qualified service organizations, always using identical replacement parts.

ACCESSORIES

Use Black & Decker replacement spool Model No. DF-080.

Reload nylon line (either bulk or prewound replacement spool) as shown in this manual.

• USE ONLY .080 in. (2mm) DIAMETER NYLON MONOFILAMENT LINE. Do not use serrated or heavier gauge line, as they will overload the motor and cause overheating. The unit only functions properly with 0.080 in. (2mm) diameter nylon monofilament line. This line is available at your local dealer or authorized service center.

WARNING: The use of any accessory not recommended by Black & Decker for use with this tool could be hazardous.

SERVICEAll BlackINFORMATION& Decker Service Centers are staffed with trainedpersonnel to provide customers with efficient and reliable power tool service. Whether you need technical advice, repair, or genuine factory replacementparts, contact the Black & Decker locationnearest you. To find your local service location, refer to the yellow page directoryunder "Tools—Electric" or call:

1-800-544-6986 or visit www.blackanddecker.com

FULLBlackTWO& Decker-YEAR(UHOME.S.) IncUSE. warrantsWARRANTYthis product for twoyears against any defects in material or workmanship. The defective product will be replaced or repaired at no chargein either of two ways.

The first, which will result in exchanges only, is toreturn the product to theretailer from whom it was purchased (provided that the store is a participating retailer). Returns shouldbe made within the time period of the retailerʼs policy for exchanges (usually 30 to 90days after the sale). Proof of purchase may be required. Please check with the retailer for theirspecific return policy regarding returns that are beyond the timeset for exchanges.

The second option is to take or send the product (prepaid) to a Black & Decker owned or authorized Service Center for repair or replacement at ouroption. Proof of purchase may be required.Black & Decker owned and authorized Service Centers are listedunder "Tools-Electric" in the yellow pages of the phone directory.

This warranty does not apply to accessories. This warranty gives you specific legal rights and you may have other rightswhich vary from state to state or province to province. Should you have any questions, contact the manager of your nearest Black & Decker Service Center.

This product is not intended for commercial use.

: If your warning labels become illegible or are

missing,FREE WARNINGcall LABEL REPLACEMENTfor a free replacement.

LATIN AMERICA:1-800-This544-warranty6986does not apply to productssold in Latin America. For products sold in Latin America,check country specificwarranty information contained in the packaging, call the local company or see the website for warranty information.

Imported by

Black & Decker (U.S.) Inc.,

701 E. Joppa Rd.

Towson, MD 21286 U.S.A.

Page 2
Image 2
Black & Decker GH2000, GH1100 Save These Instructions, Safety Warnings And Instructions Extension Cords, Troubleshooting