ASSEMBLY INSTRUCTIONS
BEFORE ASSEMBLING YOUR MOWER, CHECK THAT YOU HAVE RECEIVED THE FOLLOWING IN THE SHIPPING CARTON.
SEE FIGURE 1.
A.Mower
B.Upper Handle
C.Lower Handle
D.Mulch Insert (inside mower under rear door)
E.Grassbag and Grassbag Frame
1 | A | C |
D |
| B |
E
UNPACKING THE MOWER
1.Your mower carton contains the mower, 2 handles (attached), mulch insert and a grass bag and frame assembly.
2.Your mower has been completely assembled at the factory except for the grass bag. Remove the grassbag, grassbag frame, mower and fillers from the carton.
UNFOLDING AND ADJUSTING THE HANDLE (FIGURE 2)
1.UNPLUG TOOL, AND WAIT FOR BLADE TO COME TO A COMPLETE STOP.
2.Raise the handle section into place and secure by tightening the two knobs. Take care not to pinch or damage the power cord while adjusting the handles.
3.There are three holes on the upper handle, this allows the handle height to be set in three positions. Choose the hole that best suits your overall height.
Install the bolts to the inside of the handles so that the knobs are on the outside (to avoid interference with the rear door and grassbag). Tighten the knobs securely.
2
KNOBS ![]()
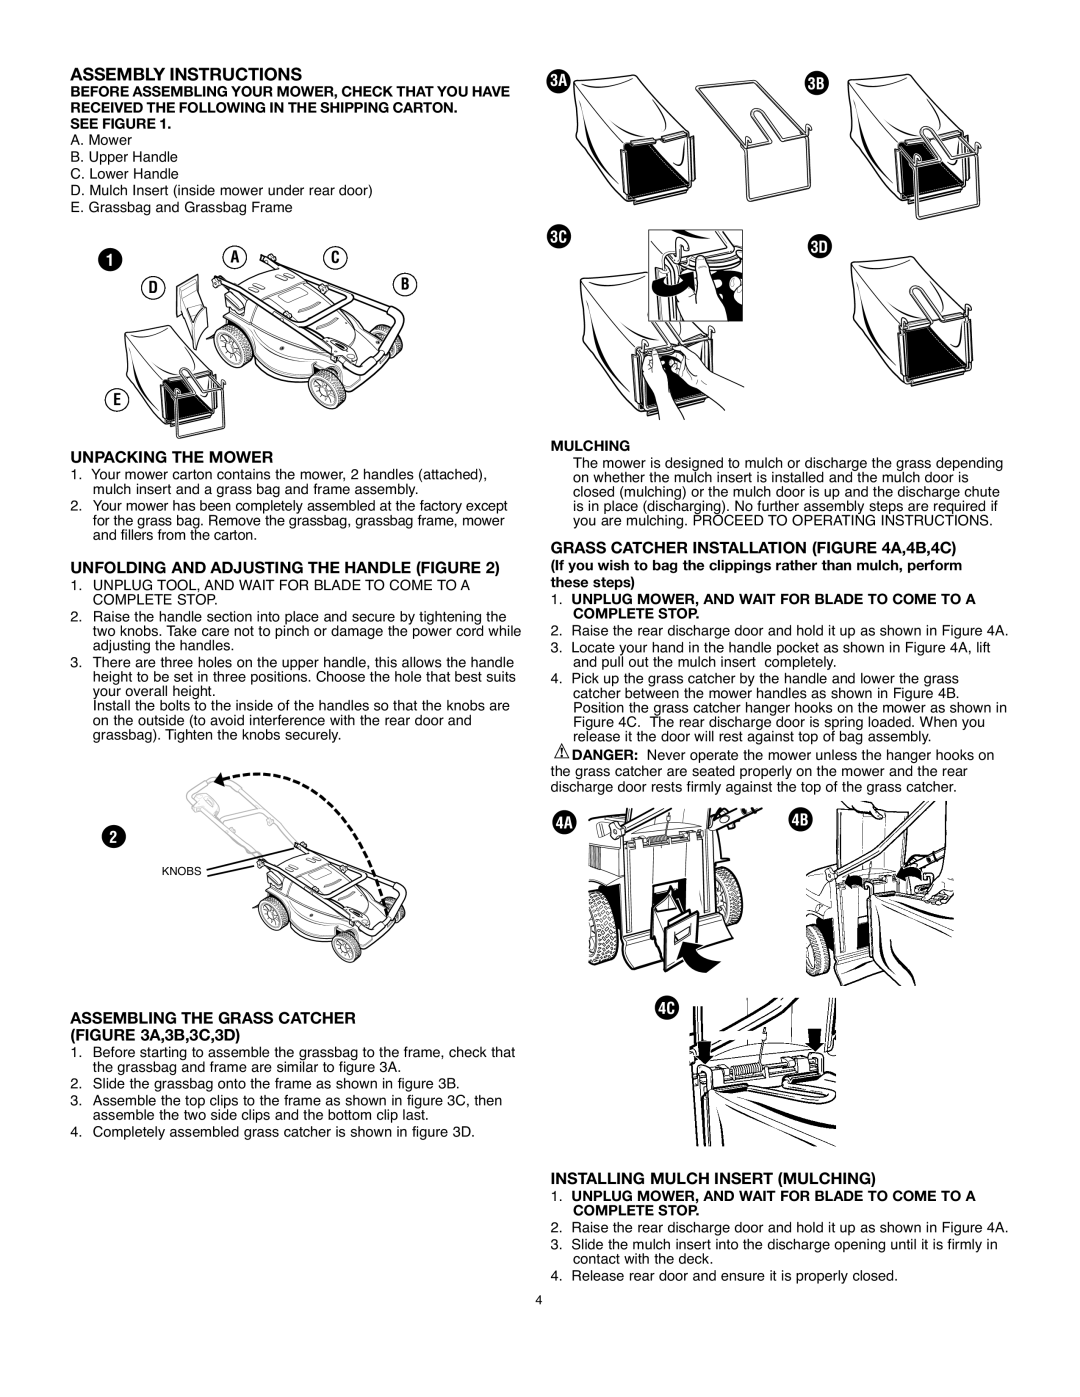
ASSEMBLING THE GRASS CATCHER (FIGURE 3A,3B,3C,3D)
1.Before starting to assemble the grassbag to the frame, check that the grassbag and frame are similar to figure 3A.
2.Slide the grassbag onto the frame as shown in figure 3B.
3.Assemble the top clips to the frame as shown in figure 3C, then assemble the two side clips and the bottom clip last.
4.Completely assembled grass catcher is shown in figure 3D.
3A | 3B |
3C
3D
MULCHING
The mower is designed to mulch or discharge the grass depending on whether the mulch insert is installed and the mulch door is closed (mulching) or the mulch door is up and the discharge chute is in place (discharging). No further assembly steps are required if you are mulching. PROCEED TO OPERATING INSTRUCTIONS.
GRASS CATCHER INSTALLATION (FIGURE 4A,4B,4C)
(If you wish to bag the clippings rather than mulch, perform these steps)
1.UNPLUG MOWER, AND WAIT FOR BLADE TO COME TO A COMPLETE STOP.
2.Raise the rear discharge door and hold it up as shown in Figure 4A.
3.Locate your hand in the handle pocket as shown in Figure 4A, lift and pull out the mulch insert completely.
4.Pick up the grass catcher by the handle and lower the grass catcher between the mower handles as shown in Figure 4B. Position the grass catcher hanger hooks on the mower as shown in Figure 4C. The rear discharge door is spring loaded. When you release it the door will rest against top of bag assembly.
![]() DANGER: Never operate the mower unless the hanger hooks on the grass catcher are seated properly on the mower and the rear discharge door rests firmly against the top of the grass catcher.
DANGER: Never operate the mower unless the hanger hooks on the grass catcher are seated properly on the mower and the rear discharge door rests firmly against the top of the grass catcher.
4A | 4B |
4C
INSTALLING MULCH INSERT (MULCHING)
1.UNPLUG MOWER, AND WAIT FOR BLADE TO COME TO A COMPLETE STOP.
2.Raise the rear discharge door and hold it up as shown in Figure 4A.
3.Slide the mulch insert into the discharge opening until it is firmly in contact with the deck.
4.Release rear door and ensure it is properly closed.
4