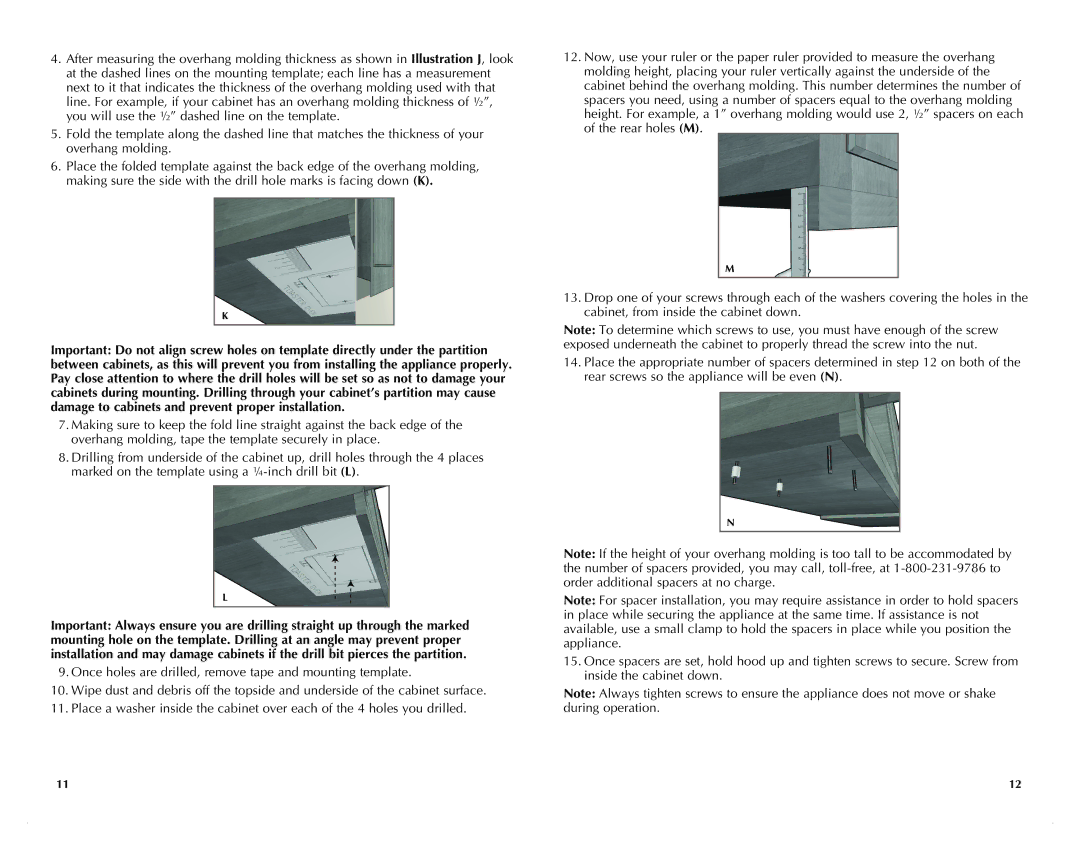
4.After measuring the overhang molding thickness as shown in Illustration J, look at the dashed lines on the mounting template; each line has a measurement next to it that indicates the thickness of the overhang molding used with that line. For example, if your cabinet has an overhang molding thickness of ½”, you will use the ½” dashed line on the template.

5.Fold the template along the dashed line that matches the thickness of your overhang molding.

6.Place the folded template against the back edge of the overhang molding, making sure the side with the drill hole marks is facing down (K).

K

Important: Do not align screw holes on template directly under the partition between cabinets, as this will prevent you from installing the appliance properly. Pay close attention to where the drill holes will be set so as not to damage your cabinets during mounting. Drilling through your cabinet’s partition may cause damage to cabinets and prevent proper installation.

7.Making sure to keep the fold line straight against the back edge of the overhang molding, tape the template securely in place.

8.Drilling from underside of the cabinet up, drill holes through the 4 places marked on the template using a ¼-inch drill bit (L).

L

Important: Always ensure you are drilling straight up through the marked mounting hole on the template. Drilling at an angle may prevent proper installation and may damage cabinets if the drill bit pierces the partition.

9.Once holes are drilled, remove tape and mounting template.

10.Wipe dust and debris off the topside and underside of the cabinet surface.

11.Place a washer inside the cabinet over each of the 4 holes you drilled.

12.Now, use your ruler or the paper ruler provided to measure the overhang molding height, placing your ruler vertically against the underside of the cabinet behind the overhang molding. This number determines the number of spacers you need, using a number of spacers equal to the overhang molding height. For example, a 1” overhang molding would use 2, ½” spacers on each of the rear holes (M).

M

13.Drop one of your screws through each of the washers covering the holes in the cabinet, from inside the cabinet down.

Note: To determine which screws to use, you must have enough of the screw exposed underneath the cabinet to properly thread the screw into the nut.

14.Place the appropriate number of spacers determined in step 12 on both of the rear screws so the appliance will be even (N).

N

Note: If the height of your overhang molding is too tall to be accommodated by the number of spacers provided, you may call, toll-free, at 1-800-231-9786 to order additional spacers at no charge.

Note: For spacer installation, you may require assistance in order to hold spacers in place while securing the appliance at the same time. If assistance is not available, use a small clamp to hold the spacers in place while you position the appliance.

15.Once spacers are set, hold hood up and tighten screws to secure. Screw from inside the cabinet down.

Note: Always tighten screws to ensure the appliance does not move or shake during operation.

11

12

Page 7
Image 7
Black & Decker TROSOS1500C manual

TROSOS1500C specifications

The Black & Decker TROSOS1500C is a versatile toaster oven that boasts a combination of convenience, efficiency, and modern technology. Designed to cater to the needs of any kitchen, this appliance is perfect for those who value both functionality and style.

One of the standout features of the TROSOS1500C is its spacious interior, which can accommodate a variety of food items. Whether it’s a whole pizza, a casserole, or a batch of cookies, this toaster oven can handle it all. The large capacity allows users to cook multiple dishes simultaneously, making it an ideal choice for families or anyone who enjoys entertaining.

The TROSOS1500C is equipped with advanced cooking technologies that ensure even heating and perfect results. The convection heating system circulates hot air within the oven, leading to faster cooking times and more consistent browning. This technology not only helps in achieving better results but also makes the appliance more energy-efficient compared to traditional ovens.

Another impressive feature is the intuitive digital control panel that allows for easy temperature and time settings. Users can choose from various cooking functions, including baking, broiling, toasting, and warming, giving them the flexibility to prepare a wide range of dishes with just a push of a button. The precise temperature control further enhances the cooking experience, ensuring that meals are cooked just right every time.

Safety is also a top priority for Black & Decker, and the TROSOS1500C comes with several safety features. The oven is designed with a cool-touch handle and housing to prevent burns during operation. Additionally, the built-in timer helps prevent overcooking, giving users peace of mind while cooking.

Cleaning the TROSOS1500C is hassle-free, thanks to its removable crumb tray and non-stick interior. These features make it easy to maintain the oven's cleanliness, ensuring that it is always ready for the next culinary adventure.

Overall, the Black & Decker TROSOS1500C stands out as an exceptional kitchen appliance that combines practicality with advanced technology. Its ample cooking space, efficient heating methods, user-friendly controls, and safety features make it an essential addition to any home, catering to the needs of novice cooks and seasoned chefs alike.