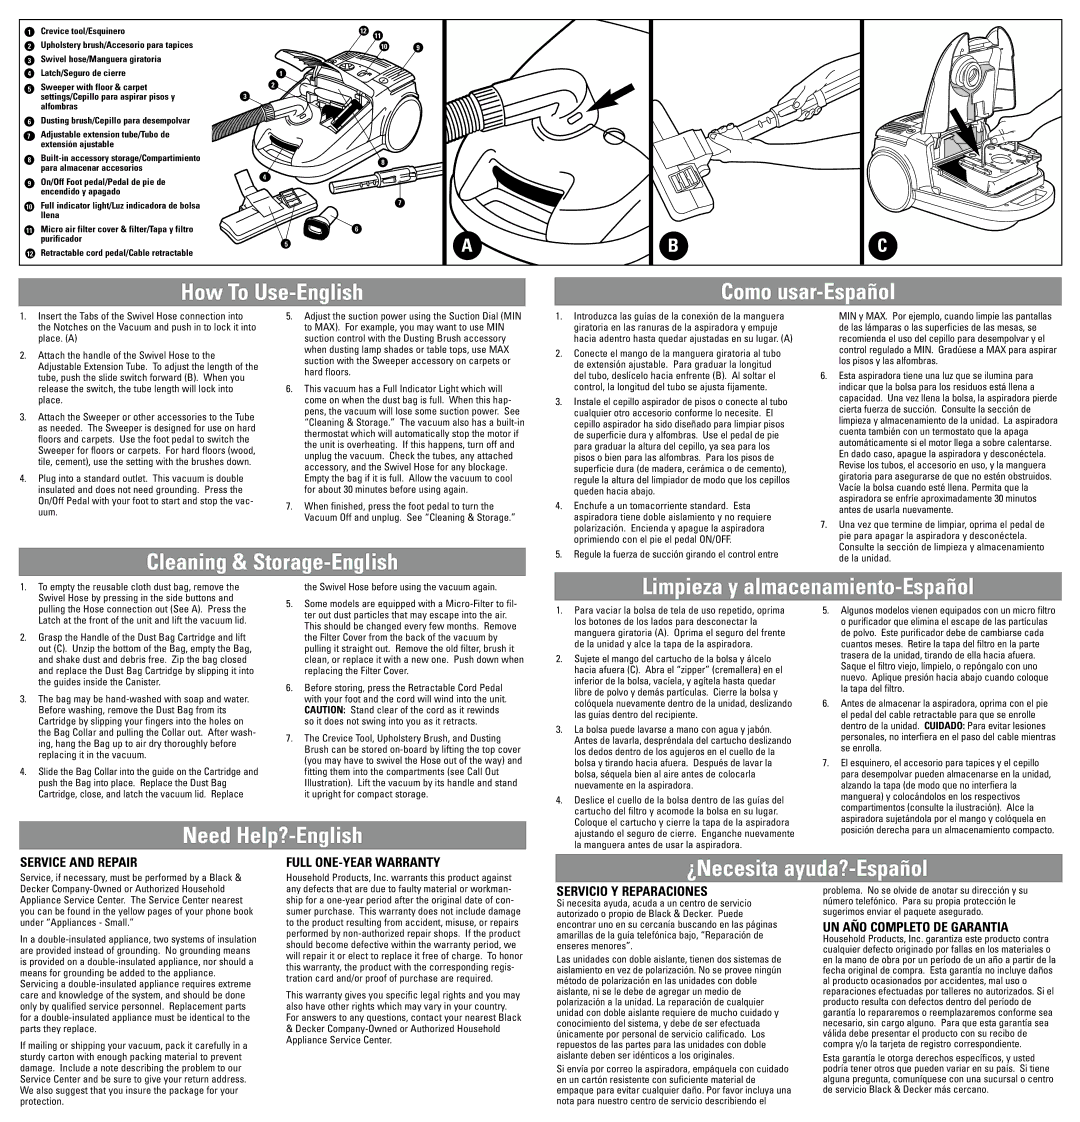
1Crevice tool/Esquinero
2Upholstery brush/Accesorio para tapices
3Swivel hose/Manguera giratoria
4Latch/Seguro de cierre
5Sweeper with floor & carpet
settings/Cepillo para aspirar pisos y | 3 |
alfombras |
|
6 Dusting brush/Cepillo para desempolvar
7 Adjustable extension tube/Tubo de extensión ajustable
1
2
12
11
10 9
8 | 8 | ||
| para almacenar accesorios | ||
| 4 | ||
9 | On/Off Foot pedal/Pedal de pie de | ||
| |||
| encendido y apagado |
| |
10 | Full indicator light/Luz indicadora de bolsa | 7 | |
| llena |
| |
11 | Micro air filter cover & filter/Tapa y filtro | 6 | |
| purificador | 5 | |
|
|
12Retractable cord pedal/Cable retractable
A
B
C
How To Use-English
Como usar-Español
1.Insert the Tabs of the Swivel Hose connection into the Notches on the Vacuum and push in to lock it into place. (A)
2.Attach the handle of the Swivel Hose to the Adjustable Extension Tube. To adjust the length of the tube, push the slide switch forward (B). When you release the switch, the tube length will lock into place.
3.Attach the Sweeper or other accessories to the Tube as needed. The Sweeper is designed for use on hard floors and carpets. Use the foot pedal to switch the Sweeper for floors or carpets. For hard floors (wood, tile, cement), use the setting with the brushes down.
4.Plug into a standard outlet. This vacuum is double insulated and does not need grounding. Press the On/Off Pedal with your foot to start and stop the vac- uum.
5.Adjust the suction power using the Suction Dial (MIN to MAX). For example, you may want to use MIN suction control with the Dusting Brush accessory when dusting lamp shades or table tops, use MAX suction with the Sweeper accessory on carpets or hard floors.
6.This vacuum has a Full Indicator Light which will come on when the dust bag is full. When this hap- pens, the vacuum will lose some suction power. See “Cleaning & Storage.” The vacuum also has a
7.When finished, press the foot pedal to turn the Vacuum Off and unplug. See “Cleaning & Storage.”
1. | Introduzca las guías de la conexión de la manguera |
| giratoria en las ranuras de la aspiradora y empuje |
| hacia adentro hasta quedar ajustadas en su lugar. (A) |
2. | Conecte el mango de la manguera giratoria al tubo |
| de extensión ajustable. Para graduar la longitud |
| del tubo, deslícelo hacia enfrente (B). Al soltar el |
| control, la longitud del tubo se ajusta fijamente. |
3. | Instale el cepillo aspirador de pisos o conecte al tubo |
| cualquier otro accesorio conforme lo necesite. El |
| cepillo aspirador ha sido diseñado para limpiar pisos |
| de superficie dura y alfombras. Use el pedal de pie |
| para graduar la altura del cepillo, ya sea para los |
| pisos o bien para las alfombras. Para los pisos de |
| superficie dura (de madera, cerámica o de cemento), |
| regule la altura del limpiador de modo que los cepillos |
| queden hacia abajo. |
4. Enchufe a un tomacorriente standard. Esta | |
| aspiradora tiene doble aislamiento y no requiere |
| polarización. Encienda y apague la aspiradora |
| oprimiendo con el pie el pedal ON/OFF. |
MIN y MAX. Por ejemplo, cuando limpie las pantallas de las lámparas o las superficies de las mesas, se recomienda el uso del cepillo para desempolvar y el control regulado a MIN. Gradúese a MAX para aspirar los pisos y las alfombras.
6. | Esta aspiradora tiene una luz que se ilumina para |
| indicar que la bolsa para los residuos está llena a |
| capacidad. Una vez llena la bolsa, la aspiradora pierde |
| cierta fuerza de succión. Consulte la sección de |
| limpieza y almacenamiento de la unidad. La aspiradora |
| cuenta también con un termostato que la apaga |
| automáticamente si el motor llega a sobre calentarse. |
| En dado caso, apague la aspiradora y desconéctela. |
| Revise los tubos, el accesorio en uso, y la manguera |
| giratoria para asegurarse de que no estén obstruidos. |
| Vacíe la bolsa cuando esté llena. Permita que la |
| aspiradora se enfríe aproximadamente 30 minutos |
| antes de usarla nuevamente. |
7. | Una vez que termine de limpiar, oprima el pedal de |
| pie para apagar la aspiradora y desconéctela. |
| Consulte la sección de limpieza y almacenamiento |
Cleaning & Storage-English
5. Regule la fuerza de succión girando el control entre |
de la unidad. |
1. To empty the reusable cloth dust bag, remove the |
Swivel Hose by pressing in the side buttons and |
the Swivel Hose before using the vacuum again.
Limpieza y almacenamiento-Español
| pulling the Hose connection out (See A). Press the |
| Latch at the front of the unit and lift the vacuum lid. |
2. | Grasp the Handle of the Dust Bag Cartridge and lift |
| out (C). Unzip the bottom of the Bag, empty the Bag, |
| and shake dust and debris free. Zip the bag closed |
| and replace the Dust Bag Cartridge by slipping it into |
| the guides inside the Canister. |
3. The bag may be | |
| Before washing, remove the Dust Bag from its |
| Cartridge by slipping your fingers into the holes on |
| the Bag Collar and pulling the Collar out. After wash- |
| ing, hang the Bag up to air dry thoroughly before |
| replacing it in the vacuum. |
4. | Slide the Bag Collar into the guide on the Cartridge and |
| push the Bag into place. Replace the Dust Bag |
| Cartridge, close, and latch the vacuum lid. Replace |
5.Some models are equipped with a
6.Before storing, press the Retractable Cord Pedal with your foot and the cord will wind into the unit. CAUTION: Stand clear of the cord as it rewinds so it does not swing into you as it retracts.
7.The Crevice Tool, Upholstery Brush, and Dusting Brush can be stored
1. | Para vaciar la bolsa de tela de uso repetido, oprima |
| los botones de los lados para desconectar la |
| manguera giratoria (A). Oprima el seguro del frente |
| de la unidad y alce la tapa de la aspiradora. |
2. | Sujete el mango del cartucho de la bolsa y álcelo |
| hacia afuera (C). Abra el “zipper” (cremallera) en el |
| inferior de la bolsa, vacíela, y agítela hasta quedar |
| libre de polvo y demás partículas. Cierre la bolsa y |
| colóquela nuevamente dentro de la unidad, deslizando |
| las guías dentro del recipiente. |
3. | La bolsa puede lavarse a mano con agua y jabón. |
| Antes de lavarla, despréndala del cartucho deslizando |
| los dedos dentro de los agujeros en el cuello de la |
| bolsa y tirando hacia afuera. Después de lavar la |
| bolsa, séquela bien al aire antes de colocarla |
| nuevamente en la aspiradora. |
4. | Deslice el cuello de la bolsa dentro de las guías del |
| cartucho del filtro y acomode la bolsa en su lugar. |
| Coloque el cartucho y cierre la tapa de la aspiradora |
5. | Algunos modelos vienen equipados con un micro filtro |
| o purificador que elimina el escape de las partículas |
| de polvo. Este purificador debe de cambiarse cada |
| cuantos meses. Retire la tapa del filtro en la parte |
| trasera de la unidad, tirando de ella hacia afuera. |
| Saque el filtro viejo, límpielo, o repóngalo con uno |
| nuevo. Aplique presión hacia abajo cuando coloque |
| la tapa del filtro. |
6. | Antes de almacenar la aspiradora, oprima con el pie |
| el pedal del cable retractable para que se enrolle |
| dentro de la unidad. CUIDADO: Para evitar lesiones |
| personales, no interfiera en el paso del cable mientras |
| se enrolla. |
7. | El esquinero, el accesorio para tapices y el cepillo |
| para desempolvar pueden almacenarse en la unidad, |
| alzando la tapa (de modo que no interfiera la |
| manguera) y colocándolos en los respectivos |
| compartimentos (consulte la ilustración). Alce la |
| aspiradora sujetándola por el mango y colóquela en |
Need Help?-English
ajustando el seguro de cierre. Enganche nuevamente |
la manguera antes de usar la aspiradora. |
posición derecha para un almacenamiento compacto. |
SERVICE AND REPAIR
Service, if necessary, must be performed by a Black &
FULL
Household Products, Inc. warrants this product against
¿Necesita ayuda?-Español
Decker
In a
If mailing or shipping your vacuum, pack it carefully in a sturdy carton with enough packing material to prevent damage. Include a note describing the problem to our Service Center and be sure to give your return address. We also suggest that you insure the package for your protection.
any defects that are due to faulty material or workman- ship for a
This warranty gives you specific legal rights and you may also have other rights which may vary in your country. For answers to any questions, contact your nearest Black
&Decker
SERVICIO Y REPARACIONES
Si necesita ayuda, acuda a un centro de servicio autorizado o propio de Black & Decker. Puede encontrar uno en su cercanía buscando en las páginas amarillas de la guía telefónica bajo, “Reparación de enseres menores”.
Las unidades con doble aislante, tienen dos sistemas de aislamiento en vez de polarización. No se provee ningún método de polarización en las unidades con doble aislante, ni se le debe de agregar un medio de polarización a la unidad. La reparación de cualquier unidad con doble aislante requiere de mucho cuidado y conocimiento del sistema, y debe de ser efectuada únicamente por personal de servicio calificado. Los repuestos de las partes para las unidades con doble aislante deben ser idénticos a los originales.
Si envía por correo la aspiradora, empáquela con cuidado en un cartón resistente con suficiente material de empaque para evitar cualquier daño. Por favor incluya una nota para nuestro centro de servicio describiendo el
problema. No se olvide de anotar su dirección y su número telefónico. Para su propia protección le sugerimos enviar el paquete asegurado.
UN AÑO COMPLETO DE GARANTIA
Household Products, Inc. garantiza este producto contra cualquier defecto originado por fallas en los materiales o en la mano de obra por un período de un año a partir de la fecha original de compra. Esta garantía no incluye daños al producto ocasionados por accidentes, mal uso o reparaciones efectuadas por talleres no autorizados. Si el producto resulta con defectos dentro del período de garantía lo repararemos o reemplazaremos conforme sea necesario, sin cargo alguno. Para que esta garantía sea válida debe presentar el producto con su recibo de compra y/o la tarjeta de registro correspondiente.
Esta garantía le otorga derechos específicos, y usted podría tener otros que pueden variar en su país. Si tiene alguna pregunta, comuníquese con una sucursal o centro de servicio Black & Decker más cercano.