WARNING: Do not operate the mower if any one or more of the grass catcher, discharge chute or mulching plug is not firmly installed on the mower.

Pivot the hood assembly up and lower the cutting height adjustment lever to the lowest position.

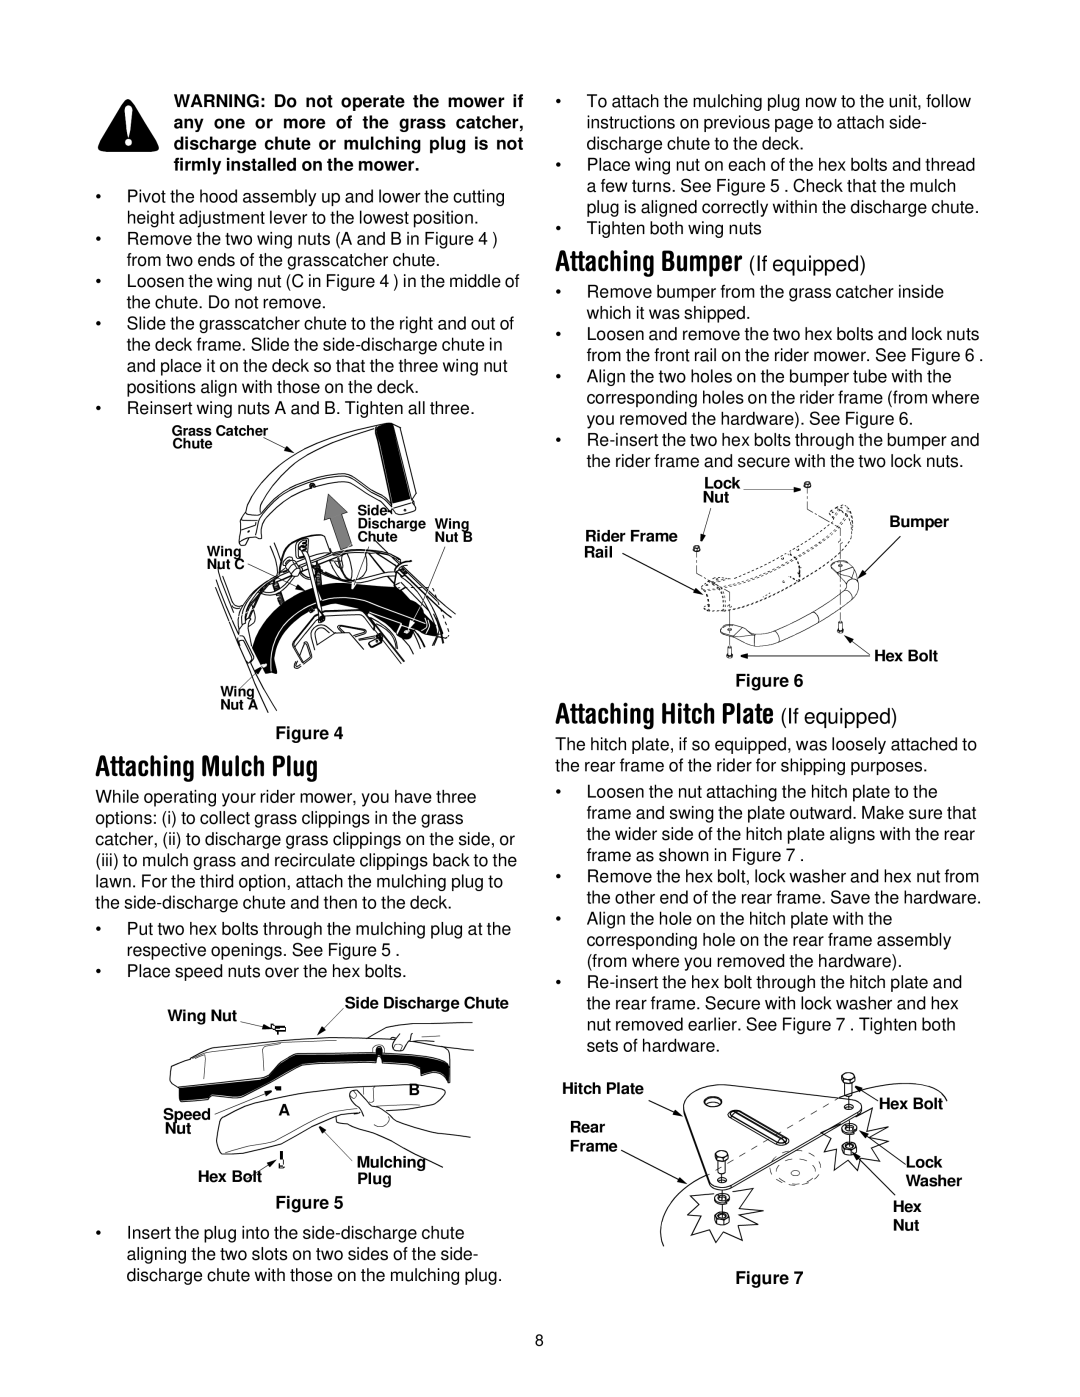
Remove the two wing nuts (A and B in Figure 4 ) from two ends of the grasscatcher chute.

Loosen the wing nut (C in Figure 4 ) in the middle of the chute. Do not remove.

Slide the grasscatcher chute to the right and out of the deck frame. Slide the side-discharge chute in and place it on the deck so that the three wing nut positions align with those on the deck.

Reinsert wing nuts A and B. Tighten all three.

Grass Catcher

Chute

Side-

Wing

Discharge

Chute

Nut B

Wing


Nut C


Wing

Nut A

Figure 4

Attaching Mulch Plug

While operating your rider mower, you have three options: (i) to collect grass clippings in the grass catcher, (ii) to discharge grass clippings on the side, or

(iii)to mulch grass and recirculate clippings back to the lawn. For the third option, attach the mulching plug to the side-discharge chute and then to the deck.

Put two hex bolts through the mulching plug at the respective openings. See Figure 5 .

Place speed nuts over the hex bolts.

Side Discharge Chute

To attach the mulching plug now to the unit, follow instructions on previous page to attach side- discharge chute to the deck.

Place wing nut on each of the hex bolts and thread a few turns. See Figure 5 . Check that the mulch plug is aligned correctly within the discharge chute.

Tighten both wing nuts

Attaching Bumper (If equipped)

Remove bumper from the grass catcher inside which it was shipped.

Loosen and remove the two hex bolts and lock nuts from the front rail on the rider mower. See Figure 6 .

Align the two holes on the bumper tube with the corresponding holes on the rider frame (from where you removed the hardware). See Figure 6.

Re-insert the two hex bolts through the bumper and the rider frame and secure with the two lock nuts.

Lock

Nut

Bumper

Rider Frame

Rail

Hex Bolt

Figure 6

Attaching Hitch Plate (If equipped)

The hitch plate, if so equipped, was loosely attached to the rear frame of the rider for shipping purposes.

• Loosen the nut attaching the hitch plate to the

frame and swing the plate outward. Make sure that

the wider side of the hitch plate aligns with the rear

frame as shown in Figure 7 .

• Remove the hex bolt, lock washer and hex nut from

the other end of the rear frame. Save the hardware.

• Align the hole on the hitch plate with the

corresponding hole on the rear frame assembly

(from where you removed the hardware).

Re-insert the hex bolt through the hitch plate and

the rear frame. Secure with lock washer and hex

Wing Nut

Speed A Nut

B

nut removed earlier. See Figure 7 . Tighten both

sets of hardware.

Hitch Plate

Hex Bolt

Rear

Frame

Hex Bolt

Mulching

Plug

Figure 5

Insert the plug into the side-discharge chute aligning the two slots on two sides of the side- discharge chute with those on the mulching plug.

Lock

Washer

Hex

Nut

Figure 7

8

Page 8
Image 8
Bolens 13B-325-401 manual Attaching Mulch Plug, Attaching Bumper If equipped, Attaching Hitch Plate If equipped

13B-325-401 specifications

The Bolens 13B-325-401 is a versatile riding lawnmower designed for homeowners who require reliable performance and ease of use in their lawn maintenance. This model, known for its powerful engine and user-friendly features, is tailored to handle a variety of landscaping tasks with precision.

At the heart of the Bolens 13B-325-401 is a robust 13.5 horsepower Briggs & Stratton engine. This engine provides ample power to tackle tough grass and uneven terrain, making it suitable for larger residential lawns. The engine is designed for easy starting, featuring a recoil system that ensures quick operation, reducing downtime and making yard work more efficient.

One of the standout features of the 13B-325-401 is its 42-inch cutting deck. This wide cutting area allows users to cover more ground in less time, and the precise design promotes an even cut across different grass types. The deck is equipped with adjustable cutting heights, allowing operators to customize the lawn cut to their desired level. With six different cutting positions, users can transition from a manicured look to a more natural finish depending on their landscaping needs.

The mower also includes a responsive hydrostatic transmission, which provides seamless speed control without the complications of manual shifting. This feature allows for effortless transitioning between forward and reverse, making maneuvering around obstacles like flower beds or trees much easier. The intuitive controls are strategically placed, ensuring that operators can adjust their speed and direction smoothly while maintaining a comfortable grip.

Durability is a key characteristic of the Bolens 13B-325-401. The heavy-duty steel frame is designed to withstand the rigors of regular use, ensuring longevity. Additionally, the mower’s compact design allows for easy storage, even in tight spaces.

User comfort has not been overlooked. The mower offers a plush seat that is adjustable, providing support during longer mowing sessions. The ergonomic steering wheel and dashboard layout improve the overall user experience, allowing for easy access to essential controls such as the ignition and throttle.

In summary, the Bolens 13B-325-401 combines power, efficiency, and comfort, making it an excellent choice for homeowners looking to simplify lawn care. Its advanced features, including a reliable engine, adjustable cutting deck, and user-friendly design, create a machine capable of maintaining beautiful lawns with confidence and ease.