VIDEO INPUT

IMAGE LEVEL ADJUSTMENT

1

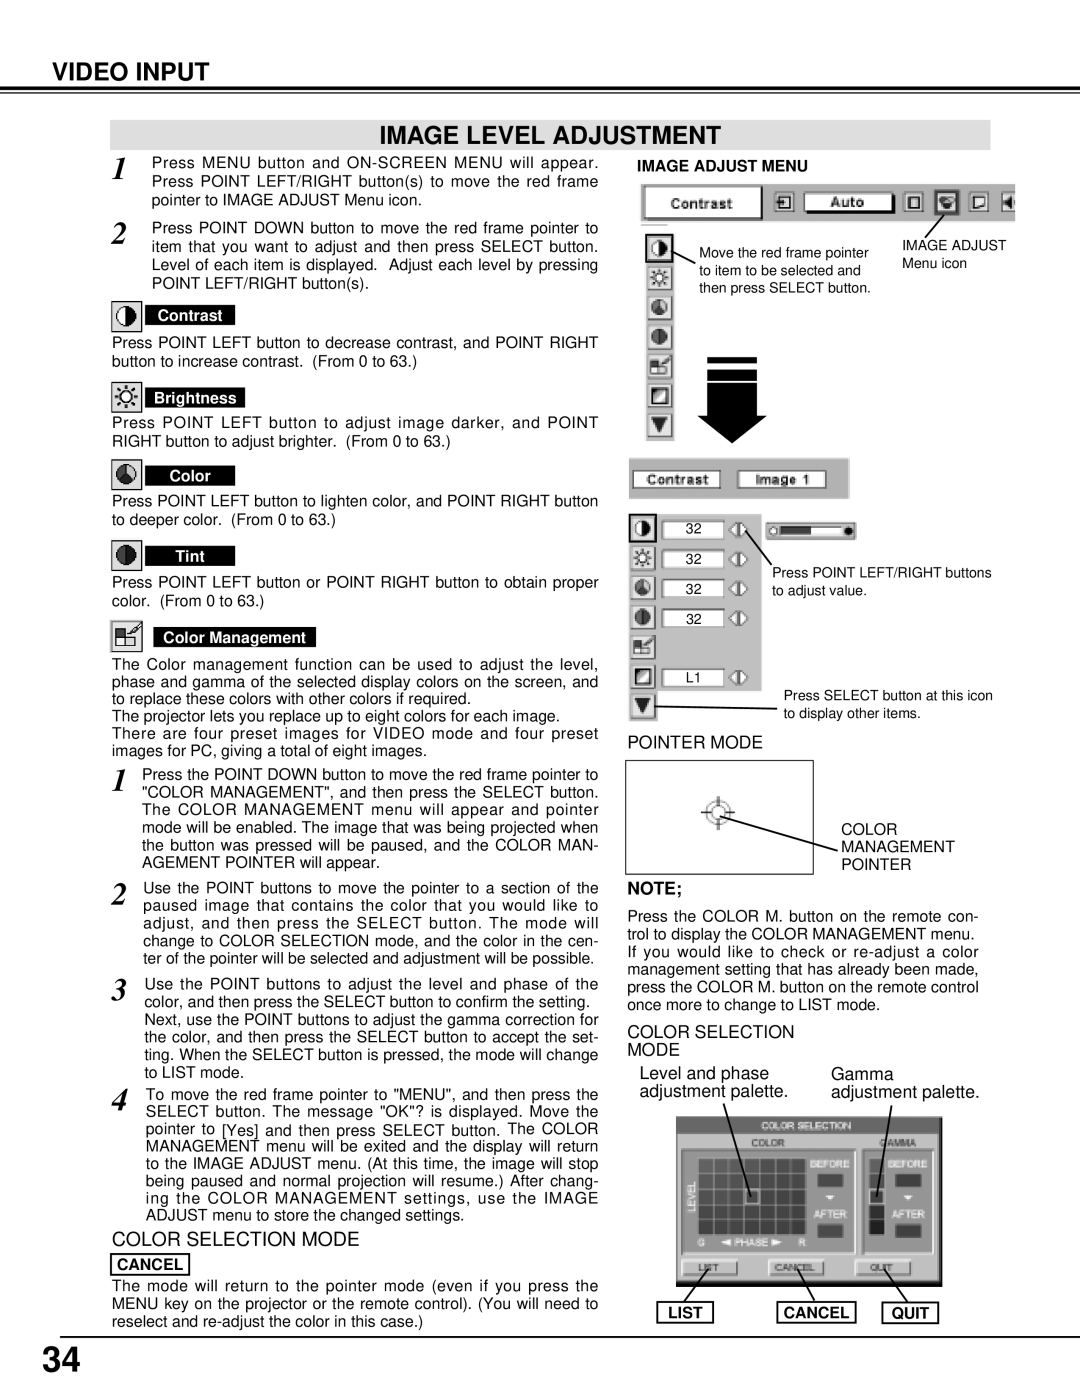
Press MENU button and ON-SCREEN MENU will appear.

Press POINT LEFT/RIGHT button(s) to move the red frame


pointer to IMAGE ADJUST Menu icon.

2

Press POINT DOWN button to move the red frame pointer to

item that you want to adjust and then press SELECT button.

Level of each item is displayed. Adjust each level by pressing POINT LEFT/RIGHT button(s).

Contrast

Press POINT LEFT button to decrease contrast, and POINT RIGHT button to increase contrast. (From 0 to 63.)

Brightness

Press POINT LEFT button to adjust image darker, and POINT RIGHT button to adjust brighter. (From 0 to 63.)

Color

Press POINT LEFT button to lighten color, and POINT RIGHT button to deeper color. (From 0 to 63.)

Tint

Press POINT LEFT button or POINT RIGHT button to obtain proper color. (From 0 to 63.)

Color Management

The Color management function can be used to adjust the level, phase and gamma of the selected display colors on the screen, and to replace these colors with other colors if required.

The projector lets you replace up to eight colors for each image. There are four preset images for VIDEO mode and four preset images for PC, giving a total of eight images.

1

Press the POINT DOWN button to move the red frame pointer to

"COLOR MANAGEMENT", and then press the SELECT button.


The COLOR MANAGEMENT menu will appear and pointer


mode will be enabled. The image that was being projected when


the button was pressed will be paused, and the COLOR MAN-


AGEMENT POINTER will appear.

2

Use the POINT buttons to move the pointer to a section of the

paused image that contains the color that you would like to


adjust, and then press the SELECT button. The mode will


change to COLOR SELECTION mode, and the color in the cen-


ter of the pointer will be selected and adjustment will be possible.

3

Use the POINT buttons to adjust the level and phase of the

color, and then press the SELECT button to confirm the setting.


Next, use the POINT buttons to adjust the gamma correction for


the color, and then press the SELECT button to accept the set-


ting. When the SELECT button is pressed, the mode will change


to LIST mode.

4

To move the red frame pointer to "MENU", and then press the

SELECT button. The message "OK"? is displayed. Move the

pointer to [Yes] and then press SELECT button. The COLOR MANAGEMENT menu will be exited and the display will return to the IMAGE ADJUST menu. (At this time, the image will stop being paused and normal projection will resume.) After chang- ing the COLOR MANAGEMENT settings, use the IMAGE ADJUST menu to store the changed settings.

COLOR SELECTION MODE

CANCEL

The mode will return to the pointer mode (even if you press the MENU key on the projector or the remote control). (You will need to reselect and re-adjust the color in this case.)

IMAGE ADJUST MENU

Move the red frame pointer

IMAGE ADJUST

Menu icon

to item to be selected and


then press SELECT button.


32


32

Press POINT LEFT/RIGHT buttons


32

to adjust value.

32


L1

Press SELECT button at this icon to display other items.

POINTER MODE

COLOR

MANAGEMENT

POINTER

NOTE;

Press the COLOR M. button on the remote con- trol to display the COLOR MANAGEMENT menu. If you would like to check or re-adjust a color management setting that has already been made, press the COLOR M. button on the remote control once more to change to LIST mode.

COLOR SELECTION

MODE

Level and phase

Gamma

adjustment palette.

adjustment palette.

LIST


CANCEL


QUIT

34

Page 34
Image 34
BOXLIGHT CINEMA 20HD manual Video Input Image Level Adjustment, Color, Tint

CINEMA 20HD specifications

Introducing the BOXLIGHT CINEMA 20HD, a cutting-edge projector designed to transform your home entertainment experience. With advanced technologies and user-friendly features, this projector brings your favorite movies, games, and presentations to life with stunning clarity and vibrant colors.

One of the standout features of the CINEMA 20HD is its impressive resolution. Offering full HD 1080p, this projector ensures that every detail of your content is displayed with precision. Whether you're watching a blockbuster film or showcasing a presentation, the sharpness and accuracy of the image will captivate any audience. The projector boasts a brightness of 3500 lumens, making it suitable for various lighting conditions. This means you can enjoy your viewing experience even in rooms with ambient light without compromising picture quality.

Another significant characteristic of the BOXLIGHT CINEMA 20HD is its versatility in connectivity. It comes equipped with multiple HDMI ports, USB inputs, and even wireless capabilities, allowing you to connect a variety of devices effortlessly. Whether you want to stream content from a smartphone, laptop, or other devices, the CINEMA 20HD makes it simple to switch between sources.

The projector also features built-in speakers that deliver quality sound, enhancing your overall viewing experience. For those who crave an immersive audio experience, the option to connect external sound systems is available, further elevating your cinematic adventure.

In terms of design, the BOXLIGHT CINEMA 20HD is sleek and portable, making it easy to move from one room to another or take along for outdoor events. The lightweight body does not sacrifice durability, ensuring that you can enjoy its features for years to come.

Additionally, the projector is designed with user convenience in mind. Easy setup and a compatible remote control allow for a hassle-free operation. The adjustments for focus and zoom are straightforward, so you can quickly achieve the perfect image size and clarity.

In conclusion, the BOXLIGHT CINEMA 20HD embodies a blend of cutting-edge technology, impressive features, and user-friendly design, making it an ideal choice for anyone looking to enhance their home entertainment setup. Whether for movies, gaming, or presentations, it promises to deliver an extraordinary visual experience.