Installation Instructions | Aerada 1000 Series Gooseneck Faucet |
Installation Instructions - Electronic Battery Box (DC)
Models S53-306 and S53-307
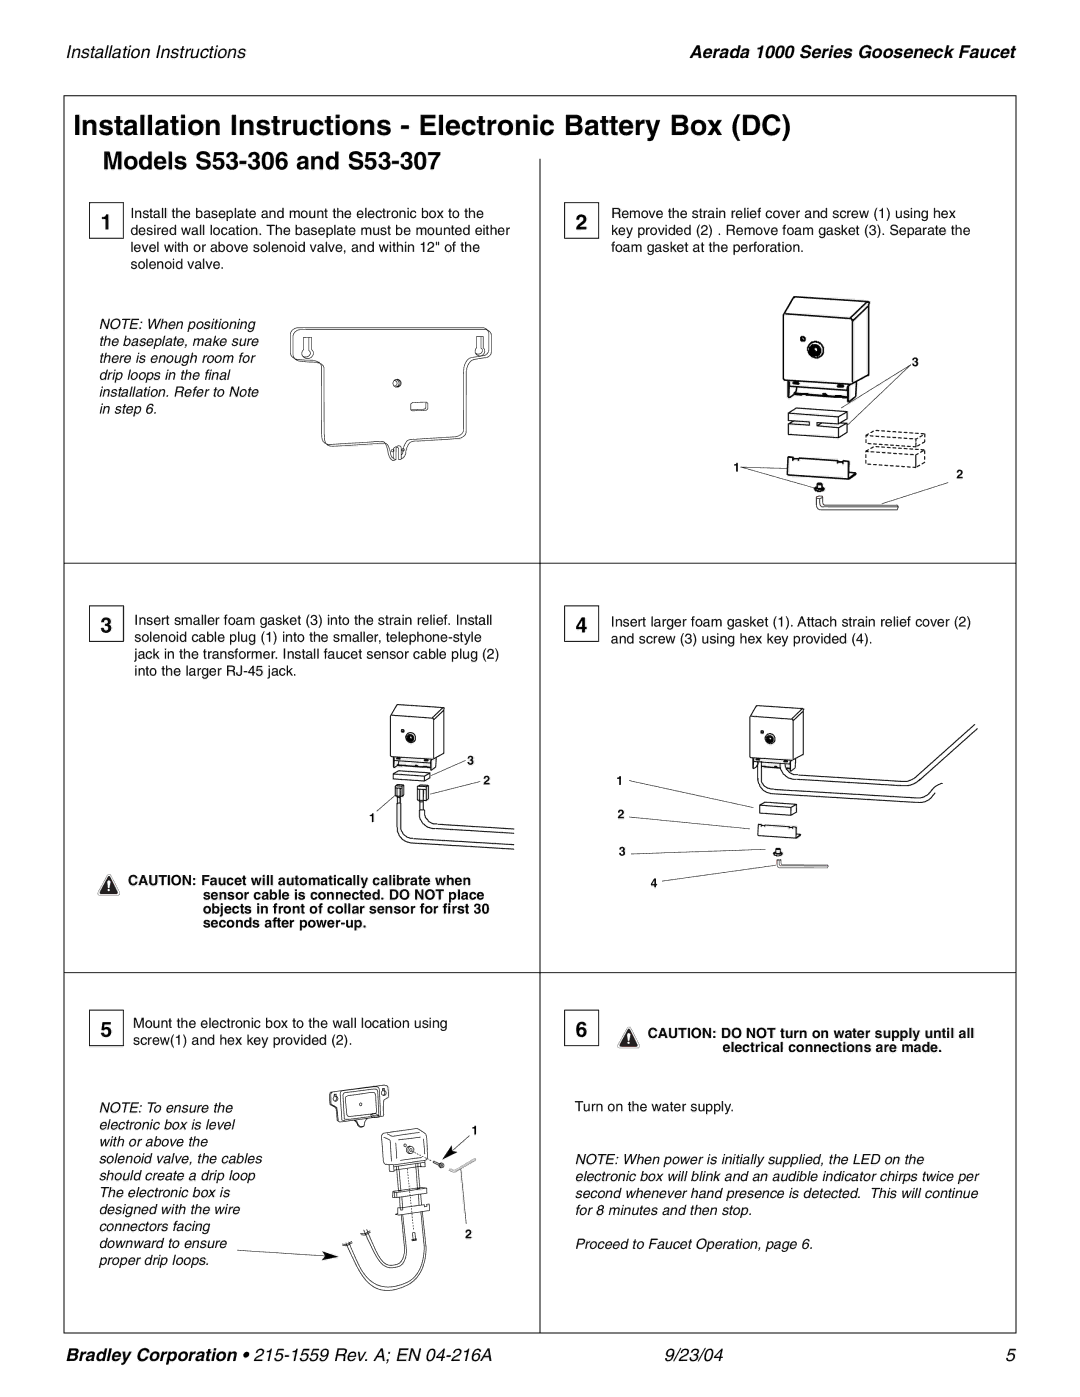
1 | Install the baseplate and mount the electronic box to the | 2 | Remove the strain relief cover and screw (1) using hex |
|
desired wall location. The baseplate must be mounted either | key provided (2) . Remove foam gasket (3). Separate the | |||
| level with or above solenoid valve, and within 12" of the |
| foam gasket at the perforation. |
|
| solenoid valve. |
|
|
|
NOTE: When positioning |
|
|
| |
the baseplate, make sure |
|
|
| |
there is enough room for |
| 3 |
| |
drip loops in the final |
|
|
| |
installation. Refer to Note |
|
|
| |
in step 6. |
|
|
| |
|
|
| 1 | 2 |
|
|
|
| |
3 | Insert smaller foam gasket (3) into the strain relief. Install | 4 | Insert larger foam gasket (1). Attach strain relief cover (2) |
| solenoid cable plug (1) into the smaller, |
| and screw (3) using hex key provided (4). |
|
| ||
| jack in the transformer. Install faucet sensor cable plug (2) |
|
|
| into the larger |
|
|
3 |
|
2 | 1 |
1 | 2 |
| 3 |
CAUTION: Faucet will automatically calibrate when | 4 |
sensor cable is connected. DO NOT place |
|
objects in front of collar sensor for first 30 |
|
seconds after |
|
5 | Mount the electronic box to the wall location using | 6 | CAUTION: DO NOT turn on water supply until all |
| screw(1) and hex key provided (2). |
| electrical connections are made. |
|
|
| |
NOTE: To ensure the | Turn on the water supply. | ||
electronic box is level | 1 |
| |
with or above the |
| ||
|
| ||
solenoid valve, the cables | NOTE: When power is initially supplied, the LED on the | ||
should create a drip loop | electronic box will blink and an audible indicator chirps twice per | ||
The electronic box is | second whenever hand presence is detected. This will continue | ||
designed with the wire | for 8 minutes and then stop. | ||
connectors facing | 2 |
| |
downward to ensure |
| ||
Proceed to Faucet Operation, page 6. | |||
proper drip loops. |
|
| |
Bradley Corporation • | 9/23/04 | 5 |