P2285_R02c.qxd 12/8/2003 12:20 PM Page 22


 Installation:

 Forward

 Facing


 Switching

 the
the
 LATCH
LATCH
 Connectors


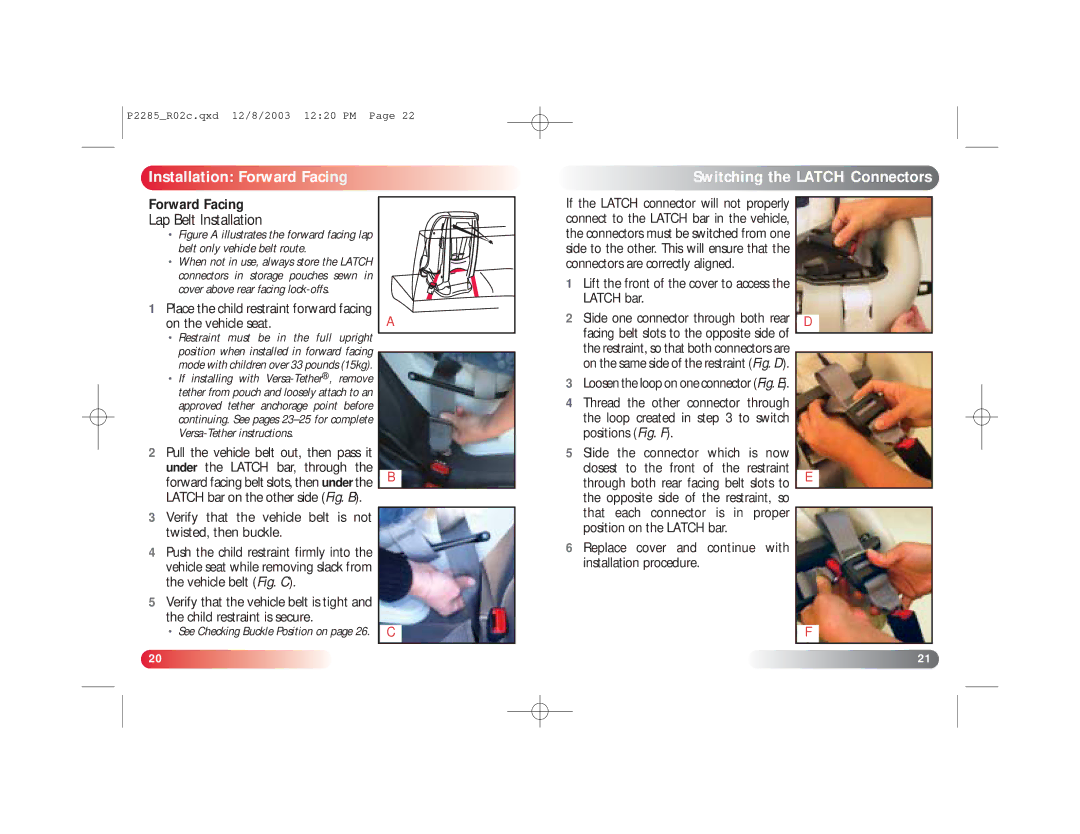
Forward Facing
Lap Belt Installation
•Figure A illustrates the forward facing lap belt only vehicle belt route.
•When not in use, always store the LATCH connectors in storage pouches sewn in cover above rear facing
1Place the child restraint forward facing on the vehicle seat.
•Restraint must be in the full upright position when installed in forward facing mode with children over 33 pounds (15kg).
•If installing with
2Pull the vehicle belt out, then pass it under the LATCH bar, through the forward facing belt slots, then under the LATCH bar on the other side (Fig. B).
3Verify that the vehicle belt is not twisted, then buckle.
4Push the child restraint firmly into the vehicle seat while removing slack from the vehicle belt (Fig. C).
5Verify that the vehicle belt is tight and the child restraint is secure.
•See Checking Buckle Position on page 26.
A |
B
C
If the LATCH connector will not properly connect to the LATCH bar in the vehicle, the connectors must be switched from one side to the other. This will ensure that the connectors are correctly aligned.
1Lift the front of the cover to access the LATCH bar.
2 | Slide one connector through both rear |
|
|
D | |||
| facing belt slots to the opposite side of |
|
|
|
|
| |
| the restraint, so that both connectors are |
|
|
| on the same side of the restraint (Fig. D). |
|
|
3 | Loosen the loop on one connector (Fig. E). |
|
|
4 | Thread the other connector through |
|
|
| the loop created in step 3 to switch |
|
|
| positions (Fig. F). |
|
|
5 | Slide the connector which is now |
|
|
| closest to the front of the restraint |
|
|
| E |
| |
| through both rear facing belt slots to |
| |
| the opposite side of the restraint, so |
|
|
| that each connector is in proper |
|
|
| position on the LATCH bar. |
|
|
6 | Replace cover and continue with |
|
|
| installation procedure. |
|
|
F
![]()
![]()
![]()
![]()
![]()
![]() 20
20![]()
![]()
![]()
![]()
![]()
![]()
![]()
![]()
![]()
![]()
![]()
![]()
![]()
![]()
![]()
![]()
![]()
![]()
![]()
![]()
![]()
![]()
![]()
![]()
![]()
![]()
![]()
![]()
![]()
![]()
![]()
![]()
![]()
![]()
![]()
![]()
![]()
![]()
![]()
![]()
![]()
![]()
![]()
![]()
![]()
![]()
![]()
![]()
![]()
![]()
![]()
![]()
![]()
![]()
![]()
![]()
![]()
![]()
![]()
![]()
![]()
![]()
![]()
![]()
![]()
![]()
![]()
![]()
![]()
![]()
![]()
![]()
![]()
![]()
![]()
![]()
![]()
![]()
![]()
![]()
![]()
![]()
![]()
![]()
![]()
![]()
![]()
![]()
![]()
![]()
![]()
![]()
![]()
![]()
![]()
![]()
![]()
![]()
![]()
![]()
![]()
![]()
![]()
![]()
![]()
![]()
![]()
![]()
![]()
![]()
![]()
![]()
![]()
![]()
![]()
![]()
![]()
![]()
![]()
![]()
![]()
![]()
![]()
![]()
![]()
![]()
![]()
![]()
![]()
![]()
![]()
![]()
![]()
![]()
![]()
![]()
![]()
![]()
![]()
![]()
![]()
![]()
![]()
![]()
![]()
![]()
![]()
![]()
![]()
![]()
![]()
![]()
![]()
![]()
![]()
![]()
![]()
![]()
![]()
![]()
![]()
![]()
![]()
![]()
![]()
![]()
![]()
![]()
![]()
![]()
![]()
![]()
![]()
![]()
![]()
![]()
![]()
![]()
![]()
![]()
![]()
![]()
![]()
![]()
![]()
![]()
![]()
![]()
![]()
![]()
![]()
![]()
![]()
![]()
![]()
![]() 21
21![]()
![]()
![]()
![]()
![]()
![]()