INSTALL THE HOUSING

Existing Construction

1. Choose the location for your fan/light in the ceiling. For best possible performance, use the shortest possible duct run and

a minimum number of elbows.

INSTALACIÓN DE LA CUBIERTA

Construcción existente

1.

Seleccione la ubicación del ventilador con lámpara en el cielo raso.


Para obtener el mejor rendimiento posible, utilice en tramo de


conductos lo más corto posible y un número mínimo de codos.

2.

En el entretecho, coloque las abrazaderas de montaje contro la vigueta.

2.In attic, position mounting brackets against joist.Trace outline of housing on ceiling material.

3.Set housing aside and cut ceiling opening slightly larger than marked.

4.Place housing in opening so that its bottom edge is flush with finished ceiling. Nail to joist through keyhole on both sides.To ensure a noise-free installation, drive another nail through the top hole of each mounting bracket.

5.Additional mounting holes are provided for installations where access from above is inconvenient or not possible. Nail or screw housing directly to joists or framing.

INSTALL THE DUCTWORK

NOTE: The duct connector has a counter-balanced damper flap. The flap will be "open" approx. 1" when duct connector is attached to housing. This design permits insulation to be in direct contact with fan/light housing per UL (Underwriters Laboratories) stan- dards. The slightest backdraft, however, will close the damper flap, preventing air from entering unit or finished space.

1.Snap the damper/duct connector onto housing. Make sure that tabs on the connector lock into slots in housing. Top of damper/duct connector should be flush with top of housing.

2.Connect 4” round duct to damper/duct connector and extend duct to outside through a roof or wall cap. Check damper to make sure that it opens freely. Tape all duct connections to make them secure and air tight.

ADDITIONAL MOUNTING HOLES

ORIFICIOS DE MONTAJE

ADICIONALES


Trace el perímetro de la cubierta en el material del techo.

3.

Coloque la cubierta a un lado y haga una abertura en el techo


ligeramente más grande que el perímetro marcado.

4.

Coloque la cubierta en la abertura de manera que su borde inferior


quede al ras del cielo raso terminado. Clave la cubierta en la vigueta


a través del orificio en forma de cerradura, en ambos lados. Para


asegurar un montaje sin ruido, coloque otro clavo en el orificio supe-


rior de cada aleta de montaje.

5.

En la cubierta se pueden encontrar orificios de montaje adicionales


para aquellas instalaciones en las que es inconveniente o imposible


el acceso desde arriba. Clave o atornille la cubierta directamente en


las viguetas o el armazón.

INSTALACIÓN DE LOS CONDUCTOS

NOTA: El conector del conducto tiene una aleta compensadora para el regulador de tiro La aleta estará “abierta” aproximadamente 1” (2.5 cm) cuando el conector del conducto se sujete a la cubierta.Este diseño permi- te que el material de aislamiento esté en contacto directo con la cubierta del ventilador con lámpara de acuerdo con las normas de UL (Underwriters Laboratories).Sin embargo, la más ligera corriente invertida cerrará la aleta del regulador de tiro, evitando así la entrada de aire a la unidad o al espacio terminado.

1.

Conecte a presión el conector del regulador de tiro/conducto en la


cubierta. Asegúrese de que las aletas del conector queden fijas en las


ranuras de la cubierta. La parte superior del conector del regulador de


tiro/conducto debe quedar al ras de la parte superior de la cubierta.

2.

Conecte el conducto redondo de 4” (10.2 cm) en el conector del regulador


de tiro/conducto y extienda el conducto hasta el exterior a través de una


tapa de techo o de pared. Revise el regulador de tiro para asegurarse


de que abre libremente. Coloque cinta en todas las conexiones de los

CONNECT THE WIRING

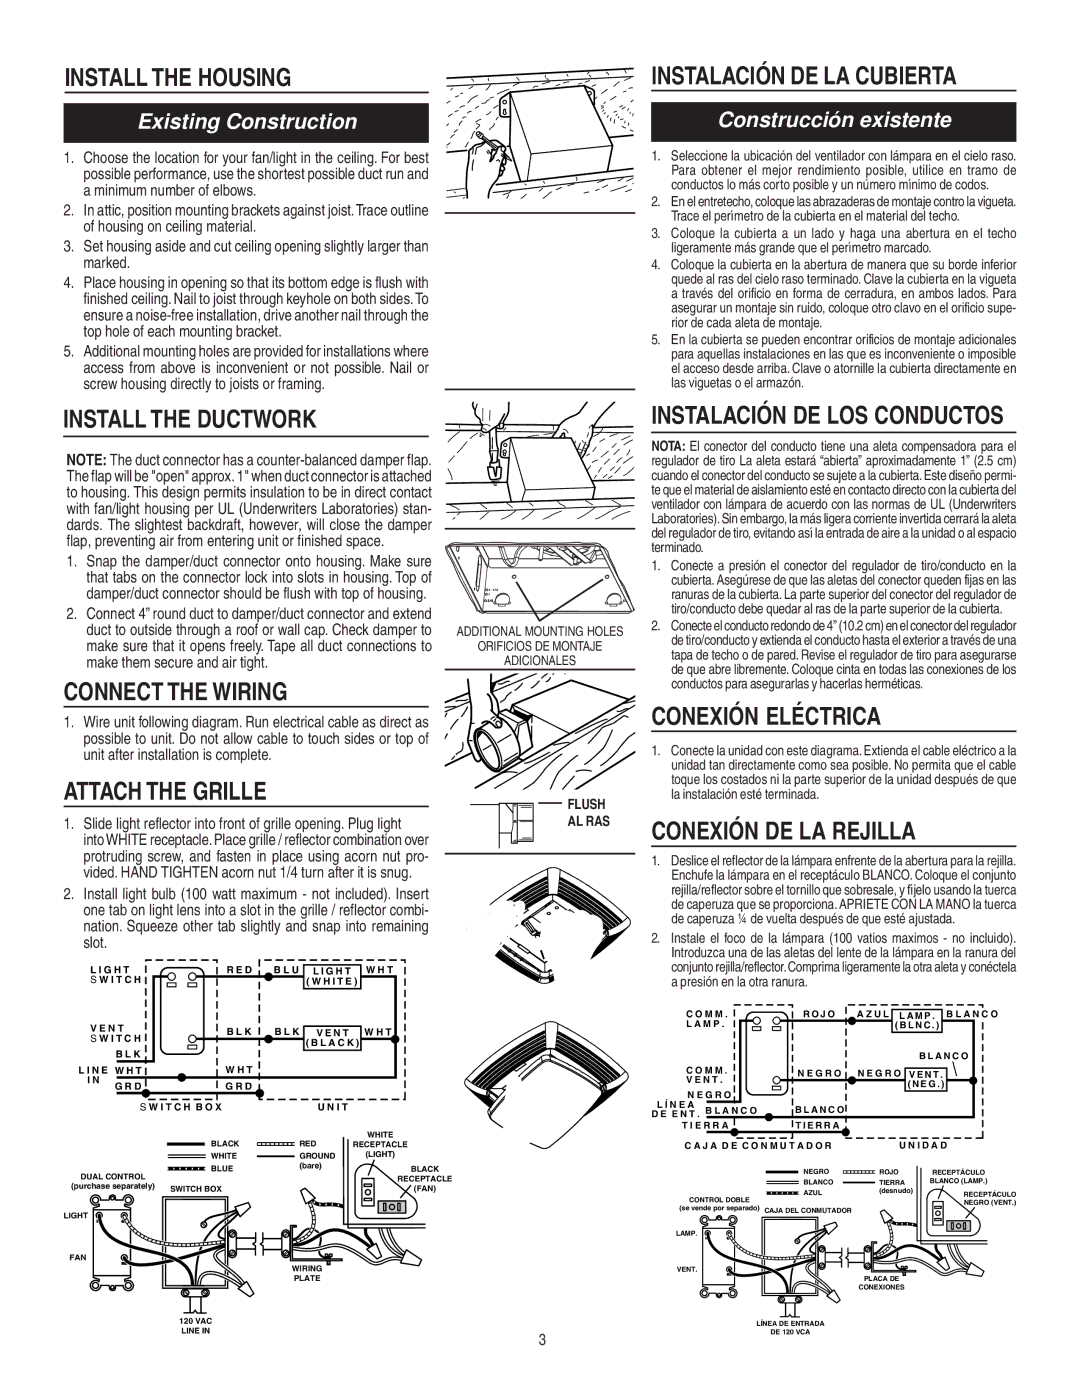
1. Wire unit following diagram. Run electrical cable as direct as possible to unit. Do not allow cable to touch sides or top of unit after installation is complete.

ATTACH THE GRILLE

1.Slide light reflector into front of grille opening. Plug light into WHITE receptacle. Place grille / reflector combination over protruding screw, and fasten in place using acorn nut pro- vided. HAND TIGHTEN acorn nut 1/4 turn after it is snug.

2.Install light bulb (100 watt maximum - not included). Insert

one tab on light lens into a slot in the grille / reflector combi- nation. Squeeze other tab slightly and snap into remaining slot.

L I G H T

R E D

B L U L I G H T W H T

S W I T C H


( W H I T E )

V E N T

B L K

B L K V E N T W H T

S W I T C H


( B L A C K )


B L K


L I N E W H T

W H T


I N

G R D

G R D


S W I T C H B O X

U N I T


BLACK

RED

WHITE


RECEPTACLE


WHITE

GROUND

(LIGHT)


BLUE

(bare)

BLACK

DUAL CONTROL


RECEPTACLE

(purchase separately)

SWITCH BOX


(FAN)

LIGHT


FAN


WIRING


PLATE


FLUSH AL RAS

conductos para asegurarlas y hacerlas herméticas.

CONEXIÓN ELÉCTRICA

1.Conecte la unidad con este diagrama. Extienda el cable eléctrico a la unidad tan directamente como sea posible. No permita que el cable toque los costados ni la parte superior de la unidad después de que la instalación esté terminada.

CONEXIÓN DE LA REJILLA

1.Deslice el reflector de la lámpara enfrente de la abertura para la rejilla. Enchufe la lámpara en el receptáculo BLANCO. Coloque el conjunto rejilla/reflector sobre el tornillo que sobresale, y fíjelo usando la tuerca de caperuza que se proporciona. APRIETE CON LA MANO la tuerca de caperuza ¼ de vuelta después de que esté ajustada.

2.Instale el foco de la lámpara (100 vatios maximos - no incluido). Introduzca una de las aletas del lente de la lámpara en la ranura del conjunto rejilla/reflector.Comprima ligeramente la otra aleta y conéctela a presión en la otra ranura.

C O M M .

R O J O

A Z U L L A M P . B L A N C O

L A M P .


( B L N C . )


B L A N C O

C O M M .

N E G R O

N E G R O V E N T .


V E N T .


( N E G . )


N E G R O


L Í N E A

B L A N C O


D E E N T . B L A N C O


T I E R R A

T I E R R A


C A J A D E C O N M U T A D O R

U N I D A D


NEGRO

ROJO

RECEPTÁCULO


BLANCO

TIERRA

BLANCO (LAMP.)


AZUL

(desnudo)

RECEPTÁCULO

CONTROL DOBLE


NEGRO (VENT.)

(se vende por separado) CAJA DEL CONMUTADOR


LAMP.


VENT.


PLACA DE


CONEXIONES


120 VAC


LÍNEA DE ENTRADA

LINE IN

3

DE 120 VCA


Page 3
Image 3
Broan 683L Instalación DE LA Cubierta, Install the Ductwork, Connect the Wiring, Attach the Grille, Conexión Eléctrica

683L specifications

The Broan 683L is a versatile and efficient ventilation fan designed to enhance indoor air quality while ensuring quiet and unobtrusive operation. This model stands out as a perfect blend of functionality, advanced technology, and sleek design, making it an ideal addition to bathrooms and other small spaces that require adequate ventilation.

One of the primary features of the Broan 683L is its powerful yet quiet performance. Equipped with a robust motor, this ventilation fan operates at an airflow capacity of 70 CFM, effectively circulating air to eliminate moisture and odors. This is particularly beneficial in bathroom settings, where humidity can lead to mold and mildew growth. The fan boasts a sound level of just 1.5 sones, ensuring a peaceful environment without the disruptive noise often associated with traditional ventilation systems.

The design of the Broan 683L features a low-profile, compact housing that allows for easy installation in various ceiling types. It is compatible with existing 4-inch ductwork, simplifying the installation process, especially in renovations. The attractive white polymeric grille provides a clean, modern aesthetic that fits seamlessly into any decor.

Technology is at the forefront of the Broan 683L, which incorporates innovative ventilation solutions. The fan includes a built-in exhaust damper that prevents backdrafts and helps maintain energy efficiency. Additionally, the fan can be connected to humidity sensing controls for automatic operation, ensuring that it only runs when needed. This feature greatly enhances convenience while reducing energy consumption.

Moreover, the Broan 683L is designed for durability and ease of maintenance. The durable motor is engineered for long-lasting performance, and the grille can be easily removed for cleaning purposes, promoting hygiene and optimal airflow over time.

In summary, the Broan 683L is an excellent choice for those seeking a reliable, efficient, and quiet ventilation solution. Its combination of powerful airflow, low noise levels, user-friendly design, and advanced technology makes it a standout option for enhancing indoor air quality in any small space. Whether you're renovating an existing bathroom or constructing a new one, the Broan 683L promises to deliver the ventilation needs with style and efficiency.