PREPARE THE HOOD |
|
| PLENUM | |
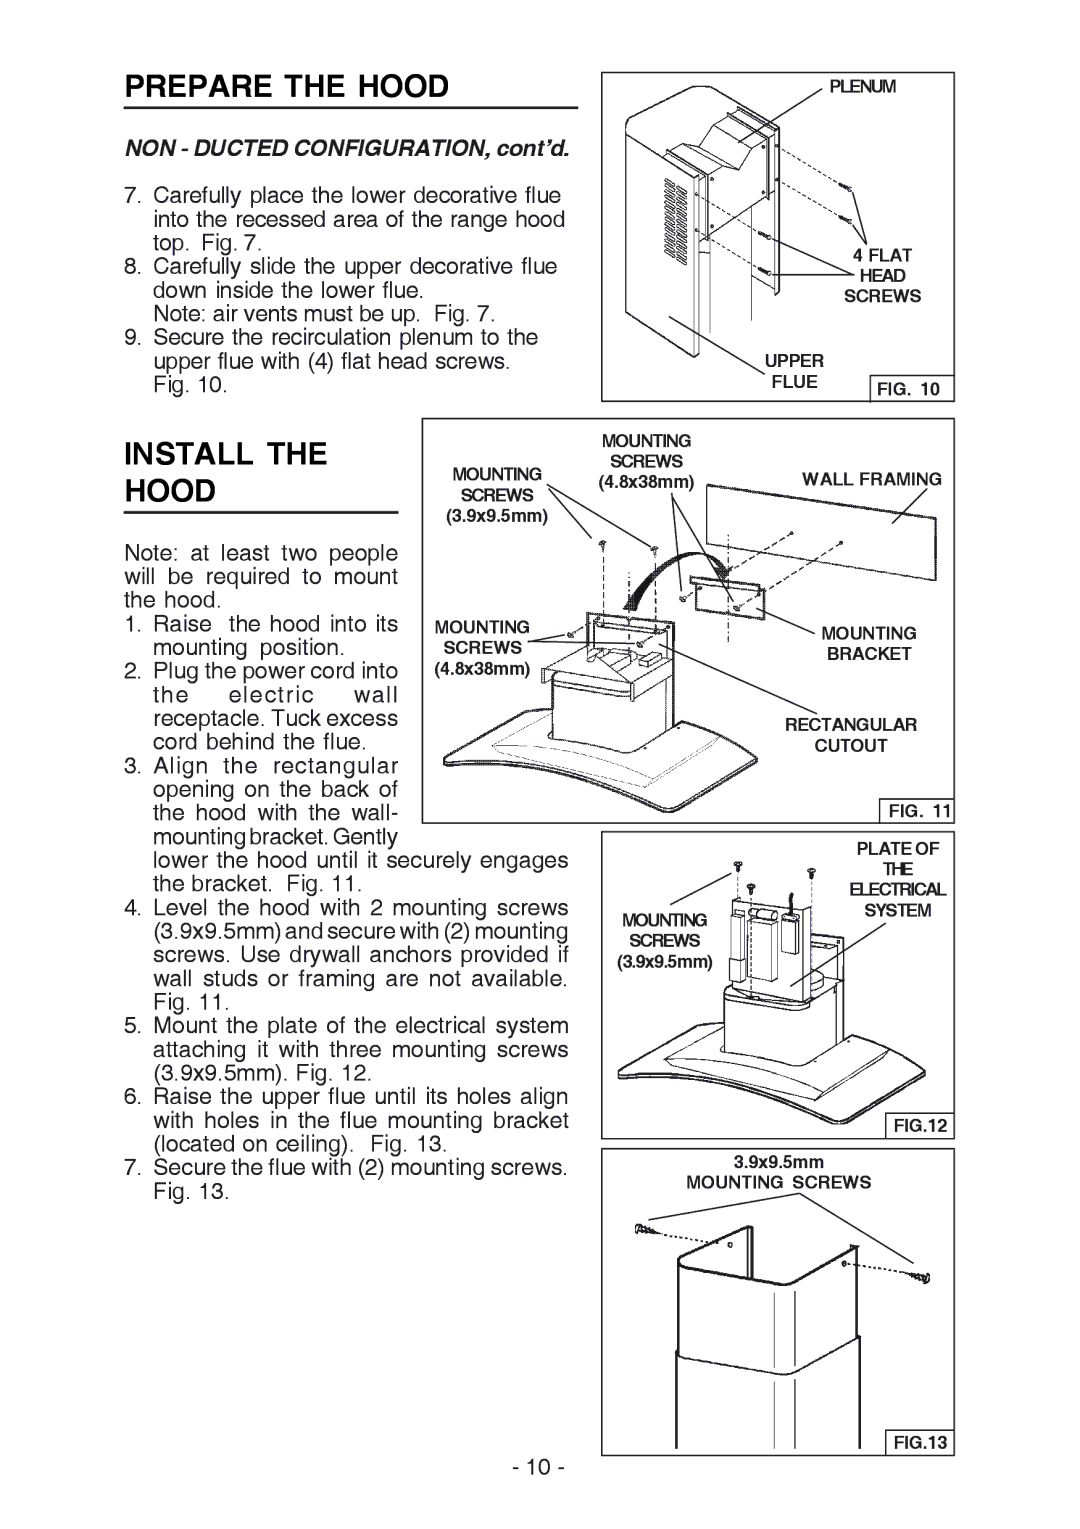
NON - DUCTED CONFIGURATION, cont’d. |
|
|
| |
7. Carefully place the lower decorative flue |
|
|
| |
into the recessed area of the range hood |
|
|
| |
top. Fig. 7. |
|
|
| 4 FLAT |
8. Carefully slide the upper decorative flue |
|
| ||
|
| HEAD | ||
down inside the lower flue. |
|
|
| |
|
|
| SCREWS | |
Note: air vents must be up. Fig. 7. |
|
|
| |
9. Secure the recirculation plenum to the |
|
|
| |
upper flue with (4) flat head screws. |
| UPPER |
| |
Fig. 10. |
|
| FLUE | FIG. 10 |
INSTALL THE |
| MOUNTING |
|
|
MOUNTING | SCREWS | WALL FRAMING | ||
HOOD | (4.8x38mm) | |||
SCREWS |
|
|
| |
| (3.9x9.5mm) |
|
|
|
Note: at least two people |
|
|
|
| ||
will be required to mount |
|
|
|
| ||
the hood. |
|
|
|
|
|
|
1. Raise | the hood into its | MOUNTING |
| MOUNTING | ||
mounting position. |
| SCREWS |
| |||
|
| BRACKET | ||||
2. Plug the power cord into | (4.8x38mm) |
|
|
| ||
the | electric | wall |
|
|
|
|
receptacle. Tuck excess |
|
| RECTANGULAR | |||
cord behind the flue. |
|
| CUTOUT | |||
3. Align | the rectangular |
|
|
|
| |
opening on the back of |
|
|
|
| ||
the hood with the wall- |
|
|
| FIG. 11 | ||
mounting bracket. Gently |
|
|
|
| ||
|
| PLATE OF | ||||
lower the hood until it securely engages |
| |||||
|
| THE | ||||
the bracket. Fig. 11. |
|
|
| |||
|
| ELECTRICAL | ||||
4. Level the hood with 2 mounting screws | MOUNTING | SYSTEM | ||||
(3.9x9.5mm) and secure with (2) mounting |
|
| ||||
SCREWS |
|
| ||||
screws. Use drywall anchors provided if |
|
| ||||
(3.9x9.5mm) |
|
| ||||
wall studs or framing are not available. |
|
|
| |||
Fig. 11. |
|
|
|
|
| |
5. | Mount the plate of the electrical system |
|
| attaching it with three mounting screws |
|
| (3.9x9.5mm). Fig. 12. |
|
6. | Raise the upper flue until its holes align |
|
| with holes in the flue mounting bracket | FIG.12 |
| (located on ceiling). Fig. 13. | 3.9x9.5mm |
7. | Secure the flue with (2) mounting screws. | |
| Fig. 13. | MOUNTING SCREWS |
|
| |
|
| FIG.13 |
| - 10 - |
|