Operation MA N U a L
Important Safety Instructions
For Users in the UK, EIRE, Malta Cyprus only
Congratulations on Choosing Brother Computer Sewing Machine
Please Read Before Using Your Sewing Machine
For a longer service life
For repair or adjustment
Page
Contents
108
100
103
107
Principal Parts
Setting UP
Foot controller jack
Power socket
Main power switch
Air vents Card slot
Other Included Accessories
Extra spool pin and spool felt
Net
Part Name Part Code Others
Options
Screen messages guide you through each operation
Selection Keys
Operation Buttons
Using the operation buttons
Basic Sewing Machine Operation
Flat BED Extension Table
Free arm
Insert the plug into a wall outlet Main power switch
Power Supply
Key to sharpen them
Using the Screen Keys
Adjusting the Brightness of the Screen
About the Screen
HOW to Change Language
Example To change the display language to Spanish
Touch
How to clear the language selection
Bobbin Winding / Bobbin Thread Setting
Turn the power on
Out and pushed toward the back of the sewing machine
Operation Machine
Push the bobbin shaft to the left. Remove the bobbin
Setting the bobbin
Upper Threading
Raise the presser foot using the presser foot lever
With your left hand
Run the thread all the way through the thread guides
Threading the take-up lever Thread take-up lever
Run thread through the guide above the needle
HOW to USE the Automatic Needle Threader
Starting and Stopping Sewing
START/STOP button
Foot controller
Stitch Selection Utility Stitches
Stitches
Press Key
Trial Sewing
Contents
Adjusting the stitch width
Adjusting the stitch length
Stitch Width and Stitch Length
Auto Manual
Stitch width mm inch Stitch length mm inch
Triple zigzag
Non-adjustable
Patchwork stitch
Fagoting
Loosening the upper thread tension
Thread Tension
Correct tension
Tightening the upper thread tension
Changing the presser foot
Presser Foot
Embroidery foot Q
Changing the Embroidery foot and the zipper foot
Feed Dogs
Checking the needle
Needle
Type Size
FABRIC/THREAD/NEEDLE Combination Chart
Thread
Needle size
Utility Stitches
Straight Stitches
Straight Left Straight Middle
Sewing corners
Changing needle position
Sewing curves
Sewing thick seams
Sewing thick fabric
Sewing thin fabric
Using the free arm
Stretch stitch Reinforced stitch
Stretch Stitch and Triple Stitch
Stretch stitch
Triple stitch
Zigzag Stitches
Overcasting using a zigzag stitch
Applique using a zigzag stitch
Attach the applique using adhesive or basting, then sew it
Lower fabric
Patchwork for crazy quilt
Sewing a curve with a zigzag stitch
Upper fabric
Stretch elastic while sewing Elastic Band
Dotted Zigzag
Attaching elastic bands
Elastic zigzag
Weight fabrics. Attach G foot. Keep foot guide along edge
Overcasting
Overcasting
For use on stretchable fabrics. Attach J foot. Keep foot on
While sewing
Ing
Blind HEM Stitches
Use the on stretch fabrics and the for other fabrics
Blind hem stitch
If the needle catches the fold of hem too much
If the needle does not catch the fold of hem enough
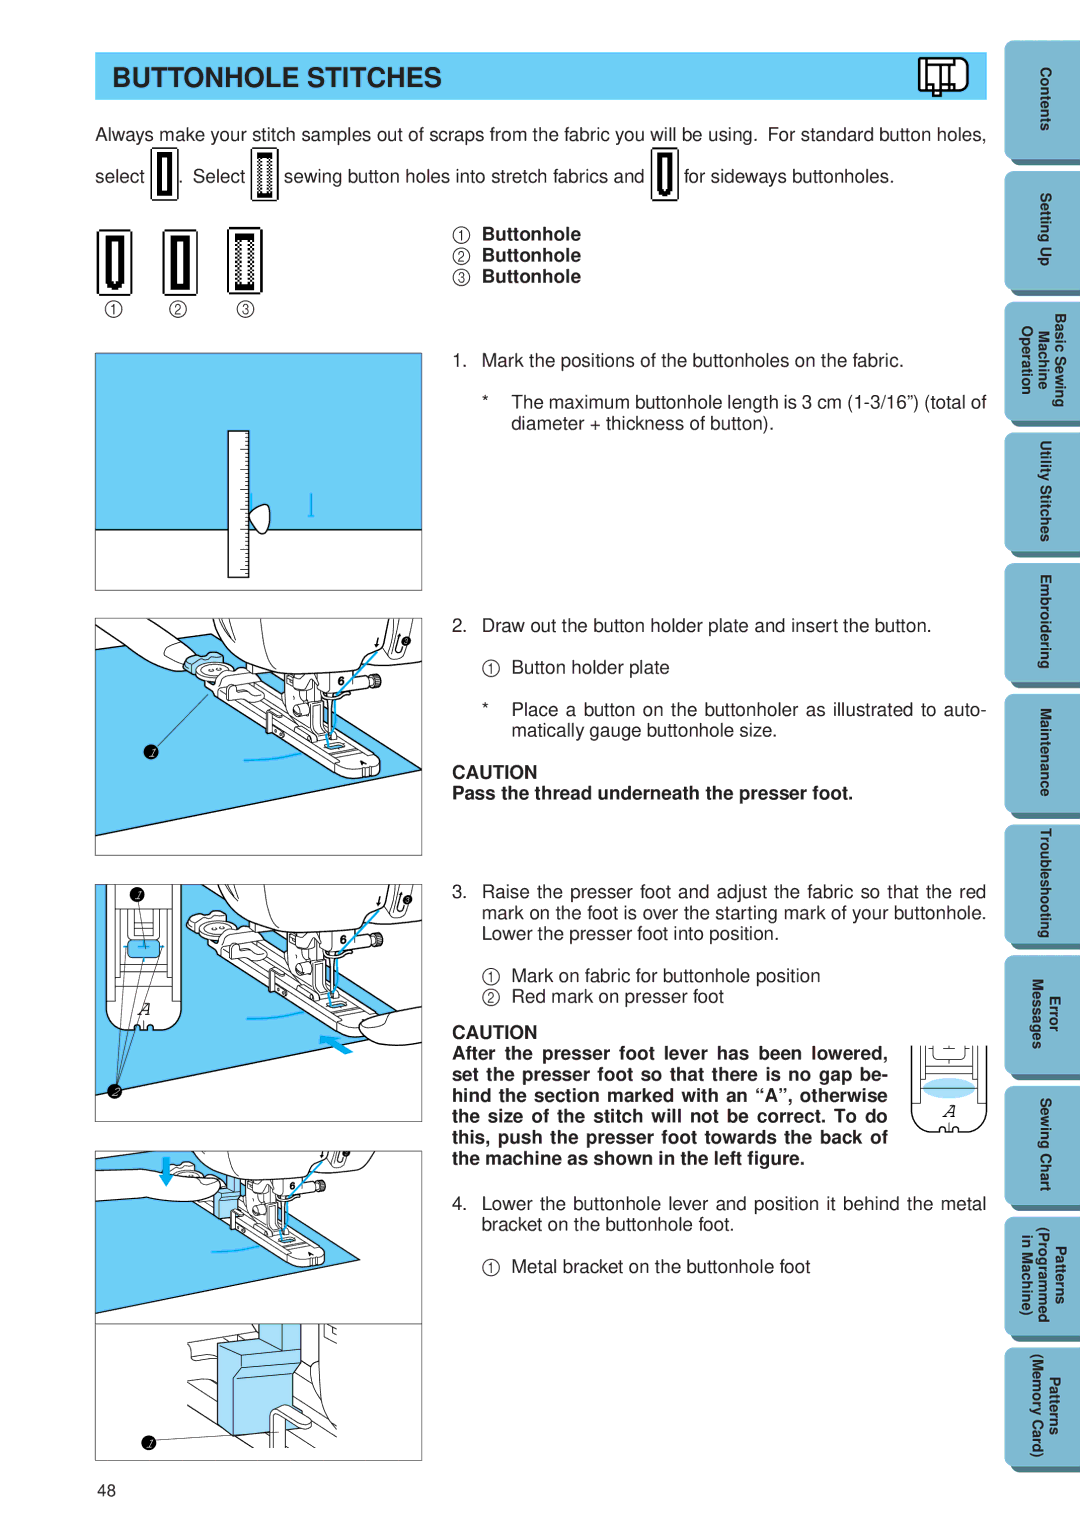
Buttonhole Stitches
Buttonhole
Pass the thread underneath the presser foot
Order of one cycle
Pin
Reinforcement stitch
Set the stitch width to match the diameter of the gimp
Into the buttonhole seam buttonholes only
Tie it there
Lower the presser foot and start sewing
BAR Tacking
Use for reinforcing the openings of pockets, etc
Bar tack
Thick fabrics
Finish
Appliques
Sewing the applique around corners
Applique Zig zag Fagoting
Scallop
Scallop
Patchwork stitch
Patchwork Stitch
Zipper Insertion Centered and Side Application
Centered application
Preparations
Side application
Embroidering
Use to add a decorative touch to garments
Smocking
Button Sewing
Option
Attach button sew-on foot sold separately Select
Attaching buttons with four holes
Embroidery unit and memory cards optional
Carriage Connector
Embroidering
Before YOU Begin
Attaching the embroidery unit
Removing embroidery unit
Choosing Embroidery Patterns Part
One-point patterns
Operation Machine
Borders
Key to go back to the previous screen
Sew screen will appear
Example For practice, try the word BUS
Lettering
Numerals and punctuation
Lower and upper case letters
Pushing Key will take you to the Punctuation Number screens
Selecting patterns from a memory card
Press the key to go back to the previous screen
If you accidentally choose the wrong design
If you choose the wrong character
To change size
To make words
Thread and Needle
Embroidering
Embroidering attractive finishes
Stabilizers
Setting the fabric into the embroidery frame
Outer frame
Removing the embroidery frame
Align the two pins on the embroidery unit frame holder with
Embroidery arm frame holder Stitching Pins
Fitting the embroidery frame to the embroidery unit
Embroidering
Embroidering order for pattern parts
Heavyweight fabrics denim, fleece, felt
Fabric
Fabric and thread breakage
Checking thread colors
Checking Thread Colors and Time Required
Checking time required to complete a pattern
Choosing Embroidery Placement
Press key to go to the edit screen
Small hoop Optional Regular hoop
Checking the embroidering area
Moving the embroidery location
Embroidering from a specific starting point
Rection
Rotating and Mirroring Patterns
Rotating patterns
Mirroring patterns
Changing Size and Stitch Density of Characters and Borders
Press key, then press key
Multi-colored lettering
If the upper thread breaks
If the Thread Breaks During Embroidery
When starting over from the beginning
Continuing after the power shuts off
Example Continuing from a position within the second color
Combining characters to form words
Embroidery Applications
Multi-color Single-color Sewing
Outline Embroidery
Embroidering appliques using a frame pattern
You may attach by basting
Embroidering onto small pieces of fabric or onto corners
Example a
Iron on to attach to fabric If you dont wish to use an iron
Memory
Saving groups of characters
For example, to save the word one on page one
For example, to restore the word Girl
Press key Pattern has been restored
Restoring saved designs
Cleaning the sewing machine surface
Maintenance
Cleaning
Cleaning the screen
Race with a brush or a vacuum cleaner
Cleaning brush
Remove accumulated lint and thread from the inner shuttle
Set the end cap Tighten the screw End cap Screw
Changing the Light Bulb
Troubleshooting
Before Taking Your Machine in for Service
Basic sewing machine maintenance
27~29
Finding the Source of the Problem
LCD touch screen is hard to read
Needle breaks
Machine does not start
Embroidery unit does not work
Error Messages
104
Alarms
Instruction messages
This message is dis- played during bobbin winding
Machine Programmed Patterns
Sewing Chart
Sizes can be enlarged or reduced
Utility stitches Character embroidering chart
Frame pattern embroidering chart
Patterns Programmed in Machine
ONE Point Mark Embroidery Pattern
Patterns Memory Card