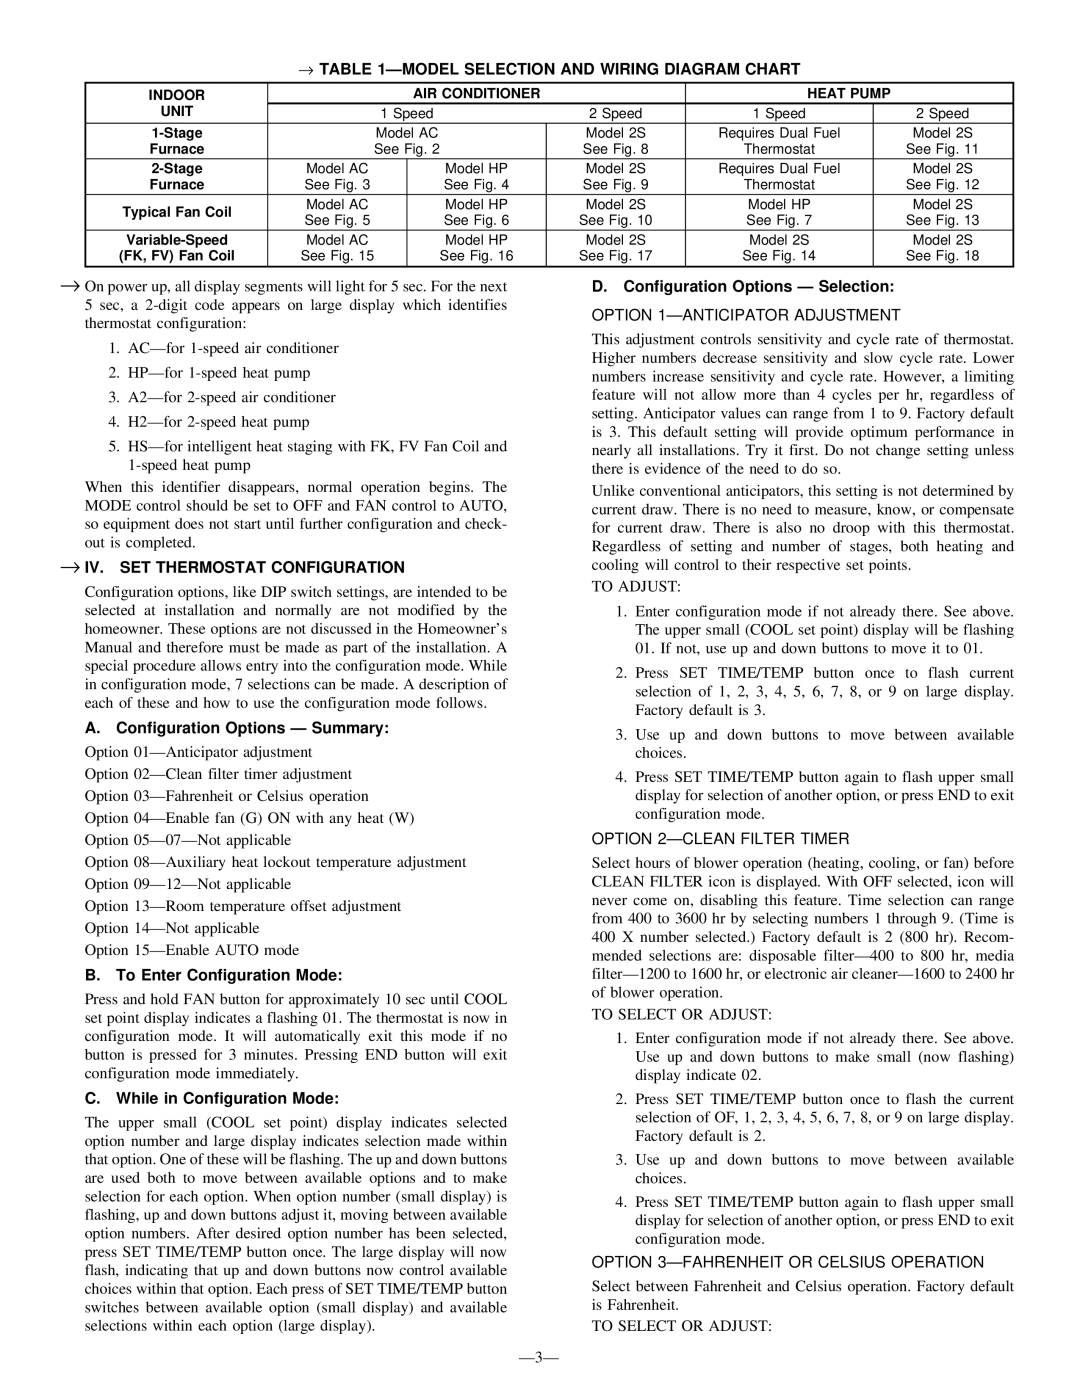
→TABLE 1ÐMODEL SELECTION AND WIRING DIAGRAM CHART
INDOOR |
|
| AIR CONDITIONER |
| HEAT PUMP |
| |
UNIT |
| 1 Speed | 2 Speed | 1 Speed |
| 2 Speed | |
|
|
|
|
|
|
|
|
| Model AC | Model 2S | Requires Dual Fuel |
| Model 2S | ||
Furnace |
| See Fig. 2 | See Fig. 8 | Thermostat |
| See Fig. 11 | |
Model AC |
| Model HP | Model 2S | Requires Dual Fuel |
| Model 2S | |
Furnace | See Fig. 3 |
| See Fig. 4 | See Fig. 9 | Thermostat |
| See Fig. 12 |
Typical Fan Coil | Model AC |
| Model HP | Model 2S | Model HP |
| Model 2S |
See Fig. 5 |
| See Fig. 6 | See Fig. 10 | See Fig. 7 |
| See Fig. 13 | |
|
|
| |||||
Model AC |
| Model HP | Model 2S | Model 2S |
| Model 2S | |
(FK, FV) Fan Coil | See Fig. 15 |
| See Fig. 16 | See Fig. 17 | See Fig. 14 |
| See Fig. 18 |
→On power up, all display segments will light for 5 sec. For the next 5 sec, a
1.ACÐfor
2.HPÐfor
3.A2Ðfor
4.H2Ðfor
5.HSÐfor intelligent heat staging with FK, FV Fan Coil and
When this identifier disappears, normal operation begins. The MODE control should be set to OFF and FAN control to AUTO, so equipment does not start until further configuration and check- out is completed.
→IV. SET THERMOSTAT CONFIGURATION
Configuration options, like DIP switch settings, are intended to be selected at installation and normally are not modified by the homeowner. These options are not discussed in the Homeowner's Manual and therefore must be made as part of the installation. A special procedure allows entry into the configuration mode. While in configuration mode, 7 selections can be made. A description of each of these and how to use the configuration mode follows.
A.Configuration Options Ð Summary:
Option 01ÐAnticipator adjustment
Option 02ÐClean filter timer adjustment
Option 03ÐFahrenheit or Celsius operation
Option 04ÐEnable fan (G) ON with any heat (W)
Option 05Ð07ÐNot applicable
Option 08ÐAuxiliary heat lockout temperature adjustment Option 09Ð12ÐNot applicable
Option 13ÐRoom temperature offset adjustment
Option 14ÐNot applicable
Option 15ÐEnable AUTO mode
B.To Enter Configuration Mode:
Press and hold FAN button for approximately 10 sec until COOL set point display indicates a flashing 01. The thermostat is now in configuration mode. It will automatically exit this mode if no button is pressed for 3 minutes. Pressing END button will exit configuration mode immediately.
C.While in Configuration Mode:
The upper small (COOL set point) display indicates selected option number and large display indicates selection made within that option. One of these will be flashing. The up and down buttons are used both to move between available options and to make selection for each option. When option number (small display) is flashing, up and down buttons adjust it, moving between available option numbers. After desired option number has been selected, press SET TIME/TEMP button once. The large display will now flash, indicating that up and down buttons now control available choices within that option. Each press of SET TIME/TEMP button switches between available option (small display) and available selections within each option (large display).
Ð3Ð
D. Configuration Options Ð Selection:
OPTION 1ÐANTICIPATOR ADJUSTMENT
This adjustment controls sensitivity and cycle rate of thermostat. Higher numbers decrease sensitivity and slow cycle rate. Lower numbers increase sensitivity and cycle rate. However, a limiting feature will not allow more than 4 cycles per hr, regardless of setting. Anticipator values can range from 1 to 9. Factory default is 3. This default setting will provide optimum performance in nearly all installations. Try it first. Do not change setting unless there is evidence of the need to do so.
Unlike conventional anticipators, this setting is not determined by current draw. There is no need to measure, know, or compensate for current draw. There is also no droop with this thermostat. Regardless of setting and number of stages, both heating and cooling will control to their respective set points.
TO ADJUST:
1.Enter configuration mode if not already there. See above. The upper small (COOL set point) display will be flashing 01. If not, use up and down buttons to move it to 01.
2.Press SET TIME/TEMP button once to flash current selection of 1, 2, 3, 4, 5, 6, 7, 8, or 9 on large display. Factory default is 3.
3.Use up and down buttons to move between available choices.
4.Press SET TIME/TEMP button again to flash upper small display for selection of another option, or press END to exit configuration mode.
OPTION 2ÐCLEAN FILTER TIMER
Select hours of blower operation (heating, cooling, or fan) before CLEAN FILTER icon is displayed. With OFF selected, icon will never come on, disabling this feature. Time selection can range from 400 to 3600 hr by selecting numbers 1 through 9. (Time is 400 X number selected.) Factory default is 2 (800 hr). Recom- mended selections are: disposable filterÐ400 to 800 hr, media filterÐ1200 to 1600 hr, or electronic air cleanerÐ1600 to 2400 hr of blower operation.
TO SELECT OR ADJUST:
1.Enter configuration mode if not already there. See above. Use up and down buttons to make small (now flashing) display indicate 02.
2.Press SET TIME/TEMP button once to flash the current selection of OF, 1, 2, 3, 4, 5, 6, 7, 8, or 9 on large display. Factory default is 2.
3.Use up and down buttons to move between available choices.
4.Press SET TIME/TEMP button again to flash upper small display for selection of another option, or press END to exit configuration mode.
OPTION 3ÐFAHRENHEIT OR CELSIUS OPERATION
Select between Fahrenheit and Celsius operation. Factory default is Fahrenheit.
TO SELECT OR ADJUST: