Bulldog Security RS1100E manual 
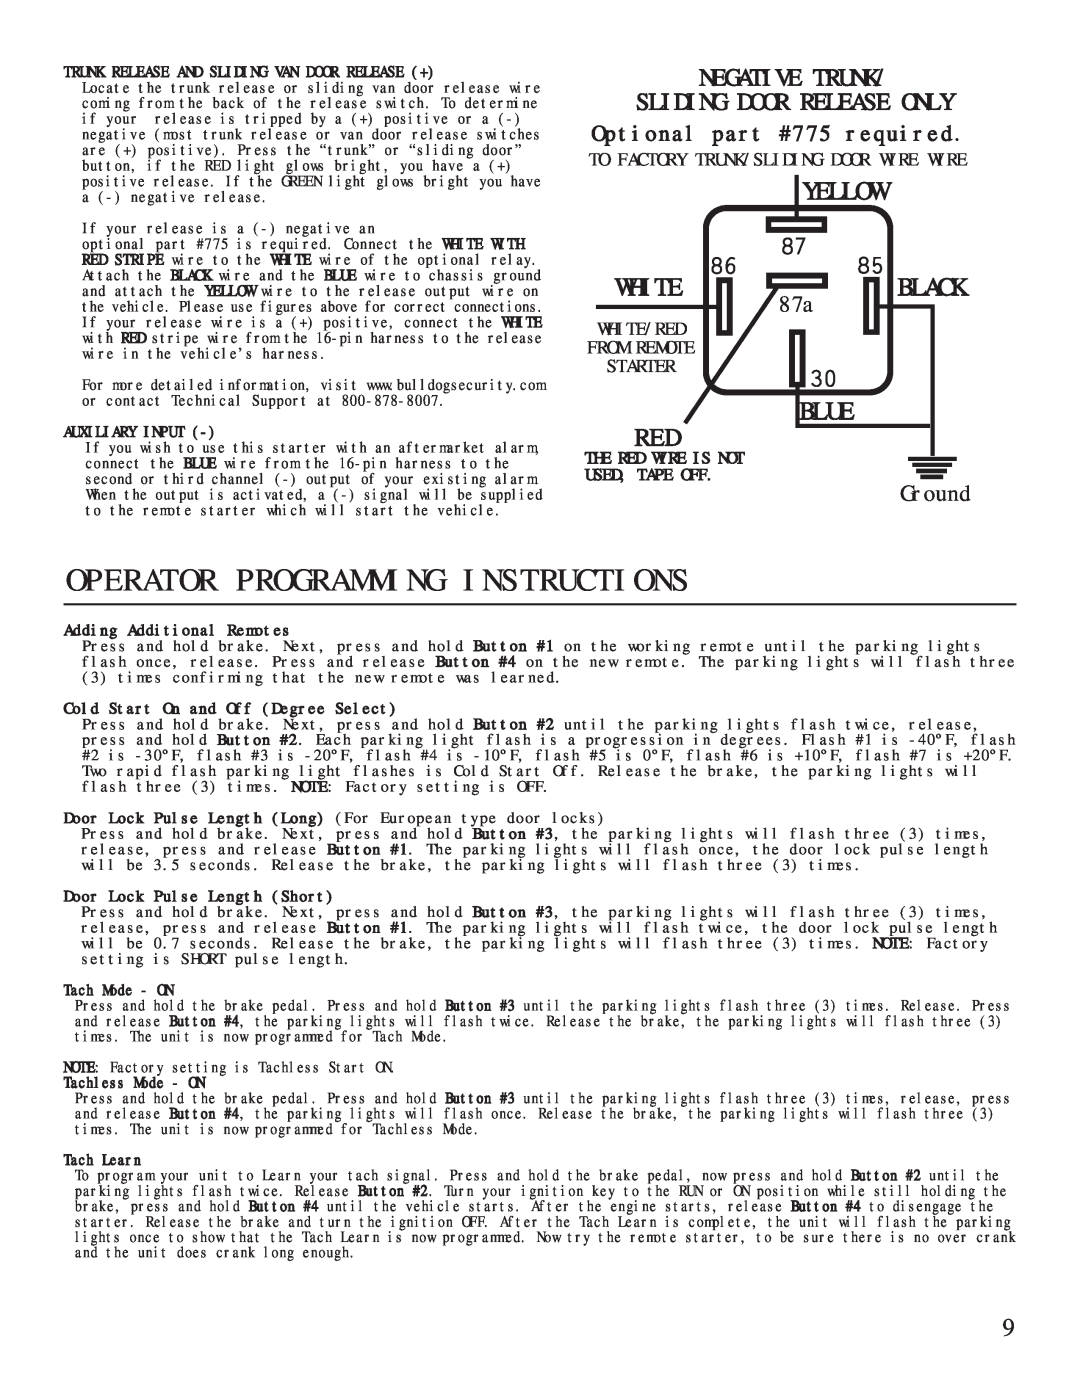
Operator Programming Instructions, Ground, Yellow, White, Blue Red

Models: RS1100E RS114

1 11
Download 11 pages 32.42 Kb
Page 10
Image 10
TRUNK RELEASE AND SLIDING VAN DOOR RELEASE (+)

Locate the trunk release or sliding van door release wire coming from the back of the release switch. To determine if your release is tripped by a (+) positive or a (-) negative (most trunk release or van door release switches are (+) positive). Press the “trunk” or “sliding door” button, if the RED light glows bright, you have a (+) positive release. If the GREEN light glows bright you have a (-) negative release.

If your release is a (-) negative an

optional part #775 is required. Connect the WHITE WITH RED STRIPE wire to the WHITE wire of the optional relay. Attach the BLACK wire and the BLUE wire to chassis ground and attach the YELLOW wire to the release output wire on the vehicle. Please use figures above for correct connections. If your release wire is a (+) positive, connect the WHITE with RED stripe wire from the 16-pin harness to the release wire in the vehicle’s harness.

For more detailed information, visit www.bulldogsecurity.com or contact Technical Support at 800-878-8007.

AUXILIARY INPUT (-)

If you wish to use this starter with an aftermarket alarm, connect the BLUE wire from the 16-pin harness to the second or third channel (-) output of your existing alarm. When the output is activated, a (-) signal will be supplied to the remote starter which will start the vehicle.

NEGATIVE TRUNK/

SLIDING DOOR RELEASE ONLY

Optional part #775 required.

TO FACTORY TRUNK/SLIDING DOOR WIRE WIRE
YELLOW
WHITE

87a

BLACK
WHITE/RED

FROM REMOTE

STARTER

BLUE

RED

THE RED WIRE IS NOT

USED, TAPE OFF.

Ground

OPERATOR PROGRAMMING INSTRUCTIONS

Adding Additional Remotes

Press and hold brake. Next, press and hold Button #1 on the working remote until the parking lights flash once, release. Press and release Button #4 on the new remote. The parking lights will flash three

(3) times confirming that the new remote was learned.

Cold Start On and Off (Degree Select)

Press and hold brake. Next, press and hold Button #2 until the parking lights flash twice, release, press and hold Button #2. Each parking light flash is a progression in degrees. Flash #1 is -40ºF, flash #2 is -30ºF, flash #3 is -20ºF, flash #4 is -10ºF, flash #5 is 0ºF, flash #6 is +10ºF, flash #7 is +20ºF. Two rapid flash parking light flashes is Cold Start Off. Release the brake, the parking lights will flash three (3) times. NOTE: Factory setting is OFF.

Door Lock Pulse Length (Long) (For European type door locks)

Press and hold brake. Next, press and hold Button #3, the parking lights will flash three (3) times, release, press and release Button #1. The parking lights will flash once, the door lock pulse length will be 3.5 seconds. Release the brake, the parking lights will flash three (3) times.

Door Lock Pulse Length (Short)

Press and hold brake. Next, press and hold Button #3, the parking lights will flash three (3) times, release, press and release Button #1. The parking lights will flash twice, the door lock pulse length will be 0.7 seconds. Release the brake, the parking lights will flash three (3) times. NOTE: Factory setting is SHORT pulse length.

Tach Mode - ON

Press and hold the brake pedal. Press and hold Button #3 until the parking lights flash three (3) times. Release. Press and release Button #4, the parking lights will flash twice. Release the brake, the parking lights will flash three (3) times. The unit is now programmed for Tach Mode.

NOTE: Factory setting is Tachless Start ON.

Tachless Mode - ON

Press and hold the brake pedal. Press and hold Button #3 until the parking lights flash three (3) times, release, press and release Button #4, the parking lights will flash once. Release the brake, the parking lights will flash three (3) times. The unit is now programmed for Tachless Mode.

Tach Learn

To program your unit to Learn your tach signal. Press and hold the brake pedal, now press and hold Button #2 until the parking lights flash twice. Release Button #2. Turn your ignition key to the RUN or ON position while still holding the brake, press and hold Button #4 until the vehicle starts. After the engine starts, release Button #4 to disengage the starter. Release the brake and turn the ignition OFF. After the Tach Learn is complete, the unit will flash the parking lights once to show that the Tach Learn is now programmed. Now try the remote starter, to be sure there is no over crank and the unit does crank long enough.

9

Page 10
Image 10
Bulldog Security RS1100E manual Operator Programming Instructions, Negative Trunk Sliding Door Release Only, Ground, Yellow