SERVICE (cont.)

FROTHER AND WHIPPER MOTOR (cont.)

4.Remove dispense tip (3) and twist the whipper chamber (4) clockwise and pull it off the whipper chamber receptacle (8).

5.Pull the frother (6) off the motor shaft. Notice the flat side on the shaft and the matching flat inside the frother. It is important that these two flats are lined up when reassembling.

6.Slip the o-ring (5) off the whipper chamber receptical (8).

7.Remove the two #6-32 screws (7) securing whip- per chamber receptical (8) to the front panel.

8.Slide the receptical w/seal off of the motor shaft.

9.Slide teflon washer (9) and o-ring (10) off of the motor shaft.

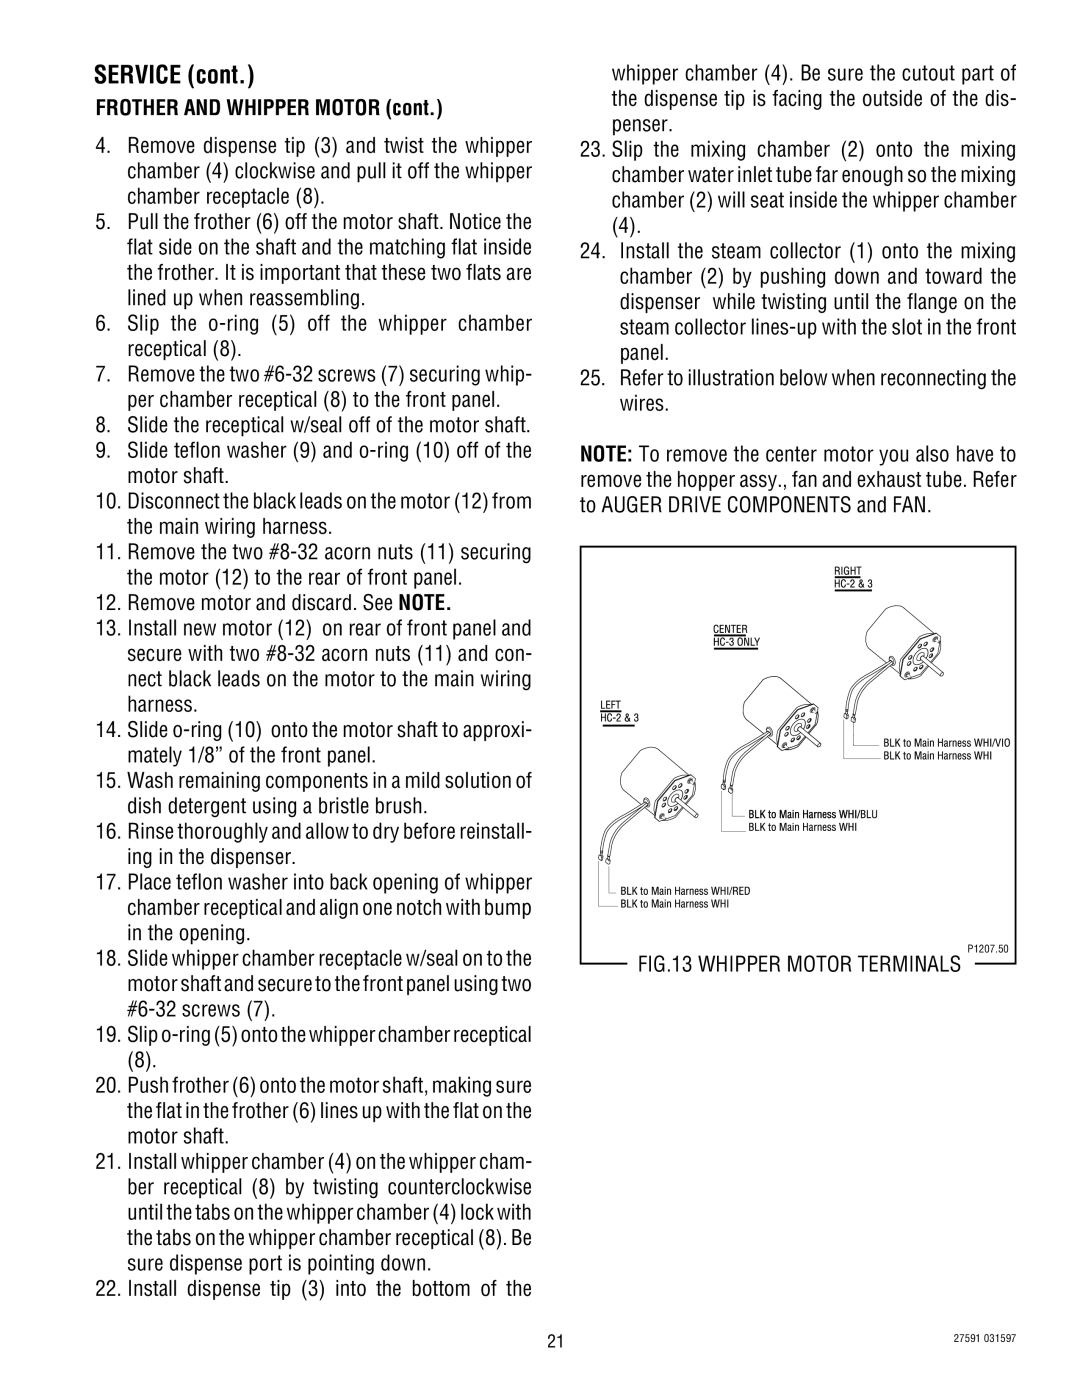
10.Disconnect the black leads on the motor (12) from the main wiring harness.

11.Remove the two #8-32 acorn nuts (11) securing the motor (12) to the rear of front panel.

12.Remove motor and discard. See NOTE.

13.Install new motor (12) on rear of front panel and secure with two #8-32 acorn nuts (11) and con- nect black leads on the motor to the main wiring harness.

14.Slide o-ring (10) onto the motor shaft to approxi- mately 1/8” of the front panel.

15.Wash remaining components in a mild solution of dish detergent using a bristle brush.

16.Rinse thoroughly and allow to dry before reinstall- ing in the dispenser.

17.Place teflon washer into back opening of whipper chamber receptical and align one notch with bump in the opening.

18.Slide whipper chamber receptacle w/seal on to the motor shaft and secure to the front panel using two #6-32 screws (7).

19.Slip o-ring (5) onto the whipper chamber receptical

(8).

20.Push frother (6) onto the motor shaft, making sure the flat in the frother (6) lines up with the flat on the motor shaft.

21.Install whipper chamber (4) on the whipper cham- ber receptical (8) by twisting counterclockwise until the tabs on the whipper chamber (4) lock with the tabs on the whipper chamber receptical (8). Be sure dispense port is pointing down.

22.Install dispense tip (3) into the bottom of the

whipper chamber (4). Be sure the cutout part of the dispense tip is facing the outside of the dis- penser.

23.Slip the mixing chamber (2) onto the mixing chamber water inlet tube far enough so the mixing chamber (2) will seat inside the whipper chamber

(4).

24.Install the steam collector (1) onto the mixing chamber (2) by pushing down and toward the dispenser while twisting until the flange on the steam collector lines-up with the slot in the front panel.

25.Refer to illustration below when reconnecting the wires.

NOTE: To remove the center motor you also have to remove the hopper assy., fan and exhaust tube. Refer to AUGER DRIVE COMPONENTS and FAN.

P1207.50

FIG.13 WHIPPER MOTOR TERMINALS

21

27591 031597


Page 21
Image 21
Bunn HC-2 HC-3 service manual Frother and Whipper Motor, Whipper Motor Terminals

HC-2 HC-3 specifications

The Bunn HC-2 and HC-3 are high-performance commercial coffee brewers designed for cafes, restaurants, and institutions that prioritize quality, efficiency, and reliability. Renowned for their exceptional brewing capabilities, both models come with a range of features that cater to the demanding needs of coffee enthusiasts and professionals alike.

One of the core characteristics of the Bunn HC-2 and HC-3 is their brewing technology. These machines utilize a patented steeping mechanism that allows for optimal water temperature and contact time, extracting the finest flavors from the coffee grounds. The precise temperature control, maintained at a consistent level, ensures that every cup of coffee is brewed to perfection. Furthermore, the machines have an impressive brew capacity, with the HC-2 capable of brewing up to 3.8 gallons per hour, while the HC-3 can brew up to 5.3 gallons per hour, making them ideal for high-traffic environments.

Another significant feature of the Bunn HC-2 and HC-3 is their ease of use. The user-friendly interface allows baristas to quickly set brew cycles and adjust brewing parameters to suit different coffee types. Both models are designed with a sleek, ergonomic aesthetic that fits seamlessly into any workspace, while also being built with durable materials to withstand the rigors of daily use.

In terms of efficiency, these brewers come equipped with energy-saving technology. The automatic warmers on both machines adjust the heat output based on the coffee’s temperature, reducing energy consumption without compromising quality. Additionally, the compact design of these units means they occupy minimal counter space, making them suitable for both small and large establishments.

Maintenance is straightforward with the Bunn HC-2 and HC-3, as they feature a self-diagnostic system that alerts users to any potential issues. This feature minimizes downtime and ensures the longevity of the equipment. Furthermore, the brewing components can be easily accessed for cleaning and maintenance.

In summary, the Bunn HC-2 and HC-3 stand out in the commercial coffee brewing market with their advanced brewing technology, high capacity, user-friendly design, energy efficiency, and ease of maintenance. These features make them a preferred choice for anyone looking to deliver high-quality coffee consistently, ensuring that businesses can satisfy even the most discerning coffee drinkers. With Bunn’s commitment to innovation and quality, these brewers continue to set the standard in the coffee equipment industry.