INITIAL SET-UP

1.Locate the drip tray assembly beneath the dispenser nested in the packing material.

2.Remove the drip tray and the drip tray cover and set them aside.

3.Remove the water strainer assembly from the drip tray and set it aside.

4.Remove the four legs from the drip tray, apply non-skid pads to the bottom of the legs and securely install the legs in the dispenser base.

ELECTRICAL REQUIREMENTS

CAUTION - The dispenser must be disconnected from the power source until specified in Initial Set-Up.

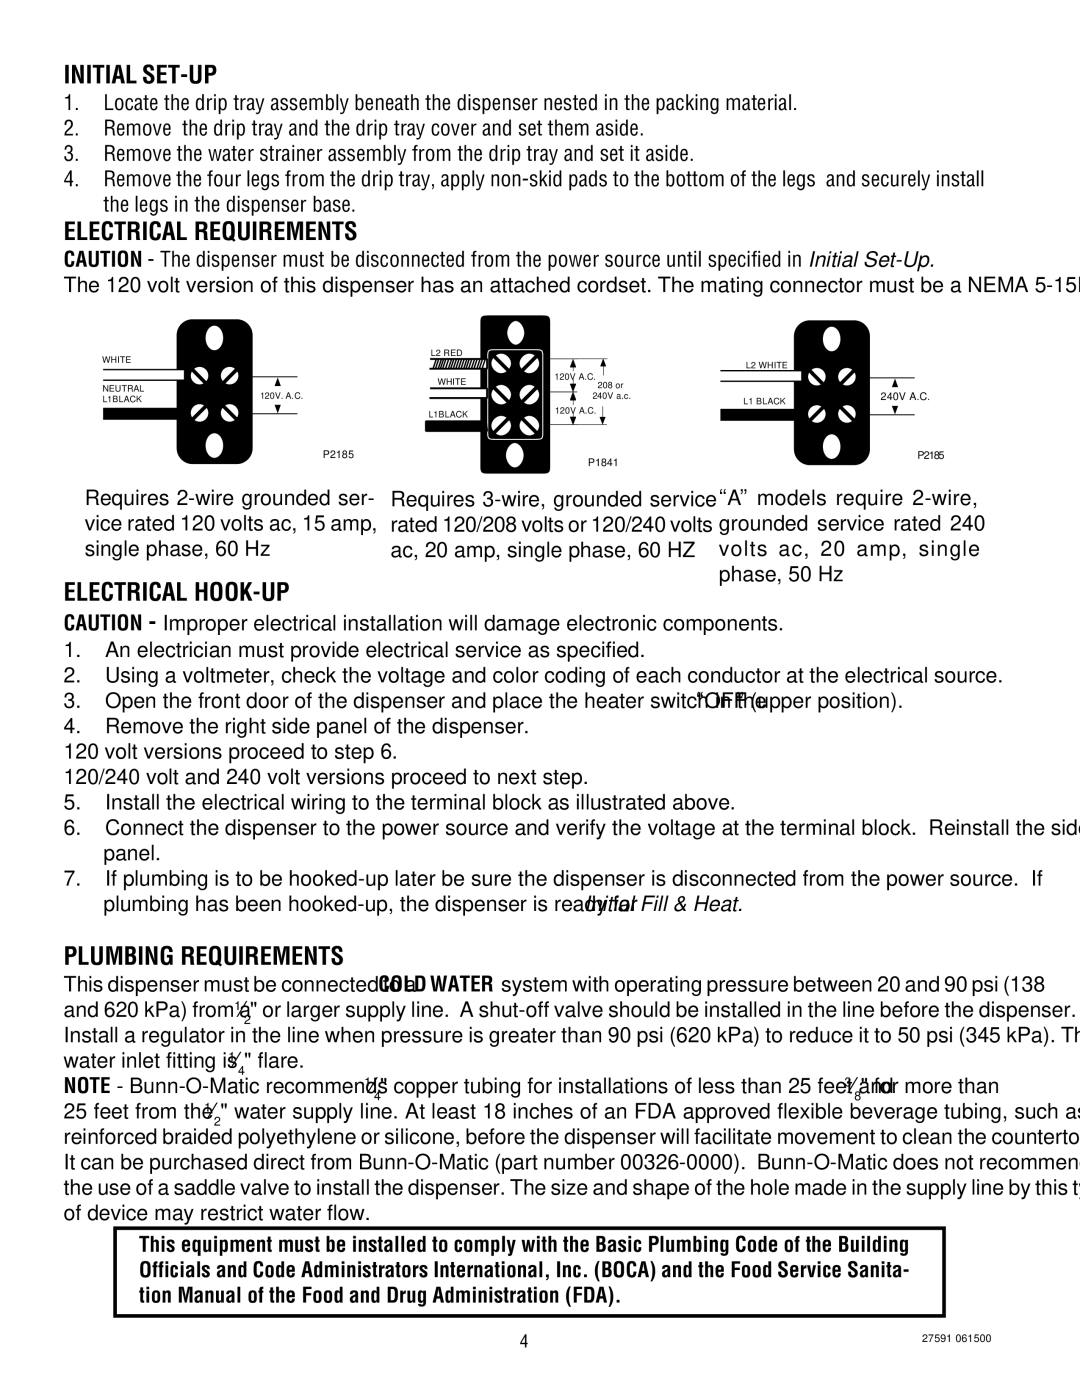
The 120 volt version of this dispenser has an attached cordset. The mating connector must be a NEMA 5-15R.

L2 RED

WHITE


NEUTRAL

WHITE

120V. A.C.

L1BLACK


L1BLACK


L2 WHITE


120V A.C.


208 or


240V A.C.

240V a.c.

L1 BLACK

120V A.C.


P2185

P1841

P2185


Requires 2-wire grounded ser-

Requires 3-wire, grounded service

“A” models require 2-wire,

vice rated 120 volts ac, 15 amp,

rated 120/208 volts or 120/240 volts

grounded service rated 240

single phase, 60 Hz

ac, 20 amp, single phase, 60 HZ

volts ac, 20 amp, single


phase, 50 Hz

ELECTRICAL HOOK-UP

CAUTION - Improper electrical installation will damage electronic components.

1.An electrician must provide electrical service as specified.

2.Using a voltmeter, check the voltage and color coding of each conductor at the electrical source.

3.Open the front door of the dispenser and place the heater switch in the “OFF” (upper position).

4.Remove the right side panel of the dispenser.

120 volt versions proceed to step 6.

120/240 volt and 240 volt versions proceed to next step.

5.Install the electrical wiring to the terminal block as illustrated above.

6.Connect the dispenser to the power source and verify the voltage at the terminal block. Reinstall the side panel.

7.If plumbing is to be hooked-up later be sure the dispenser is disconnected from the power source. If plumbing has been hooked-up, the dispenser is ready for Initial Fill & Heat.

PLUMBING REQUIREMENTS

This dispenser must be connected to a COLD WATER system with operating pressure between 20 and 90 psi (138 and 620 kPa) from a 12" or larger supply line. A shut-off valve should be installed in the line before the dispenser. Install a regulator in the line when pressure is greater than 90 psi (620 kPa) to reduce it to 50 psi (345 kPa). The water inlet fitting is 14" flare.

NOTE - Bunn-O-Matic recommends 14" copper tubing for installations of less than 25 feet and 38" for more than 25 feet from the 12" water supply line. At least 18 inches of an FDA approved flexible beverage tubing, such as reinforced braided polyethylene or silicone, before the dispenser will facilitate movement to clean the countertop. It can be purchased direct from Bunn-O-Matic (part number 00326-0000). Bunn-O-Matic does not recommend the use of a saddle valve to install the dispenser. The size and shape of the hole made in the supply line by this type of device may restrict water flow.

This equipment must be installed to comply with the Basic Plumbing Code of the Building Officials and Code Administrators International, Inc. (BOCA) and the Food Service Sanita- tion Manual of the Food and Drug Administration (FDA).

4

27591 061500


Page 4
Image 4
Bunn HC-2 HC-3 service manual Initial SET-UP, Electrical Requirements, Electrical HOOK-UP, Plumbing Requirements

HC-2 HC-3 specifications

The Bunn HC-2 and HC-3 are high-performance commercial coffee brewers designed for cafes, restaurants, and institutions that prioritize quality, efficiency, and reliability. Renowned for their exceptional brewing capabilities, both models come with a range of features that cater to the demanding needs of coffee enthusiasts and professionals alike.

One of the core characteristics of the Bunn HC-2 and HC-3 is their brewing technology. These machines utilize a patented steeping mechanism that allows for optimal water temperature and contact time, extracting the finest flavors from the coffee grounds. The precise temperature control, maintained at a consistent level, ensures that every cup of coffee is brewed to perfection. Furthermore, the machines have an impressive brew capacity, with the HC-2 capable of brewing up to 3.8 gallons per hour, while the HC-3 can brew up to 5.3 gallons per hour, making them ideal for high-traffic environments.

Another significant feature of the Bunn HC-2 and HC-3 is their ease of use. The user-friendly interface allows baristas to quickly set brew cycles and adjust brewing parameters to suit different coffee types. Both models are designed with a sleek, ergonomic aesthetic that fits seamlessly into any workspace, while also being built with durable materials to withstand the rigors of daily use.

In terms of efficiency, these brewers come equipped with energy-saving technology. The automatic warmers on both machines adjust the heat output based on the coffee’s temperature, reducing energy consumption without compromising quality. Additionally, the compact design of these units means they occupy minimal counter space, making them suitable for both small and large establishments.

Maintenance is straightforward with the Bunn HC-2 and HC-3, as they feature a self-diagnostic system that alerts users to any potential issues. This feature minimizes downtime and ensures the longevity of the equipment. Furthermore, the brewing components can be easily accessed for cleaning and maintenance.

In summary, the Bunn HC-2 and HC-3 stand out in the commercial coffee brewing market with their advanced brewing technology, high capacity, user-friendly design, energy efficiency, and ease of maintenance. These features make them a preferred choice for anyone looking to deliver high-quality coffee consistently, ensuring that businesses can satisfy even the most discerning coffee drinkers. With Bunn’s commitment to innovation and quality, these brewers continue to set the standard in the coffee equipment industry.