Standard with Automatic SCAN: This setting allows most targets to be distanced up to 1300 yards. Used for moderately reflective targets that are typical of most distancing situations. The minimum distance in the standard mode is 10 yards. To use the Automatic SCAN feature, simply hold down on the POWER button for approximately 3 seconds and move the rangefinder from object to object while leaving the POWER button depressed. Automatic SCAN will allow the range to be continuously updated as multiple objects are targeted.
BullsEye™ (VDT™ Indicator - ![]() ): This advanced mode allows easy acquisition of small targets and game without inadvertently getting distances to background targets that have stronger signal strength. When more than one object has been acquired, distance of the closer object will be displayed and a crosshair will surround the BullsEye™ indicator informing the user that distance to the closer object is being displayed in the VDT™. Once in this mode, press the POWER button to turn the unit on. Next, align the aiming circle onto the object (i.e. deer) that you want distance to. Next, press and hold the POWER button and move the laser slowly over the deer until crosshairs surround the BullsEye indicator. If the laser beam recognized more than one object (i.e. deer and background trees), distance of the closer object (i.e. deer) will be displayed and crosshairs will surround the BullsEye indicator informing the user that distance to the closer object is being displayed in the VDT™ (Figure 1). There may be times when only the laser beam only sees one object in its path. In this case, 218 the distance will be displayed, but because more than one object was not acquired, crosshairs will not surround the BullsEye indicator.
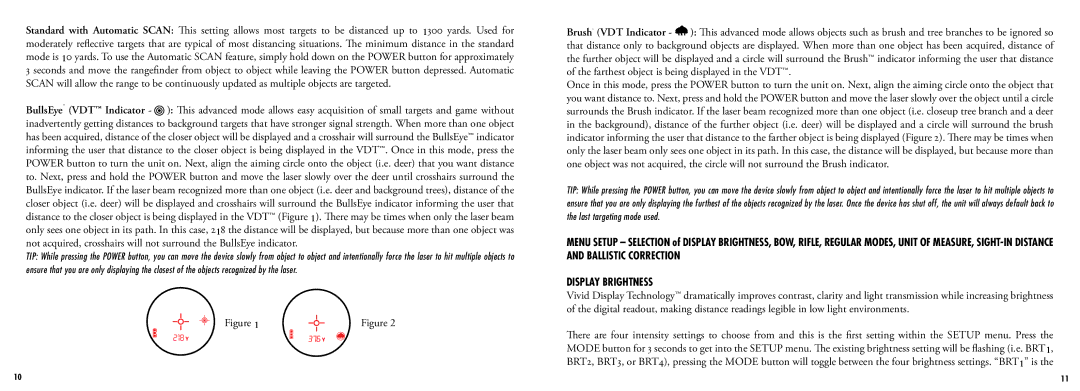
): This advanced mode allows easy acquisition of small targets and game without inadvertently getting distances to background targets that have stronger signal strength. When more than one object has been acquired, distance of the closer object will be displayed and a crosshair will surround the BullsEye™ indicator informing the user that distance to the closer object is being displayed in the VDT™. Once in this mode, press the POWER button to turn the unit on. Next, align the aiming circle onto the object (i.e. deer) that you want distance to. Next, press and hold the POWER button and move the laser slowly over the deer until crosshairs surround the BullsEye indicator. If the laser beam recognized more than one object (i.e. deer and background trees), distance of the closer object (i.e. deer) will be displayed and crosshairs will surround the BullsEye indicator informing the user that distance to the closer object is being displayed in the VDT™ (Figure 1). There may be times when only the laser beam only sees one object in its path. In this case, 218 the distance will be displayed, but because more than one object was not acquired, crosshairs will not surround the BullsEye indicator.
TIP: While pressing the POWER button, you can move the device slowly from object to object and intentionally force the laser to hit multiple objects to ensure that you are only displaying the closest of the objects recognized by the laser.
Figure 1 | Figure 2 |
218![]()
Brush™ (VDT Indicator - ![]()
![]() ): This advanced mode allows objects such as brush and tree branches to be ignored so that distance only to background objects are displayed. When more than one object has been acquired, distance of the further object will be displayed and a circle will surround the Brush™ indicator informing the user that distance of the farthest object is being displayed in the VDT™.
): This advanced mode allows objects such as brush and tree branches to be ignored so that distance only to background objects are displayed. When more than one object has been acquired, distance of the further object will be displayed and a circle will surround the Brush™ indicator informing the user that distance of the farthest object is being displayed in the VDT™.
Once in this mode, press the POWER button to turn the unit on. Next, align the aiming circle onto the object that you want distance to. Next, press and hold the POWER button and move the laser slowly over the object until a circle surrounds the Brush indicator. If the laser beam recognized more than one object (i.e. closeup tree branch and a deer in the background), distance of the further object (i.e. deer) will be displayed and a circle will surround the brush indicator informing the user that distance to the farther object is being displayed (Figure 2). There may be times when only the laser beam only sees one object in its path. In this case, the distance will be displayed, but because more than one object was not acquired, the circle will not surround the Brush indicator.
TIP: While pressing the POWER button, you can move the device slowly from object to object and intentionally force the laser to hit multiple objects to ensure that you are only displaying the furthest of the objects recognized by the laser. Once the device has shut off, the unit will always default back to the last targeting mode used.
MENU SETUP – SELECTION of DISPLAY BRIGHTNESS, BOW, RIFLE, REGULAR MODES, UNIT OF MEASURE,
DISPLAY BRIGHTNESS
Vivid Display Technology™ dramatically improves contrast, clarity and light transmission while increasing brightness of the digital readout, making distance readings legible in low light environments.
There are four intensity settings to choose from and this is the first setting within the SETUP menu. Press the MODE button for 3 seconds to get into the SETUP menu. The existing brightness setting will be flashing (i.e. BRT1, BRT2, BRT3, or BRT4), pressing the MODE button will toggle between the four brightness settings. “BRT1” is the
10 | 11 |