Spray Guns for Airless Paint Sprayers
General Safety Information (Cont.)
NOTE: If gun sprays while in the locked position follow instructions in Maintenance section for trigger lock.
12.Verify that all connections are secure before operating. Do not use pliers to tighten or loosen high pressure connections.
13.Know how to stop your unit and bleed pressure quickly. Be thor- oughly familiar with the controls.
To reduce the risk of injury:
1.Do not spray acids, corrosive mate- rials, toxic chemicals, fertilizers, or pesticides. Using these materials could result in death or serious injury.
2.Always wear appropriate gloves, eye protection, and a respirator or mask when painting.
3.Always work in a clean environ- ment. Do not aim the spray gun at any dust or debris.
4.Do not operate or spray near chil- dren. Keep children, pets, and visi- tors away from equipment and work area at all times.
5.Do not over reach or stand on an unstable support. Keep effective footing and balance at all times.
6.Stay alert and watch what you are doing.
7.Do not operate the equipment when fatigued or under the influ- ence of drugs or alcohol.
FAILURE TO FOLLOW THESE INSTRUCTIONS CAN RESULT IN SERIOUS INJURY INCLUDING DEATH.
Preparation
Airless painting systems, unlike most other power tools, require additional care to ensure proper working order.
CONSULT YOUR AIRLESS PAINT SPRAYER OWNER'S MANUAL FOR OPERATING INSTRUCTIONS.
Spraying Instructions
Professional looking results can be obtained by following the spray tips below.
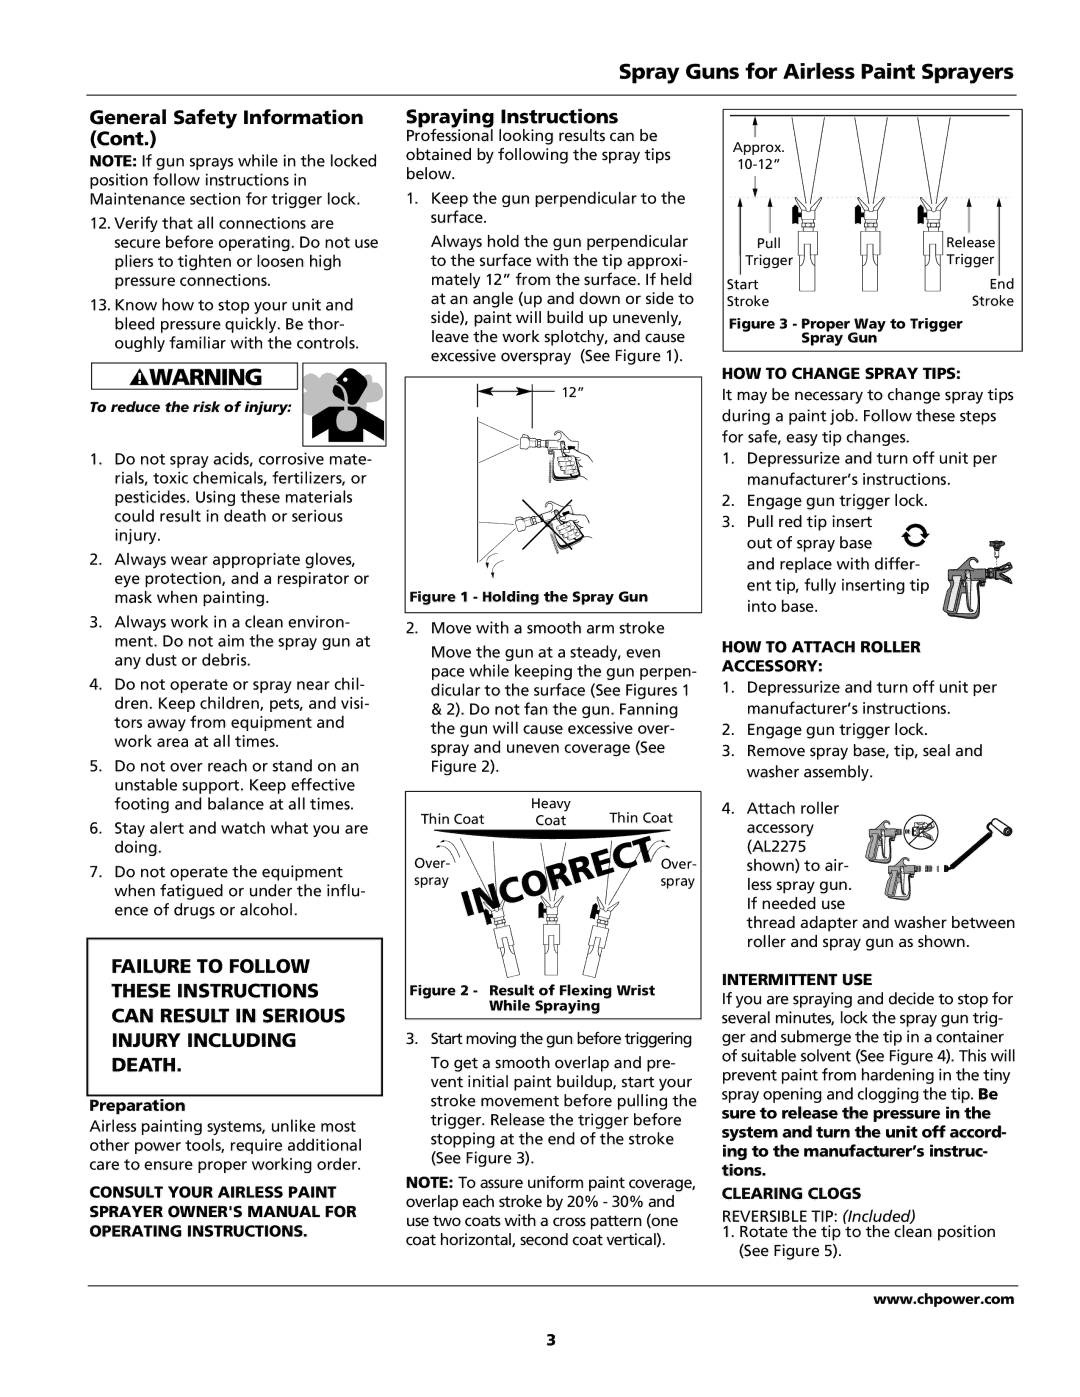
1.Keep the gun perpendicular to the surface.
Always hold the gun perpendicular to the surface with the tip approxi- mately 12” from the surface. If held at an angle (up and down or side to side), paint will build up unevenly, leave the work splotchy, and cause excessive overspray (See Figure 1).
12”
Figure 1 - Holding the Spray Gun
2.Move with a smooth arm stroke
Move the gun at a steady, even pace while keeping the gun perpen- dicular to the surface (See Figures 1 & 2). Do not fan the gun. Fanning the gun will cause excessive over- spray and uneven coverage (See Figure 2).
Thin Coat | Heavy | Thin Coat |
Coat | ||
Over- |
| Over- |
spray |
| spray |
Figure 2 - Result of Flexing Wrist | ||
| While Spraying |
|
3.Start moving the gun before triggering
To get a smooth overlap and pre- vent initial paint buildup, start your stroke movement before pulling the trigger. Release the trigger before stopping at the end of the stroke (See Figure 3).
NOTE: To assure uniform paint coverage, overlap each stroke by 20% - 30% and use two coats with a cross pattern (one coat horizontal, second coat vertical).
Approx.
Pull | Release |
Trigger | Trigger |
Start | End |
Stroke | Stroke |
Figure 3 - Proper Way to Trigger Spray Gun
HOW TO CHANGE SPRAY TIPS:
It may be necessary to change spray tips during a paint job. Follow these steps for safe, easy tip changes.
1.Depressurize and turn off unit per manufacturer’s instructions.
2.Engage gun trigger lock.
3.Pull red tip insert
out of spray base ![]() and replace with differ- ent tip, fully inserting tip into base.
and replace with differ- ent tip, fully inserting tip into base.
HOW TO ATTACH ROLLER
ACCESSORY:
1.Depressurize and turn off unit per manufacturer’s instructions.
2.Engage gun trigger lock.
3.Remove spray base, tip, seal and washer assembly.
4.Attach roller
accessory (AL2275
shown) to air- less spray gun.
If needed use
thread adapter and washer between roller and spray gun as shown.
INTERMITTENT USE
If you are spraying and decide to stop for several minutes, lock the spray gun trig- ger and submerge the tip in a container of suitable solvent (See Figure 4). This will prevent paint from hardening in the tiny spray opening and clogging the tip. Be sure to release the pressure in the system and turn the unit off accord- ing to the manufacturer’s instruc- tions.
CLEARING CLOGS
REVERSIBLE TIP: (Included)
1.Rotate the tip to the clean position (See Figure 5).
www.chpower.com
3
