|
|
| MXS3000 | |
Assembly (cont.) |
|
| ||
Lamp |
|
| ||
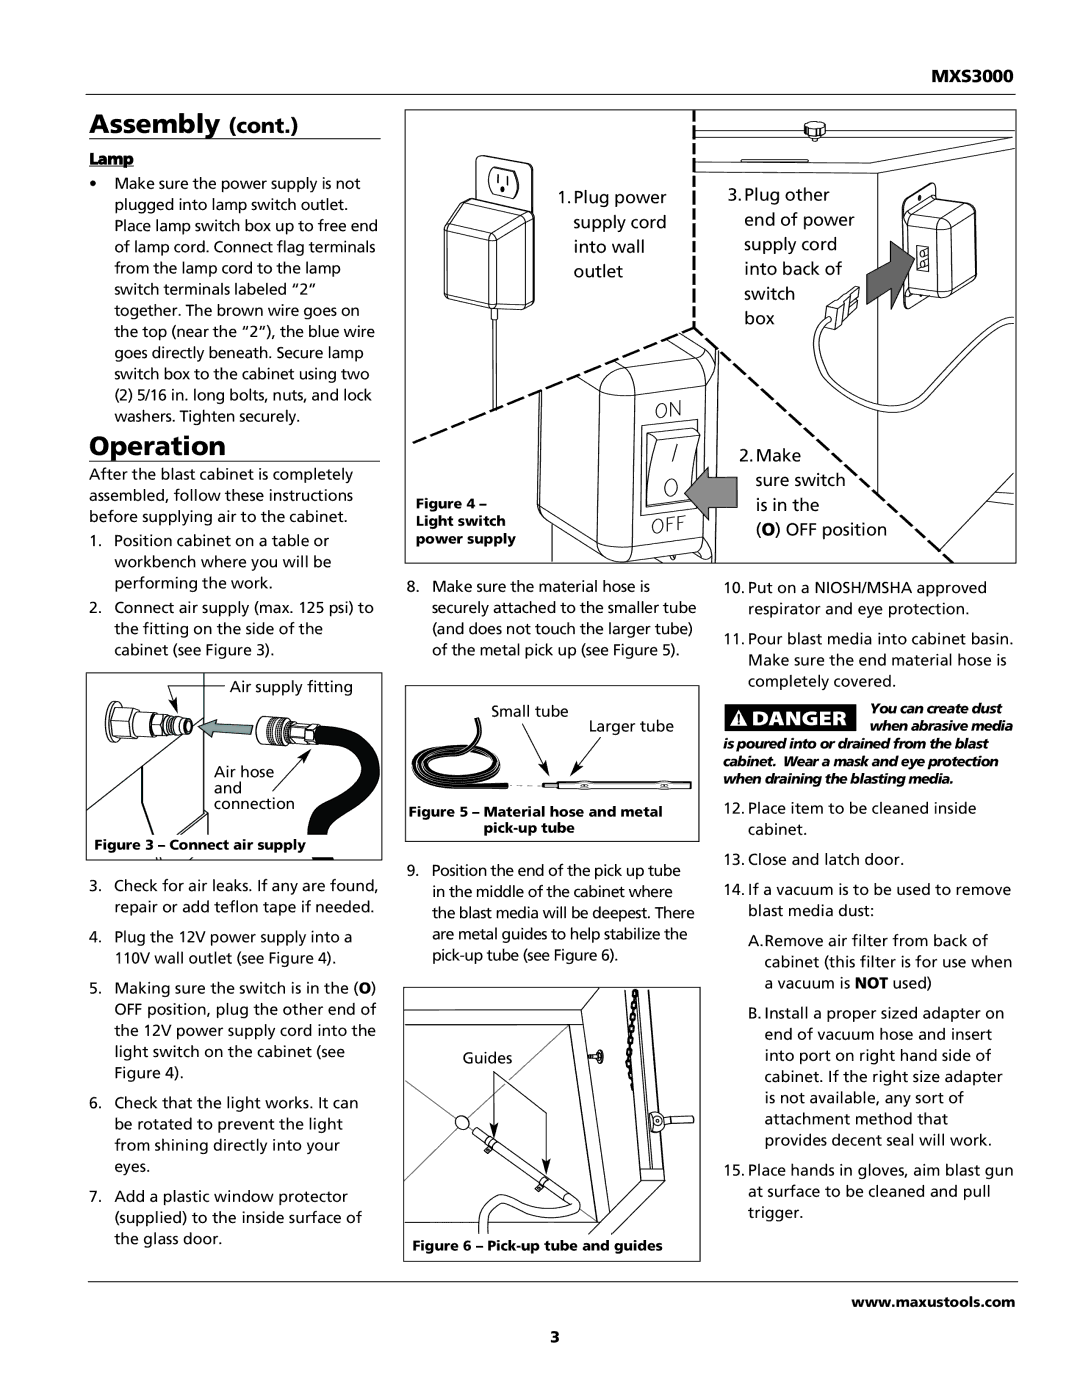
• | Make sure the power supply is not | 1. Plug power | 3. Plug other | |
| plugged into lamp switch outlet. | |||
| supply cord | end of power | ||
| Place lamp switch box up to free end | |||
| of lamp cord. Connect flag terminals | into wall | supply cord | |
| from the lamp cord to the lamp | outlet | into back of | |
| switch terminals labeled “2” |
| switch | |
| together. The brown wire goes on |
| box | |
| the top (near the “2”), the blue wire |
| ||
|
|
| ||
| goes directly beneath. Secure lamp |
|
| |
| switch box to the cabinet using two |
|
| |
| (2) 5/16 in. long bolts, nuts, and lock |
|
| |
| washers. Tighten securely. |
|
| |
Operation |
| 2. Make | ||
After the blast cabinet is completely |
| sure switch | ||
assembled, follow these instructions |
| |||
Figure 4 – | is in the | |||
before supplying air to the cabinet. | ||||
Light switch | (O) OFF position | |||
1. | Position cabinet on a table or | power supply | ||
| ||||
| workbench where you will be |
|
| |
| performing the work. | 8. Make sure the material hose is | 10. Put on a NIOSH/MSHA approved | |
2. | Connect air supply (max. 125 psi) to | securely attached to the smaller tube | respirator and eye protection. | |
| the fitting on the side of the | (and does not touch the larger tube) | 11. Pour blast media into cabinet basin. | |
| cabinet (see Figure 3). | of the metal pick up (see Figure 5). | ||
| Make sure the end material hose is | |||
|
|
| ||
| Air supply fitting |
| completely covered. | |
|
|
| ||
|
| Small tube | You can create dust | |
|
| Larger tube | when abrasive media | |
|
|
| is poured into or drained from the blast | |
| Air hose |
| cabinet. Wear a mask and eye protection | |
|
| when draining the blasting media. | ||
| and |
| ||
|
|
| ||
| connection | Figure 5 – Material hose and metal | 12. Place item to be cleaned inside | |
|
| |||
Figure 3 – Connect air supply |
| cabinet. | ||
| 13. Close and latch door. | |||
|
| 9. Position the end of the pick up tube | ||
3. | Check for air leaks. If any are found, |
| ||
in the middle of the cabinet where | 14. If a vacuum is to be used to remove | |||
| repair or add teflon tape if needed. | the blast media will be deepest. There | blast media dust: | |
4. | Plug the 12V power supply into a | are metal guides to help stabilize the | A.Remove air filter from back of | |
| 110V wall outlet (see Figure 4). | cabinet (this filter is for use when | ||
5. | Making sure the switch is in the (O) |
| a vacuum is NOT used) | |
|
| |||
| OFF position, plug the other end of |
| B. Install a proper sized adapter on | |
| the 12V power supply cord into the |
| end of vacuum hose and insert | |
| light switch on the cabinet (see | Guides | into port on right hand side of | |
| Figure 4). |
| cabinet. If the right size adapter | |
6. | Check that the light works. It can |
| is not available, any sort of | |
| attachment method that | |||
| be rotated to prevent the light |
| ||
|
| provides decent seal will work. | ||
| from shining directly into your |
| ||
|
|
| ||
| eyes. |
| 15. Place hands in gloves, aim blast gun | |
7. | Add a plastic window protector |
| at surface to be cleaned and pull | |
| trigger. | |||
| (supplied) to the inside surface of |
| ||
|
|
| ||
| the glass door. | Figure 6 – |
| |
|
|
| ||
|
|
| www.maxustools.com | |
|
| 3 |
| |