English
Copyrights
Test the Camera Before Using
‰ Software Guide
Item Check List
Contents
Direct Printing from the Camera 121
Contents at a Glance
Image Playback and Printing
Power Source
Safety Warnings
Preventing Injury or Equipment Damage
Camera Care
Handling Precautions
LCD Panel and LCD Monitor
CF Card
Lens Electrical Contacts
Set the power switch to
Insert the battery. p.24
Quick Start Guide
Attach the lens. p.27
Focus the subject. p.30
Set the Mode Dial to 1 Full Auto. p.46
Take the picture. p.30
Review the picture on the LCD monitor. p.104
Nomenclature
Nomenclature
Zxbn
LCD Panel
Viewfinder Information
Camera user setting p.152 Bulb p.96
Mode Dial
Full Auto p.46 Battery Charger CG-580
This is a battery pack charger. p.22
Power cord Power cord socket Battery pack slot Red lamp
Battery Charger CB-5L
Conventions Used in this Manual
This manual uses the following alert symbols
Attaching the Strap
Getting Started
Recharging the Battery
After the red lamp lights, continue to recharge
Red lamp
Installing and Removing the Battery
Remove the battery
Removing the Battery Open the battery compartment cover
Battery Life
Temperature Shots remaining
Connect the power cord
Using a Household Power Outlet
Connect the DC Coupler
Place the cord in the groove
Mounting and Detaching a Lens
On the lens, set the focus mode switch to AF
Mounting a Lens Remove the caps
Attach the lens
Installing and Removing the CF Card
Installing the Card Open the cover
Insert the CF card
Removing the CF Card
Basic Operation
Power Switch
Shutter Button
Pressing halfway
Operating the 6 Dial
6 dial is mainly used for shooting-related settings
After pressing a button, turn the 6 dial
Turn the 6 dial only
After pressing a button, turn the 5 dial
Operating the 5 Dial
Turn the 5 dial only
Operating
Icon Color Category Description
Menu Operations
Select the menu setting
Menu Setting Procedure Display the menu
Set the desired setting
Select a menu item
Menu Settings
Shooting menu Red
Playback menu Blue
Set-up menu Yellow
About the LCD Monitor
Select Clear settings
Restoring the Camera’s Default SettingsN
Select Clear all camera settings
Select OK
3Setting the Language
Select Language
Set the desired language
Select Auto power off
3Set the power-off time/Auto power off
Turn the 5 dial to select cAuto power off, then press
Set the desired time
Confirm the setting
3Setting the Date and Time
Select Date/Time
Set the date and time
Turn the 4 switch to Unscrewscrew. the battery holder
Replacing the Date/Time Battery
Tighten the battery holder screw
Make sure the battery is in the proper + orientation
3Cleaning the Cmos sensorN
Stop the cleaning
Clean the image sensor
Dioptric Adjustment
Turn the dioptric adjustment knob
Holding the Camera
Fully Automatic Shooting
1Using Full Auto
Compose the shot and press the shutter button completely
Take the picture
Use the self-timer when you want to be in the picture
JSelf-timer Operation
Press the R button Select j
Look at the LCD panel and turn the 6 dial to select j
Image Settings
Image-recording Quality Settings
3Setting the Image-recording Quality
Select Quality
Set the desired recording quality
About the RAW
Possible Shots
+73 +83 +74 +84 +76 +86
Max. Burst During Continuous Shooting
Image Recording
Quality Max. Burst 150 120 319 200 446
Select Picture Style
3Selecting a Picture StyleN
Select a Picture Style
Picture Style Effects
About the Picture Style selection screen
Symbols
Monochrome
For black-and-white images
Parameters and Their Settings
3Customizing the Picture StyleN
Set the parameters
Select Monochrome
Monochrome Adjustment
Toning Effect
Filter effects
NNone SSepia BBlue PPurple GGreen
Filter Sample effects
Select User Defined
3Registering the Picture StyleN
Select the base Picture Style
With the Picture Style selected, press
Changing the Picture Style setting inadvertently
Setting the ISO Speed
GSetting the ISO SpeedN
Press the R button
While looking at the top LCD panel, turn the 5 dial
Press the E button Select the white balance setting
BSetting the White BalanceN
Display Mode Color temperature Approx. K
About White Balance
Photograph a white object
3Custom White BalanceN
Select Custom WB
Select the image
Set the color temperature
3Setting the Color TemperatureN
Press the E button
On the menu, select Color temp
3White Balance CorrectionN
Press 0 to exit the setting and return to the menu
Select WB SHIFT/BKT
White Balance Correction
Set the bracketing amount
3White Balance Auto BracketingN
, set BKT to ±0 to 1 point
Canceling White Balance Auto Bracketing
Select Color space
3Setting the Color SpaceN
Set the desired color space
About Adobe RGB
Creating a Folder Go to the Create folder screen
3Creating and Selecting a Folder
Select Create folder
Create a new folder
Creating Folders with a Personal Computer
Selecting a Folder
3File Numbering Methods
Continuous, Auto reset, or
Select File numbering
Select the file numbering method
Manual Reset
Auto Reset
BChecking Camera Settings
Display the camera settings
Camera Setting Display
Setting the AF, Metering, and Drive Modes
FSelecting the AF ModeN
Exposure is set at the moment the picture is taken
One-Shot AF for Still Subjects
About Predictive AF
AI Focus AF for Automatic Switching of AF Mode
Automatic AF point selection
SSelecting the AF PointN
Manual AF Point Selection
Selecting with the Multi-controller Press the S button
Lens’ Maximum Aperture and AF Sensitivity
Selecting with the Dial
With lenses whose maximum aperture is f/2.8 or larger
With lenses whose maximum aperture is larger than f/5.6
Focusing an Off-Center Subject
Focus by turning the lens focusing
When Autofocus Fails Manual Focusing
Subjects difficult to focus
Viewfinder
QSelecting the Metering ModeN
Press the Q button Select the metering mode
Self-timer Operation p.48
Press the R button Select the drive mode
ISelecting the Drive ModeN
Single shooting
Advanced Operations
DProgram AE
Set the Mode Dial to d Focus the subject
Flash Settings EX-series Speedlite
Shooting Settings
Image-Recording Settings
Differences Between d and 1 Full Auto
Set the Mode Dial to s Set the desired shutter speed
SShutter-Priority AE
Check the viewfinder display and shoot
Shutter Speed Display
Set the Mode Dial to f Set the desired aperture value
FAperture-Priority AE
Checkshoot. the viewfinder display
Aperture Value Display
Depth of Field PreviewN
AManual Exposure
Set the Mode Dial to a Set the desired shutter speed
Set the exposure
Set the Mode Dial to d, s, or f
Setting Exposure CompensationN
3Auto Exposure Bracketing Aebn
Current drive mode p.82 will be used for the shooting
Select AEB
Set the AEB amount
Canceling AEB
AAE LockN
Press the a button
Recompose and take the picture
Set the Mode Dial to k Set the desired aperture value
Bulb Exposures
Look at the LCD panel and turn the 6 dial
Press the shutter button completely
Mirror LockupN
Again press the shutter button completely
Mirror will swing up
Ulcd Panel Illumination
Using the Eyepiece Cover
Remove the eyecup
Attaching the Eyepiece Cover
3CF Card Reminder
3You can also silence the beeper
Select Beep
Select Off
Flash Photography
With EX-series Speedlites
100
TTL II Wireless Autoflash with Multiple Speedlites
TTL and A-TTL Autoflash Speedlites
101
Sync Speed
Using Non-Canon Flash Units
PC Terminal
102
For images taken with another camera
103
Select Review time
3Setting the Image Review Time
Set the desired review time
104
Select Auto rotate
3Auto Image Rotation
Select On
Take a vertical shot
Adjust the brightness
3Setting the LCD Brightness
Select LCD brightness
106
Image Playback
XSingle image display Playback the image
107
3AF Point Display
Shooting Information Display
108
Highlight Alert
Bright. Display
Histogram
RGB Display
109
HIndex Display
Switching from the index display to another display format
Set the camera for playback
Display the index images
Display the image
YMagnified View
Magnify the image
Scroll around the image
Select Auto play
3Automated Playback of Images Auto playback
Start the auto play
Stop the auto play
Select Rotate
3Rotating an Image
Rotate the image
113
Playback the image Go to the jump display
CJump Display
Jump forward or back
Single Image and Information Display
115
Jumping in the index display mode
Jump shot date
Jump folder
Viewing the Images on a TV
Connect the camera to the TV
116
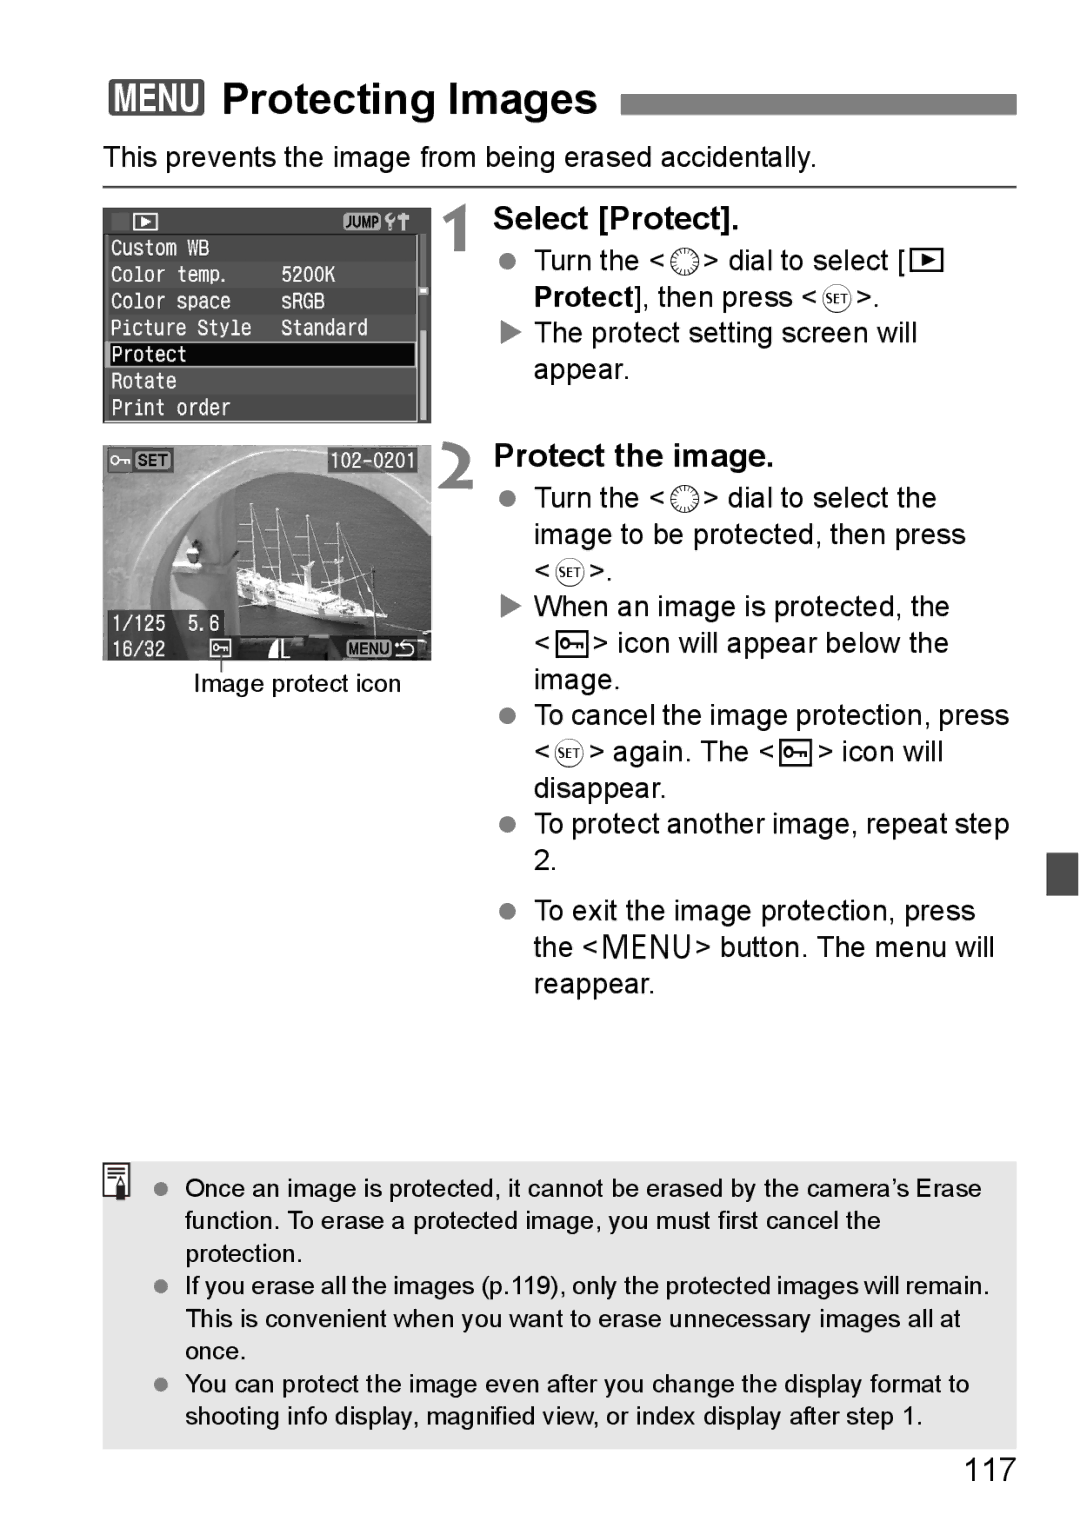
Select Protect
3Protecting Images
Protect the image
117
Erasing a Single Image Display the image
LErasing Images
Select the image to be erased
Display the erase menu
Select All
Erasing All Images Display the image
Erase the images
119
Select Format
3Formatting the CF Card
Format the CF card
120
Direct Printing from the Camera
Conventions Used in this Chapter
Canon’s PictBridge Web Site
122
Preparing to Print
Setting the Camera Select Communication
Select Print/PTP
123
Connectprinter. the camera to
Turn on the printer Turn the camera’s 4 switch to 1 or J
124
Printers and Cables
125
WPictBridge ACP Direct SBubble Jet Direct
Icon Reference pages 126 133 134 136 137 139
WPrinting with PictBridge
Select Paper settings
Select the image to be printed
Press
YSetting the Paper Type
Setting the Paper Size
USetting the Layout
About the Paper Types
Set the printing effects
128
About Page Layout
Printing Adjustments k Adjustable
Adjustment of Printing Effects
129
Off / On / Vivid Natural M
130
Adjust levels
Brightness
Brightener Red-eye corr
Turn the 5 dial to adjust the level, then press
Detail Settings of Printing Effects
131
Contrast Saturation Color tone
Set the number of copies
Setting the date and file number imprinting
Start printing
132
133
Handling Printer Errors Error Messages
APrinting with CP Direct
Select Style
134
Set the options as desired
135
Image Borders Date
Set the trimming
136
Set as necessary For details on trimming, see
Print setting screen will appear
Print setting screen
SPrinting with Bubble Jet Direct
137
Paper Borders Date
138
139
Select Trimming
Setting the Trimming
Trim the image
140
Press
141
On the upper left, you can see
Trimmed image area that will be
Easy Printing
142
Blue lamp will blink and printing will start
About Dpof
143
Select Set up
Print Settings
3Print Ordering
Select Print order
Press the M button
145
Order the print
Selecting Individual Images for Printing Select Order
146
For Standard and Both
147
For Index
Menu will then reappear
Selecting All images
Select Mark all
148
Prepare to print
3Direct Printing with Dpof
Select Print
Set the printing options
ACP Direct / SBubble Jet Direct
150
Set the Style. p.134/137
Custom Functions work in all modes except 1 Full Auto
151
Select Register camera settings
3Register Camera SettingsN
Menu settings
152
Change the setting
3Setting a Custom FunctionN
Select Custom Functions C.Fn
Select Custom Function No
Resetting All Custom FunctionsN Select Clear settings
Select Clear all Custom Functions
154
155
3Custom Function SettingsN
156
+/Disable Auto cancel works only if the flash is ready
+/Enable
157
Fires Does not fire
158
Evaluative
159
Average
1st-curtain sync 2nd-curtain sync
160
Standard Expanded
With Shutter Button only Also with Aetc
AF stop AF start
161
AE lock while metering
AF point M Auto / Auto ctr
Ee-A Ee-D Ee-S About focusing screen characteristics
162
Ee-A Standard Precision Matte
Reference
AF Modes and Drive Modes
Shooting Combinations
AE lock
164
Program Line
165
Program Line Description
166
Troubleshooting Guide
LCD’s service life has expired
Camera turns off by itself Auto power off is in effect
167
CF card is full
168
Error Code Countermeasures
Error Codes
169
Err
170
Major Accessories Optional
171
System Map
Bundled Accessories
172
AC Adapter Kit
System Map
173
174
Specifications
White Balance
175
Exposure Control
176
Drive System
177
Customization
178
European Union and EEA only
179
180
Index
111
181
146
182
Page
CEL-SF0LA211