around the date. To set the date (D), press the up button and stop on the desired date.
3.If the month (M) needs to be changed, press the soft but- ton under the month on the screen. The selection box will
move to the month number. Press the up button to set the desired month.
4.Repeat this process to change the year (Y), if necessary.
5.Press the done button. This will instruct the thermostat to begin the Holiday schedule ilranediately.
6.Close the thermostat door.
Turning the Heating and Cooling System Off
ETo use the thermostat to turn the heating and cooling sys- tem off, perform the following:
1.Open the thermostat door.
2.Press the mode button until the display shows "off' in the upper left corner.
3.Close the thermostat door.
Changing the Humidity Level E The thermostats
offer three humidity options: normal, auto, and off.
The thermostat is set at the factory for "normal humidify,"
which is a fixed humidity setting based on how much humidity the user wants in the space. This humidity level remains con- stant, regardless of the outdoor temperature. The user can man-
ually adjust the humidity level according to their own prefer- ences.
The second option, "auto humidify," uses an outdoor tem- perature sensor (if installed) to automatically adjust the indoor humidity level according to the outside temperature.
The third option is to turn off the humidify/dehumidify feature.
To change the fixed (constant) humidity setting for normal humidify, perform the following procedure:
1.Open the thermostat door.
2.The "humidify" icon will be displayed at the bottom of
the screen when the operating mode is heat. The "dehu- midify" will be displayed when the operating mode is
COO1.
3.Press the soft button under the humidify or dehumidify icons. The screen will display the current setting.
NOTE: A humidify icon will only be shown for 33CS2PPRH thermostats.
4.Press the up or down buttons to change the humidity set- ting. It is factory set at 26% for humidify and 60% for de- humidify. If there is too much condensation in the space,
set the value to a lower number. If the air is too dry, set the value to a higher number. Humidity can be set to between 10% and 46%. The dehumidify range is from 46% to 98%.
5.Close the thermostat door.
To change the humidity setting for auto humidify, perform the following procedure:
1.Open the thermostat door.
2.The "humidify" icon will be displayed at the bottom of
the screen. Press the soft button under the humidify icon. The screen will display the current setting.
NOTE: A humidify icon will only be shown for 33CS2PPRH thermostats.
3.Press the mode button. An auto icon will appear at the top of the screen. The current humidity reading and the auto
humidify set point will also be shown. The default auto humidify set point is 5.
4.Press the up or down button to change the auto humidify setting number (1 through 9). If there is too much
condensation on the windows, select a number lower than
5. If there seems to be a lot of static electricity, which of- ten means the air is too dry, select a number higher than 5.
5.Close the thermostat door.
To turn off the humidify or dehumidify feature open the thermostat door. Press the soft button under the humidify or de- humidify icons. Then press the mode button until the screen displays OE Close the themostat door.
Using Emergency Heat _ Emergency heat should be selected when it is desirable to heat the space with the auxiliary heat only.
To set the thermostat to use emergency heat, open the ther-
mostat door. Press the mode button repeatedly until the arrow under the button moves to the Em heat indicator on the screen.
Close the thermostat door.
Advanced Programming --The user can customize
several features of the thermostat. See Table 3.
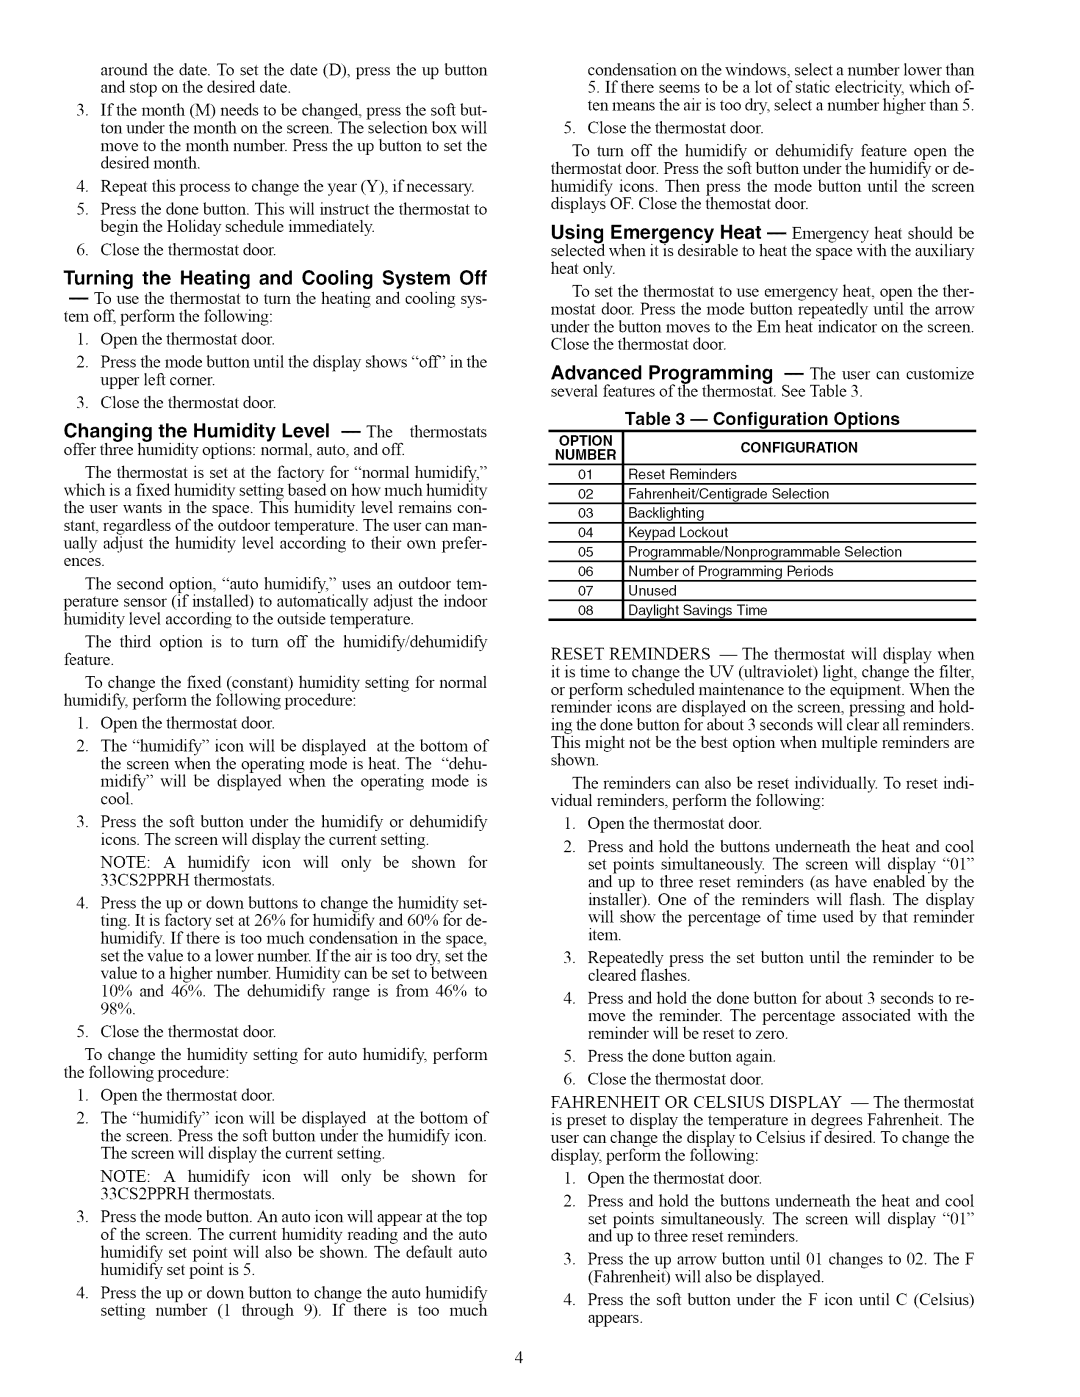
Table 3 --Configuration Options
OPTIONCONFIGURATION
NUMBER
01 Reset Reminders
02 Fahrenheit/Centigrade Selection
03 Backlighting
04 Keypad Lockout
05 Programmable/Nonprogrammable Selection
06Number of Programming Periods
07Unused
08Daylight Savings Time
RESET REMINDERS -- The thermostat will display when it is time to change the UV (ultraviolet) light, change the filter,
or perform scheduled maintenance to the equipment. When the reminder icons are displayed on the screen, pressing and hold- ing the done button for about 3 seconds will clear all reminders.
This might not be the best option when multiple reminders are shown.
The reminders can also be reset individually. To reset indi- vidual reminders, perform the following:
1.Open the thermostat door.
2.Press and hold the buttons underneath the heat and cool set points simultaneously. The screen will display "01" and up to three reset reminders (as have enabled by the installer). One of the reminders will flash. The display will show the percentage of time used by that reminder item.
3.Repeatedly press the set button until the reminder to be cleared flashes.
4.Press and hold the done button for about 3 seconds to re-
move the reminder. The percentage associated with the reminder will be reset to zero.
5.Press the done button again.
6.Close the thermostat door.
FAHRENHEIT OR CELSIUS DISPLAY -- The thermostat is preset to display the temperature in degrees Fahrenheit. The user can change the display to Celsius if desired. To change the display, perform the following:
1.Open the thermostat door.
2.Press and hold the buttons underneath the heat and cool
set points simultaneously. The screen will display "01" and up to three reset reminders.
3.Press the up arrow button until 01 changes to 02. The F (Fahrenheit) will also be displayed.
4.Press the soft button under the F icon until C (Celsius) appears.