
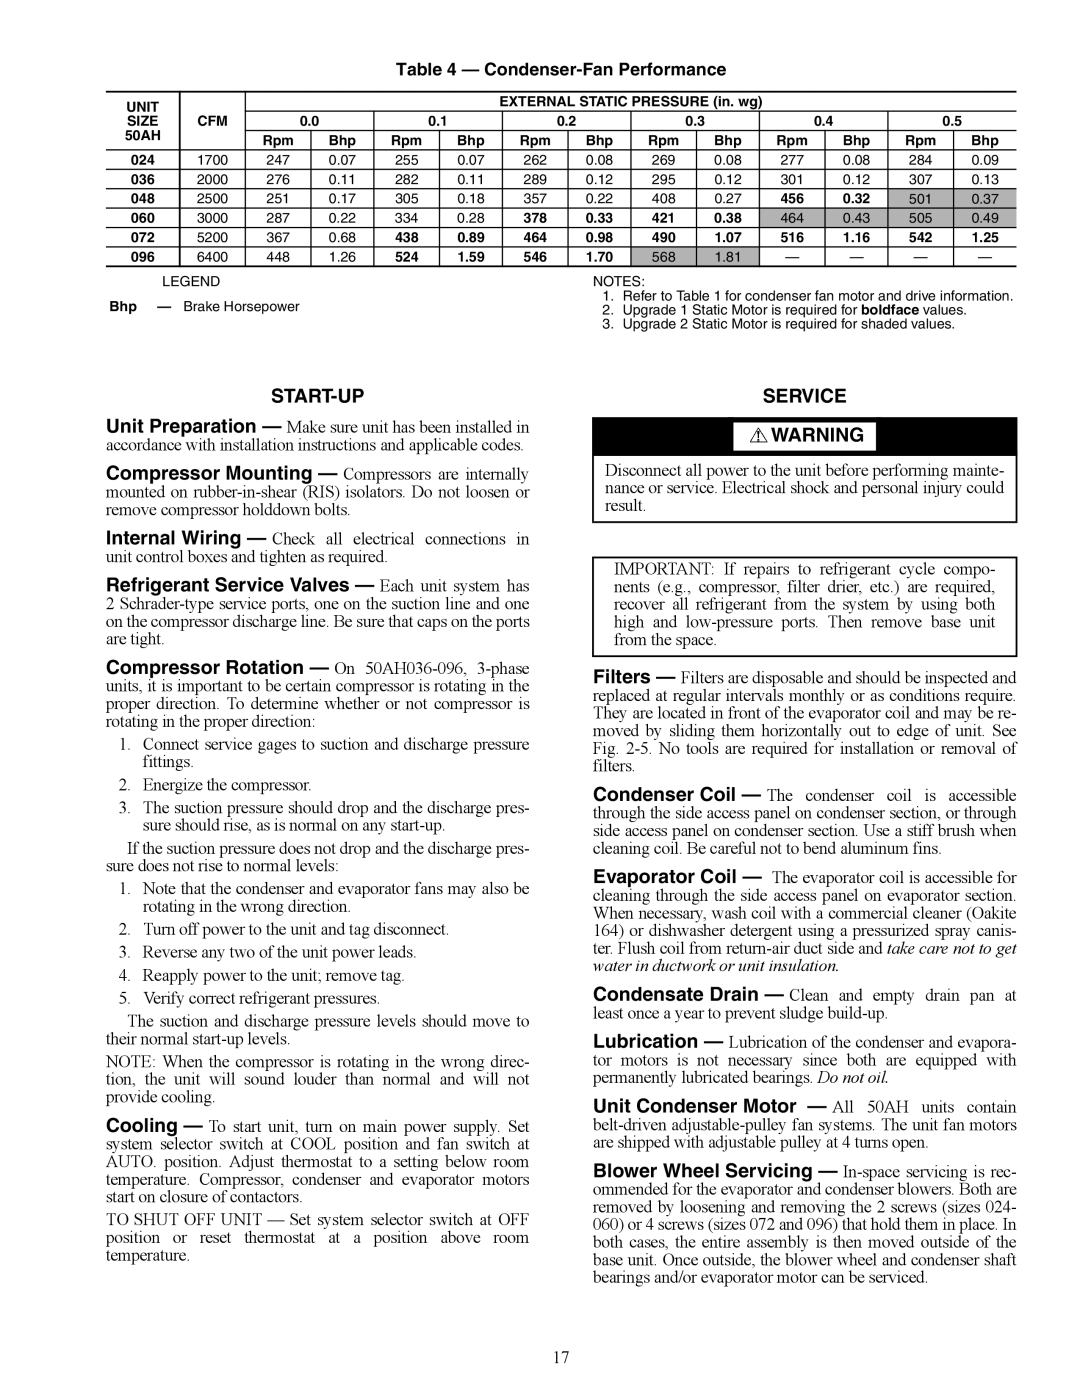
50AH024-096 specifications
The Carrier 50AH024-096 is a highly efficient and robust air conditioning unit designed to meet the cooling demands of both residential and commercial applications. This model stands out for its advanced technology and reliable performance, making it a preferred choice among HVAC professionals and end-users alike.One of the main features of the Carrier 50AH024-096 is its high-efficiency compressor, which is designed to provide optimal cooling while minimizing energy consumption. With a variable speed operation, the compressor adjusts its output to the cooling needs of the space, ensuring maximum comfort and energy savings. This feature not only enhances the unit’s efficiency but also contributes to a quieter operation, as it can throttle down to a lower speed during less demanding conditions.
The Carrier 50AH024-096 also boasts an environmentally friendly refrigerant, which is crucial in today’s market where energy efficiency and eco-friendliness are at the forefront of consumer choices. By utilizing R-410A refrigerant, this unit helps reduce the impact on ozone depletion while providing effective cooling performance.
In terms of construction, the Carrier 50AH024-096 features a durable, corrosion-resistant cabinet that ensures longevity and durability. The design allows for easy access to internal components for maintenance and service, which is an essential aspect for HVAC professionals. Additionally, the unit is equipped with advanced filter systems that ensure the indoor air quality remains high by trapping dust, allergens, and other particulates.
One of the standout characteristics of the Carrier 50AH024-096 is its compatibility with smart thermostats and advanced control systems. This allows users to integrate their cooling system into a smart home ecosystem, enabling remote access and control via mobile devices. This feature not only enhances user convenience but also promotes energy management by allowing for adjustments based on occupancy and preferences.
Energy Star certified, the Carrier 50AH024-096 is designed to exceed minimum efficiency standards, ensuring that consumers not only receive a reliable product but also experience long-term savings on energy bills.
In conclusion, the Carrier 50AH024-096 represents a significant investment in comfort, efficiency, and durability. With its advanced features and technologies, it addresses the modern needs of cooling systems, making it an excellent choice for anyone looking to upgrade their HVAC system. Whether for residential or commercial use, this model delivers both performance and peace of mind.