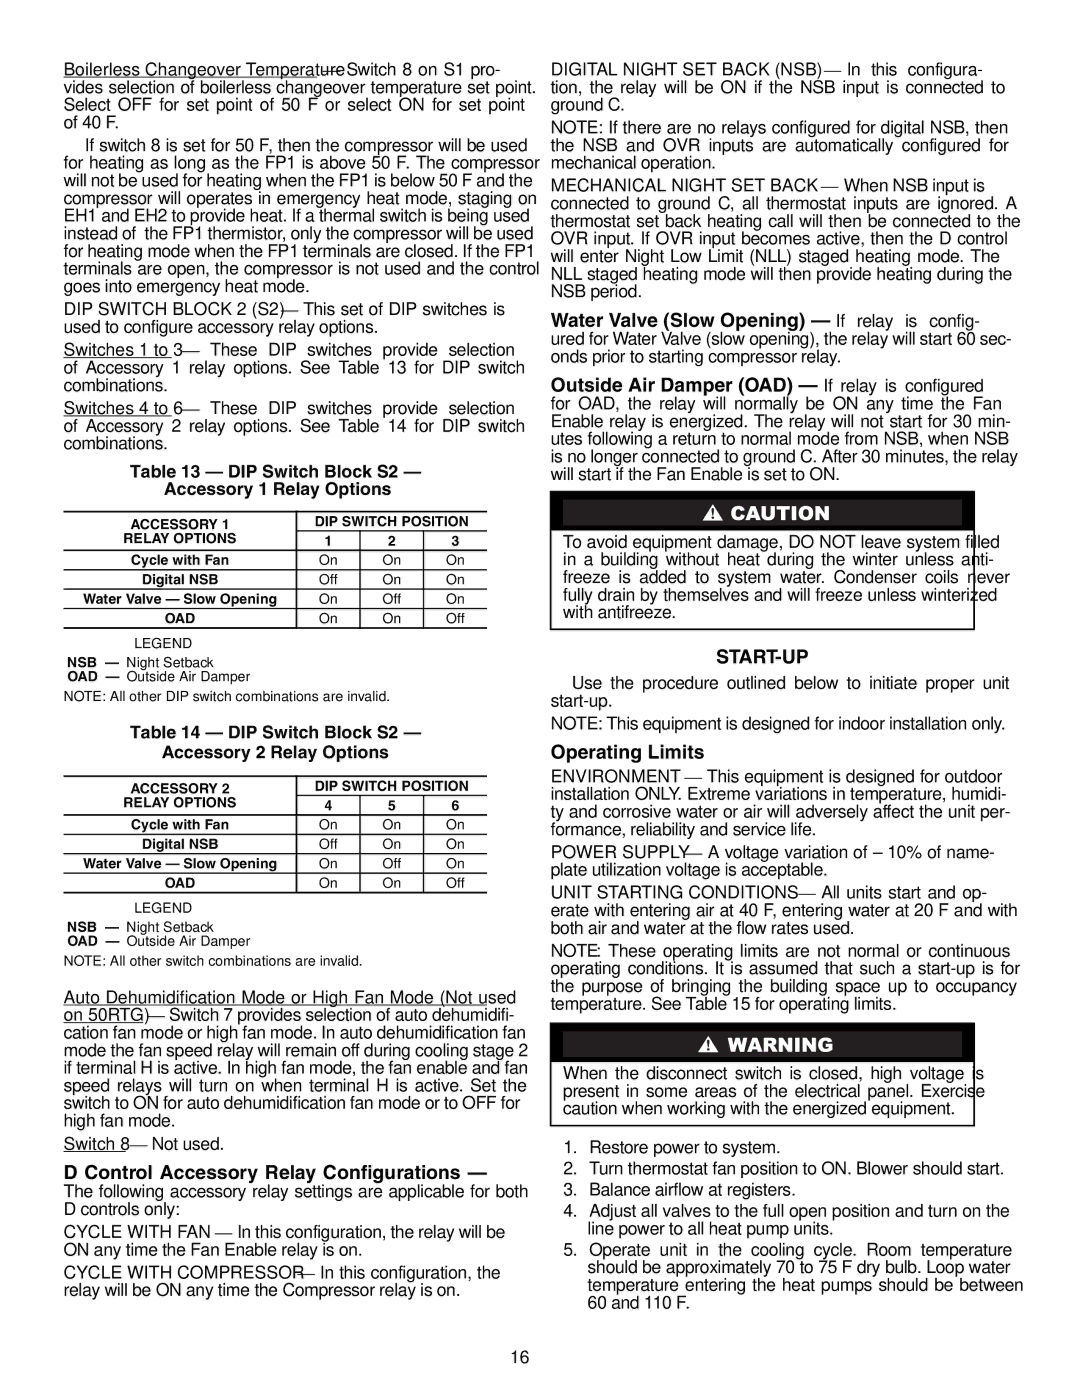
Boilerless Changeover Temperature — Switch 8 on S1 pro- vides selection of boilerless changeover temperature set point. Select OFF for set point of 50 F or select ON for set point of 40 F.

If switch 8 is set for 50 F, then the compressor will be used for heating as long as the FP1 is above 50 F. The compressor will not be used for heating when the FP1 is below 50 F and the compressor will operates in emergency heat mode, staging on EH1 and EH2 to provide heat. If a thermal switch is being used instead of the FP1 thermistor, only the compressor will be used for heating mode when the FP1 terminals are closed. If the FP1 terminals are open, the compressor is not used and the control goes into emergency heat mode.

DIP SWITCH BLOCK 2 (S2) — This set of DIP switches is used to configure accessory relay options.

Switches 1 to 3 — These DIP switches provide selection of Accessory 1 relay options. See Table 13 for DIP switch combinations.

Switches 4 to 6 — These DIP switches provide selection of Accessory 2 relay options. See Table 14 for DIP switch combinations.

Table 13 — DIP Switch Block S2 —

Accessory 1 Relay Options

ACCESSORY 1

DIP SWITCH POSITION

RELAY OPTIONS

1

2

3

Cycle with Fan

On

On

On

Digital NSB

Off

On

On

Water Valve — Slow Opening

On

Off

On

OAD

On

On

Off

LEGEND


NSB — Night Setback OAD — Outside Air Damper

NOTE: All other DIP switch combinations are invalid.

Table 14 — DIP Switch Block S2 —

Accessory 2 Relay Options

ACCESSORY 2

DIP SWITCH POSITION

RELAY OPTIONS

4

5

6

Cycle with Fan

On

On

On

Digital NSB

Off

On

On

Water Valve — Slow Opening

On

Off

On

OAD

On

On

Off

LEGEND


NSB — Night Setback

OAD — Outside Air Damper

NOTE: All other switch combinations are invalid.

Auto Dehumidification Mode or High Fan Mode (Not used on 50RTG) — Switch 7 provides selection of auto dehumidifi- cation fan mode or high fan mode. In auto dehumidification fan mode the fan speed relay will remain off during cooling stage 2 if terminal H is active. In high fan mode, the fan enable and fan speed relays will turn on when terminal H is active. Set the switch to ON for auto dehumidification fan mode or to OFF for high fan mode.

Switch 8 — Not used.

D Control Accessory Relay Configurations —

The following accessory relay settings are applicable for both D controls only:

CYCLE WITH FAN — In this configuration, the relay will be ON any time the Fan Enable relay is on.

CYCLE WITH COMPRESSOR — In this configuration, the relay will be ON any time the Compressor relay is on.

DIGITAL NIGHT SET BACK (NSB) — In this configura- tion, the relay will be ON if the NSB input is connected to ground C.

NOTE: If there are no relays configured for digital NSB, then the NSB and OVR inputs are automatically configured for mechanical operation.

MECHANICAL NIGHT SET BACK — When NSB input is connected to ground C, all thermostat inputs are ignored. A thermostat set back heating call will then be connected to the OVR input. If OVR input becomes active, then the D control will enter Night Low Limit (NLL) staged heating mode. The NLL staged heating mode will then provide heating during the NSB period.

Water Valve (Slow Opening) — If relay is config- ured for Water Valve (slow opening), the relay will start 60 sec- onds prior to starting compressor relay.

Outside Air Damper (OAD) — If relay is configured for OAD, the relay will normally be ON any time the Fan Enable relay is energized. The relay will not start for 30 min- utes following a return to normal mode from NSB, when NSB is no longer connected to ground C. After 30 minutes, the relay will start if the Fan Enable is set to ON.

To avoid equipment damage, DO NOT leave system filled in a building without heat during the winter unless anti- freeze is added to system water. Condenser coils never fully drain by themselves and will freeze unless winterized with antifreeze.

START-UP

Use the procedure outlined below to initiate proper unit start-up.

NOTE: This equipment is designed for indoor installation only.

Operating Limits

ENVIRONMENT — This equipment is designed for outdoor installation ONLY. Extreme variations in temperature, humidi- ty and corrosive water or air will adversely affect the unit per- formance, reliability and service life.

POWER SUPPLY — A voltage variation of ± 10% of name- plate utilization voltage is acceptable.

UNIT STARTING CONDITIONS — All units start and op- erate with entering air at 40 F, entering water at 20 F and with both air and water at the flow rates used.

NOTE: These operating limits are not normal or continuous operating conditions. It is assumed that such a start-up is for the purpose of bringing the building space up to occupancy temperature. See Table 15 for operating limits.

When the disconnect switch is closed, high voltage is present in some areas of the electrical panel. Exercise caution when working with the energized equipment.

1.Restore power to system.

2.Turn thermostat fan position to ON. Blower should start.

3.Balance airflow at registers.

4.Adjust all valves to the full open position and turn on the line power to all heat pump units.

5.Operate unit in the cooling cycle. Room temperature should be approximately 70 to 75 F dry bulb. Loop water temperature entering the heat pumps should be between 60 and 110 F.

16

Page 16
Image 16
Carrier 50RTG specifications Control Accessory Relay Configurations, Start-Up, Operating Limits

50RTG specifications

The Carrier 50RTG represents a significant advancement in the field of rooftop air conditioning systems, combining performance, efficiency, and reliability for commercial applications. Designed to meet the rigorous demands of today’s buildings, the 50RTG series is ideally suited for a variety of environments, including retail, office spaces, and industrial facilities.

One of the standout features of the Carrier 50RTG is its energy efficiency. Utilizing the latest in compressor technology, these units achieve high Seasonal Energy Efficiency Ratios (SEER) and Energy Efficiency Ratios (EER), which translates to lower energy costs for users. This efficiency is further enhanced by the incorporation of environmentally friendly refrigerants that comply with current regulations, reducing the overall carbon footprint of the unit.

Another notable characteristic of the 50RTG series is its modular design. The unit can be tailored to specific requirements, making it versatile for different installation scenarios. This modularity not only simplifies maintenance and repair operations but also allows for easy upgrades as technologies evolve or as space demands change.

The advanced control system in the 50RTG is another key technology that sets it apart from competing products. Intuitive user interfaces and smart controls enable precise temperature regulation and improved energy management. These controls often include features such as variable speed fans and integrated economizers, which optimize the system's performance in real-time based on current load requirements.

Durability is also a hallmark of the Carrier 50RTG. Constructed with robust materials and designed to withstand harsh weather conditions, these units provide dependable operation year-round. The corrosion-resistant finish and weather-tight construction ensure that the systems maintain their performance levels and aesthetic appeal over time.

Additionally, the 50RTG series is designed with a focus on low noise operation. With quieter components and advanced noise control technology, these units are ideal for noise-sensitive environments, ensuring that occupants can work, live, or shop in comfort without disruptive background noise.

In summary, the Carrier 50RTG series exemplifies the perfect combination of energy efficiency, advanced technology, customization potential, durability, and low noise operation, making it a top choice for commercial heating and cooling needs. Its innovative features and reliable performance solidify its status as a leader in rooftop HVAC solutions, catering to the evolving requirements of modern buildings.