50VL-- A


SPECIAL PROCEDURES FOR 208-V OPERATION


(SEE UNIT WIRING


SUPPLY


WARNING


HIGH VOLTAGE


!


POWER LEADS


POWER


LABEL)


3-PHASE SHOWN


ELECTRICAL SHOCK HAZARD


1-PHASE USES


Failure to follow this warning could result in personal


TWO POWER


EQUIP GR


injury or death.


LEADS


FIELD-SUPPLIED


Before installing or servicing system, always turn off main


FUSED DISCONNECT


CONTROL BOX


power to system and install lockout tag. With disconnect


switch open, move black wire from transformer (3/16


WHT(W1)


W1


in.)(4.8 mm) terminal marked 230 to terminal marked 208.


VIO (W2)


W2


This retaps transformer to primary voltage of 208 vac.


YEL(Y)


Y


LOW-VOLTAGE


GRN(G)


G


CONTROL VOLTAGE CONNECTIONS


RED(R)


THERMOSTAT NOTE: Do not use any type of power-stealing thermostat. Unit


POWER LEADS


R


(SEE UNIT


BRN(C)


(TYPICAL)

control problems may result.


WIRING LABEL)


C


Use no. 18 American Wire Gage (AWG) color-coded, insulated


BLU (DH)


DH


(35°C minimum) wires to make the control voltage connections


GRA (Y2)


3-Phase


between the thermostat and the unit. If the thermostat is located


Only


more than 100 ft (30.5 m) from the unit (as measured along the


SPLICE BOX


control voltage wires), use no. 16 AWG color-coded, insulated


(35° C minimum) wires.


A09066


STANDARD CONNECTION


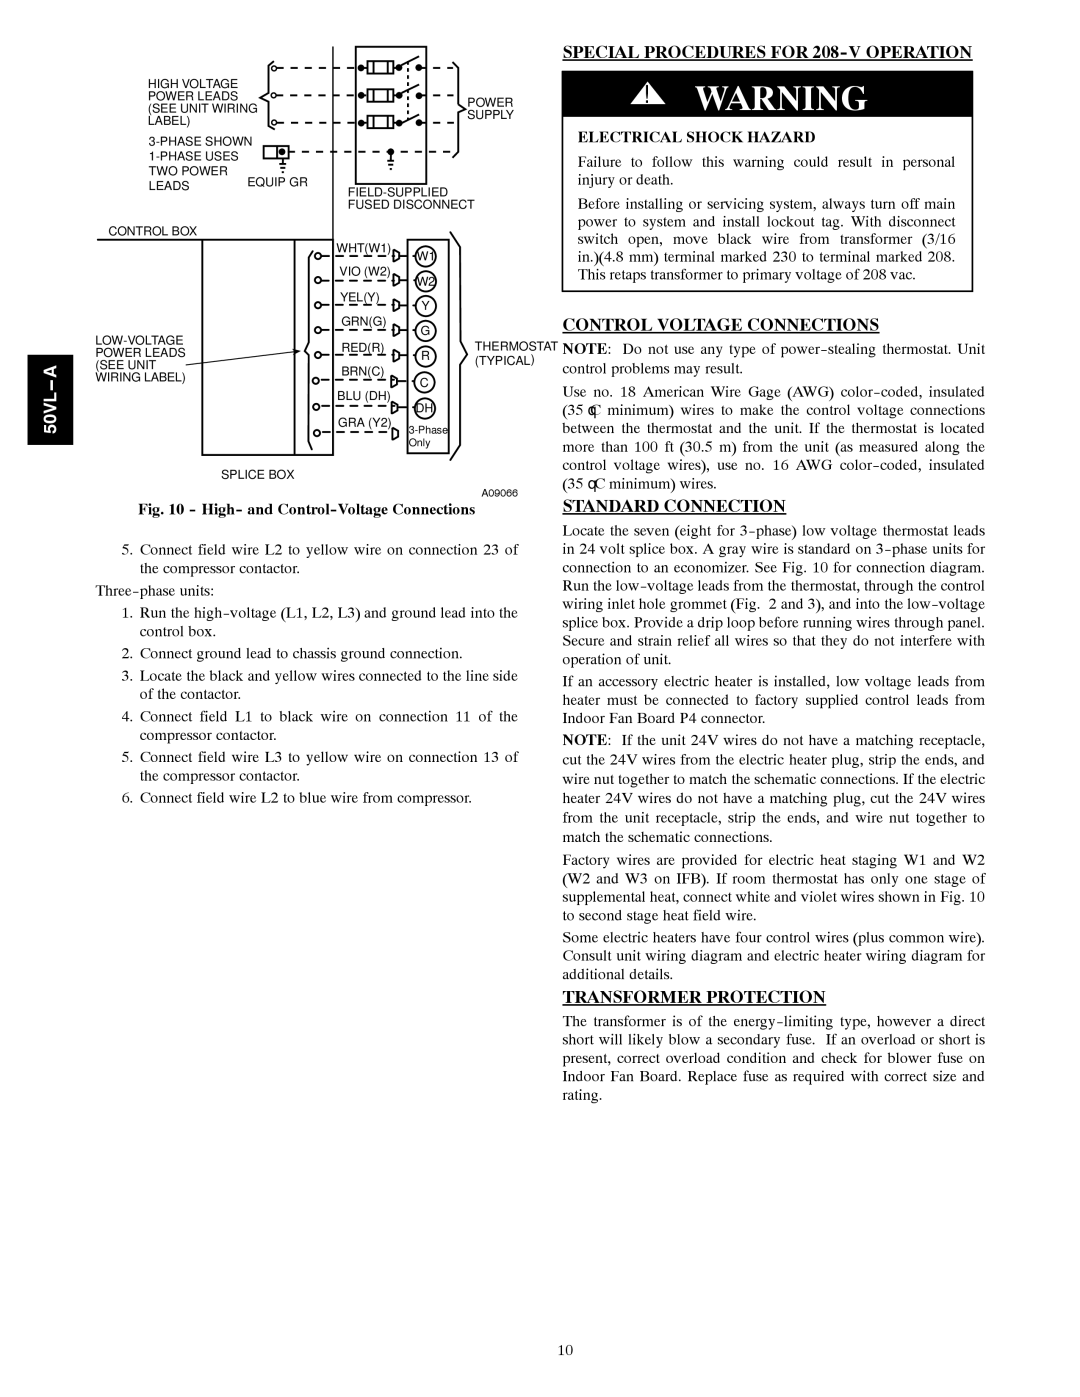
Fig. 10 - High- and Control-Voltage Connections


Locate the seven (eight for 3-phase) low voltage thermostat leads


5. Connect field wire L2 to yellow wire on connection 23 of

in 24 volt splice box. A gray wire is standard on 3-phase units for


the compressor contactor.


connection to an economizer. See Fig. 10 for connection diagram.

Three-phase units:


Run the low-voltage leads from the thermostat, through the control


wiring inlet hole grommet (Fig. 2 and 3), and into the low-voltage


1. Run the high-voltage (L1, L2, L3) and ground lead into the


splice box. Provide a drip loop before running wires through panel.


control box.


Secure and strain relief all wires so that they do not interfere with


2. Connect ground lead to chassis ground connection.


operation of unit.


3. Locate the black and yellow wires connected to the line side


If an accessory electric heater is installed, low voltage leads from


of the contactor.


heater must be connected to factory supplied control leads from


4. Connect field L1 to black wire on connection 11 of the


Indoor Fan Board P4 connector.


compressor contactor.


NOTE: If the unit 24V wires do not have a matching receptacle,


5. Connect field wire L3 to yellow wire on connection 13 of


cut the 24V wires from the electric heater plug, strip the ends, and


the compressor contactor.


wire nut together to match the schematic connections. If the electric


6. Connect field wire L2 to blue wire from compressor.

heater 24V wires do not have a matching plug, cut the 24V wires


from the unit receptacle, strip the ends, and wire nut together to


match the schematic connections.

Factory wires are provided for electric heat staging W1 and W2 (W2 and W3 on IFB). If room thermostat has only one stage of supplemental heat, connect white and violet wires shown in Fig. 10 to second stage heat field wire.

Some electric heaters have four control wires (plus common wire). Consult unit wiring diagram and electric heater wiring diagram for additional details.

TRANSFORMER PROTECTION

The transformer is of the energy-limiting type, however a direct short will likely blow a secondary fuse. If an overload or short is present, correct overload condition and check for blower fuse on Indoor Fan Board. Replace fuse as required with correct size and rating.

10

Page 10
Image 10
Carrier 50VL---A Special Procedures for 208-V Operation, Control Voltage Connections, Standard Connection

50VL---A specifications

The Carrier 50VL---A is a powerhouse in the field of air conditioning and heating solutions, designed for residential and commercial applications. This unit exemplifies Carrier’s commitment to efficiency, reliability, and advanced technology. One of the standout features of the 50VL---A is its superior energy efficiency, which is reflected in its high Seasonal Energy Efficiency Ratio (SEER) and Heating Seasonal Performance Factor (HSPF) ratings. These ratings ensure reduced energy consumption and lower utility bills, making it an environmentally friendly choice.

The 50VL---A is designed with a robust scroll compressor that not only enhances performance but also minimizes noise levels during operation. This compressor is integral to the system’s ability to maintain a consistent temperature and humidity level within the space. The unit’s sound-dampening features contribute to a quieter environment, which is particularly important in residential settings.

One of the key technologies integrated into the Carrier 50VL---A is the advanced microprocessor control system. This technology allows for precise temperature adjustments and operational diagnostics, making maintenance easier and more efficient. This system ensures that the unit operates at optimal performance, adapting to changing environmental conditions with ease.

Moreover, the 50VL---A is equipped with a multi-speed blower motor that provides enhanced airflow and comfort. This feature allows users to select different cooling or heating levels according to their specific requirements, promoting customized comfort throughout the home or office.

In addition to its performance capabilities, the Carrier 50VL---A is also built with longevity and durability in mind. The cabinet is constructed from high-quality materials that offer resistance to corrosion and wear, ensuring the unit can withstand various weather conditions over time. Furthermore, the unit’s maintenance-friendly design allows for easy access to key components, simplifying servicing and prolonging the life of the system.

Overall, the Carrier 50VL---A stands out as a reliable and advanced solution for climate control. With its energy-efficient operation, quiet performance, and user-friendly features, it represents a significant investment in home comfort and efficiency. Whether for heating during the colder months or cooling in the summer, the 50VL---A delivers exceptional performance, making it a popular choice among users seeking quality HVAC solutions.