Computer Operations
Selection of the data-display mode (bottom of the screen).
Pressing the MODE button changes the functions in the
Clock Time - In Elapsed Time, press and hold the Mode button for two seconds to display Clock Time. Pressing the Mode button again will return the
Trip Distance 1 and 2 – The computer has two separate trip distances. Trip Distance 2 is reset independently. It can be used to record distance within a ride or multiple days distances. In Trip Distance 1, press and hold the Mode button to select Distance 2. You will continue to view this distance until you select Distance 1 with the same procedure.
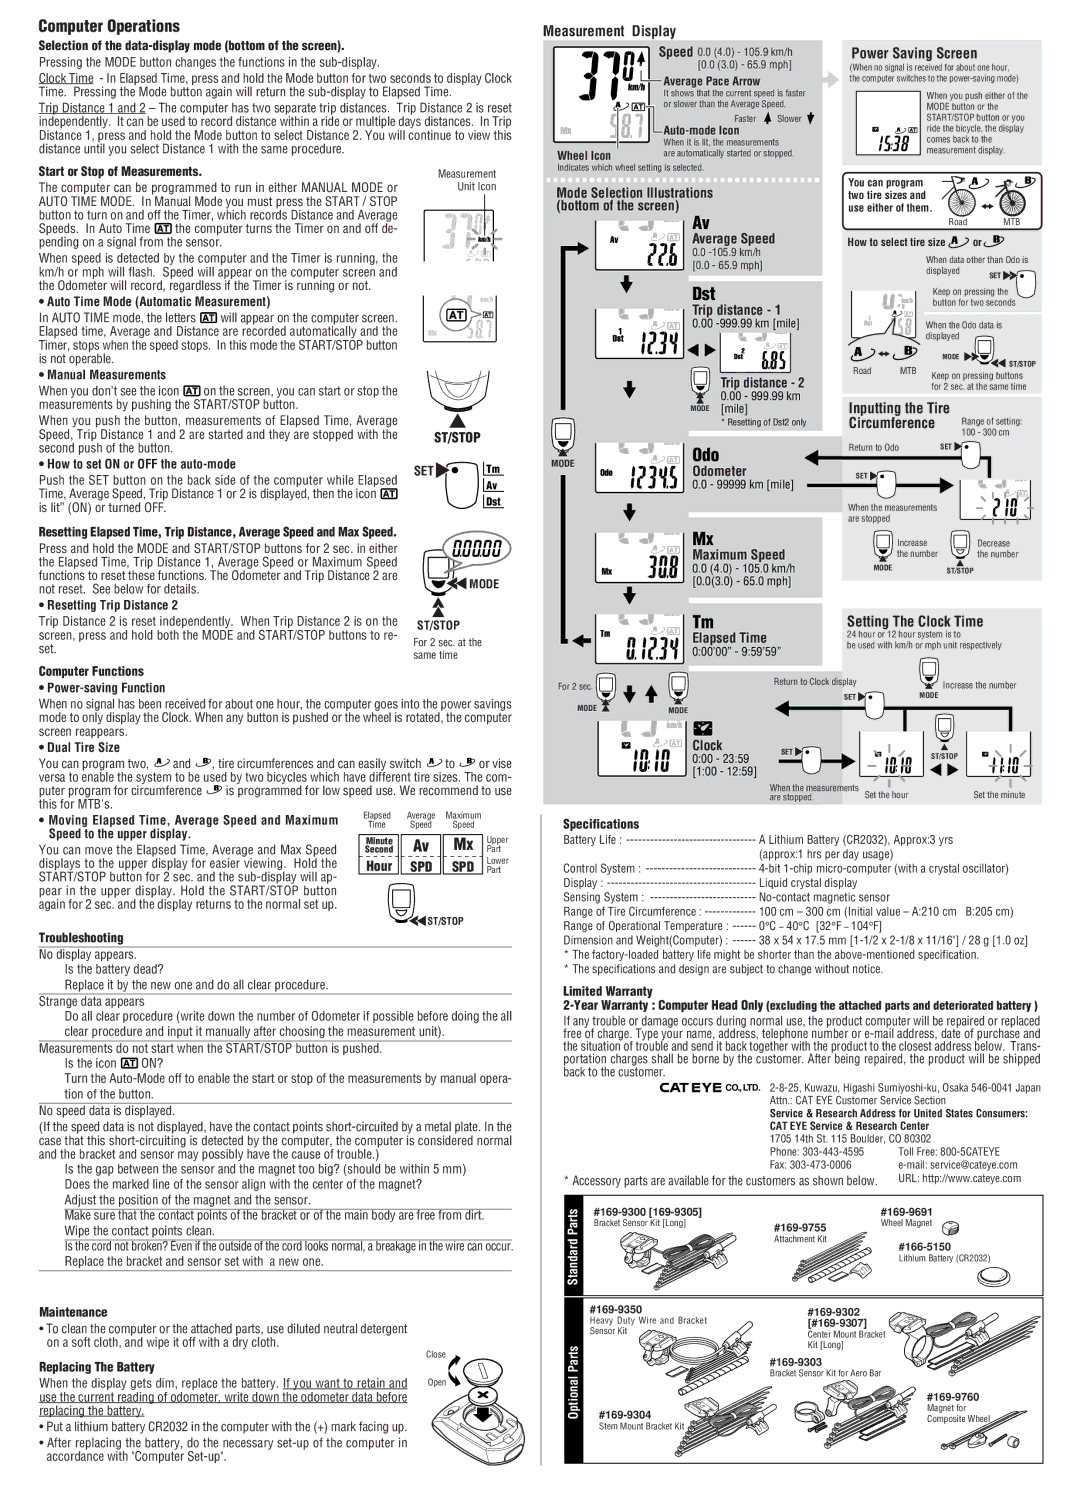
Measurement Display
Speed 0.0 (4.0) - 105.9 km/h [0.0 (3.0) - 65.9 mph]
|
|
|
|
|
| Average Pace Arrow |
|
|
|
|
|
|
| ||
|
|
|
|
|
| It shows that the current speed is faster | |
|
|
|
|
|
| or slower than the Average Speed. | |
|
|
|
|
|
| Faster | Slower |
|
|
|
|
|
|
| |
|
|
|
|
|
|
| |
|
|
|
|
|
| When it is lit, the measurements | |
Wheel Icon |
|
|
|
|
| are automatically started or stopped. | |
Power Saving Screen
(When no signal is received for about one hour, the computer switches to the
When you push either of the MODE button or the START/STOP button or you ride the bicycle, the display comes back to the measurement display.
Start or Stop of Measurements.
The computer can be programmed to run in either MANUAL MODE or AUTO TIME MODE. In Manual Mode you must press the START / STOP button to turn on and off the Timer, which records Distance and Average
Speeds. In Auto Time ![]() the computer turns the Timer on and off de- pending on a signal from the sensor.
the computer turns the Timer on and off de- pending on a signal from the sensor.
When speed is detected by the computer and the Timer is running, the km/h or mph will flash. Speed will appear on the computer screen and the Odometer will record, regardless if the Timer is running or not.
• Auto Time Mode (Automatic Measurement)
In AUTO TIME mode, the letters ![]() will appear on the computer screen. Elapsed time, Average and Distance are recorded automatically and the Timer, stops when the speed stops. In this mode the START/STOP button is not operable.
will appear on the computer screen. Elapsed time, Average and Distance are recorded automatically and the Timer, stops when the speed stops. In this mode the START/STOP button is not operable.
• Manual Measurements
When you don’t see the icon ![]() on the screen, you can start or stop the measurements by pushing the START/STOP button.
on the screen, you can start or stop the measurements by pushing the START/STOP button.
Measurement Unit Icon
Indicates which wheel setting is selected.
Mode Selection Illustrations (bottom of the screen)
Av
Average Speed
0.0
[0.0 - 65.9 mph]
Dst
Trip distance - 1
0.00
Trip distance - 2
0.00 - 999.99 km
MODE [mile]
You can program two tire sizes and use either of them.
Road MTB
How to select tire size | or | |||
|
| When data other than Odo is | ||
|
| displayed | SET | |
|
|
| ||
|
| Keep on pressing the | ||
|
| button for two seconds | ||
|
| When the Odo data is | ||
|
| displayed |
| |
|
| MODE | ST/STOP | |
Road | MTB |
| ||
Keep on pressing buttons | ||||
|
| |||
|
| for 2 sec. at the same time | ||
Inputting the Tire |
| |||
When you push the button, measurements of Elapsed Time, Average Speed, Trip Distance 1 and 2 are started and they are stopped with the second push of the button.
• How to set ON or OFF the auto-mode
Push the SET button on the back side of the computer while Elapsed Time, Average Speed, Trip Distance 1 or 2 is displayed, then the icon ![]() is lit” (ON) or turned OFF.
is lit” (ON) or turned OFF.
Resetting Elapsed Time, Trip Distance, Average Speed and Max Speed.
Press and hold the MODE and START/STOP buttons for 2 sec. in either the Elapsed Time, Trip Distance 1, Average Speed or Maximum Speed functions to reset these functions. The Odometer and Trip Distance 2 are not reset. See below for details.
• Resetting Trip Distance 2
| ST/STOP |
SET | Tm |
| Av |
| Dst |
![]()
![]() MODE
MODE
MODE
* Resetting of Dst2 only
Odo
Odometer
0.0 - 99999 km [mile]
Mx
Maximum Speed
0.0 (4.0) - 105.0 km/h [0.0(3.0) - 65.0 mph]
Circumference | Range of setting: |
| 100 - 300 cm |
Return to Odo | SET |
SET |
|
When the measurements |
|
are stopped |
|
Increase | Decrease |
the number | the number |
MODEST/STOP
Trip Distance 2 is reset independently. When Trip Distance 2 is on the screen, press and hold both the MODE and START/STOP buttons to re- set.
Computer Functions
•
ST/STOP
For 2 sec. at the same time
Tm |
| Setting The Clock Time | ||
Elapsed Time |
| 24 hour or 12 hour system is to | ||
| be used with km/h or mph unit respectively | |||
0:00’00” - 9:59’59” | ||||
|
| |||
For 2 sec. | Return to Clock display | Increase the number | ||
|
| |||
|
| SET | MODE | |
When no signal has been received for about one hour, the computer goes into the power savings mode to only display the Clock. When any button is pushed or the wheel is rotated, the computer screen reappears.
• Dual Tire Size
You can program two, ![]() and
and ![]() , tire circumferences and can easily switch
, tire circumferences and can easily switch ![]() to
to ![]() or vise versa to enable the system to be used by two bicycles which have different tire sizes. The com-
or vise versa to enable the system to be used by two bicycles which have different tire sizes. The com-
puter program for circumference ![]() is programmed for low speed use. We recommend to use this for MTB's.
is programmed for low speed use. We recommend to use this for MTB's.
• Moving Elapsed Time, Average Speed and Maximum | Elapsed | Average | Maximum |
|
Time | Speed | Speed |
| |
Speed to the upper display. |
|
|
|
|
Minute | Av | Mx | Upper | |
You can move the Elapsed Time, Average and Max Speed | Second | Part | ||
displays to the upper display for easier viewing. Hold the | Hour | SPD | SPD | Lower |
Part | ||||
START/STOP button for 2 sec. and the |
|
|
|
|
pear in the upper display. Hold the START/STOP button |
|
|
|
|
again for 2 sec. and the display returns to the normal set up. |
|
|
|
|
|
| ST/STOP |
| |
Troubleshooting |
|
|
|
|
No display appears.
Is the battery dead?
Replace it by the new one and do all clear procedure.
Strange data appears
Do all clear procedure (write down the number of Odometer if possible before doing the all clear procedure and input it manually after choosing the measurement unit).
Measurements do not start when the START/STOP button is pushed.
Is the icon ![]() ON?
ON?
Turn the
No speed data is displayed.
(If the speed data is not displayed, have the contact points
Is the gap between the sensor and the magnet too big? (should be within 5 mm) Does the marked line of the sensor align with the center of the magnet?
Adjust the position of the magnet and the sensor.
Make sure that the contact points of the bracket or of the main body are free from dirt. Wipe the contact points clean.
Is the cord not broken? Even if the outside of the cord looks normal, a breakage in the wire can occur. Replace the bracket and sensor set with a new one.
Maintenance
•To clean the computer or the attached parts, use diluted neutral detergent on a soft cloth, and wipe it off with a dry cloth.
Replacing The Battery | Close |
| |
When the display gets dim, replace the battery. If you want to retain and | Open |
use the current reading of odometer, write down the odometer data before |
|
replacing the battery. |
|
• Put a lithium battery CR2032 in the computer with the (+) mark facing up. |
|
• After replacing the battery, do the necessary |
|
accordance with "Computer |
|
MODE | MODE |
|
|
|
|
|
|
|
|
| Clock |
| SET |
|
|
|
|
| |
|
|
|
|
|
|
| |||
| 0:00 - 23:59 |
|
|
| ST/STOP |
|
| ||
|
|
|
|
|
|
|
| ||
| [1:00 - 12:59] |
|
|
|
|
|
|
|
|
|
| When the measurements |
|
| |||||
|
| are stopped. |
| Set the hour | Set the minute | ||||
Specifications |
|
|
|
|
|
|
|
|
|
Battery Life : | A Lithium Battery (CR2032), Approx:3 yrs |
|
| ||||||
|
| (approx:1 hrs per day usage) |
|
| |||||
Control System : | |||||||||
Display : | Liquid crystal display |
|
| ||||||
Sensing System : |
|
| |||||||
Range of Tire Circumference : | 100 cm – 300 cm (Initial value – A:210 cm | B:205 cm) | |||||||
Range of Operational Temperature : | 0°C – 40°C | [32°F – 104°F] |
|
| |||||
Dimension and Weight(Computer) : | 38 x 54 x 17.5 mm | ||||||||
*The
*The specifications and design are subject to change without notice.
Limited Warranty
If any trouble or damage occurs during normal use, the product computer will be repaired or replaced free of charge. Type your name, address, telephone number or
![]()
![]()
![]()
![]()
![]() CO.,LTD.
CO.,LTD.
Service & Research Address for United States Consumers:
CAT EYE Service & Research Center
1705 14th St. 115 Boulder, CO 80302
Phone: | Toll Free: |
Fax: | |
* Accessory parts are available for the customers as shown below. | URL: http://www.cateye.com |
Parts | ||||
Bracket Sensor Kit [Long] | Wheel Magnet | |||
|
| |||
Standard |
| Attachment Kit | ||
|
| |||
|
|
| Lithium Battery (CR2032) |
| |||
| Heavy Duty Wire and Bracket | ||
| Sensor Kit | Center Mount Bracket | |
Parts |
| Kit [Long] | |
| |||
| Bracket Sensor Kit for Aero Bar | ||
Optional |
| ||
| |||
Magnet for | |||
Composite Wheel | |||
| Stem Mount Bracket Kit | ||
|
|