Installation Instructions | PAC516 | |
INSTALLATION |
| |
The PAC516 is intended for use in installations where the wall | PAC516 | |
surface has not been finished and the structure (studs) is | ||
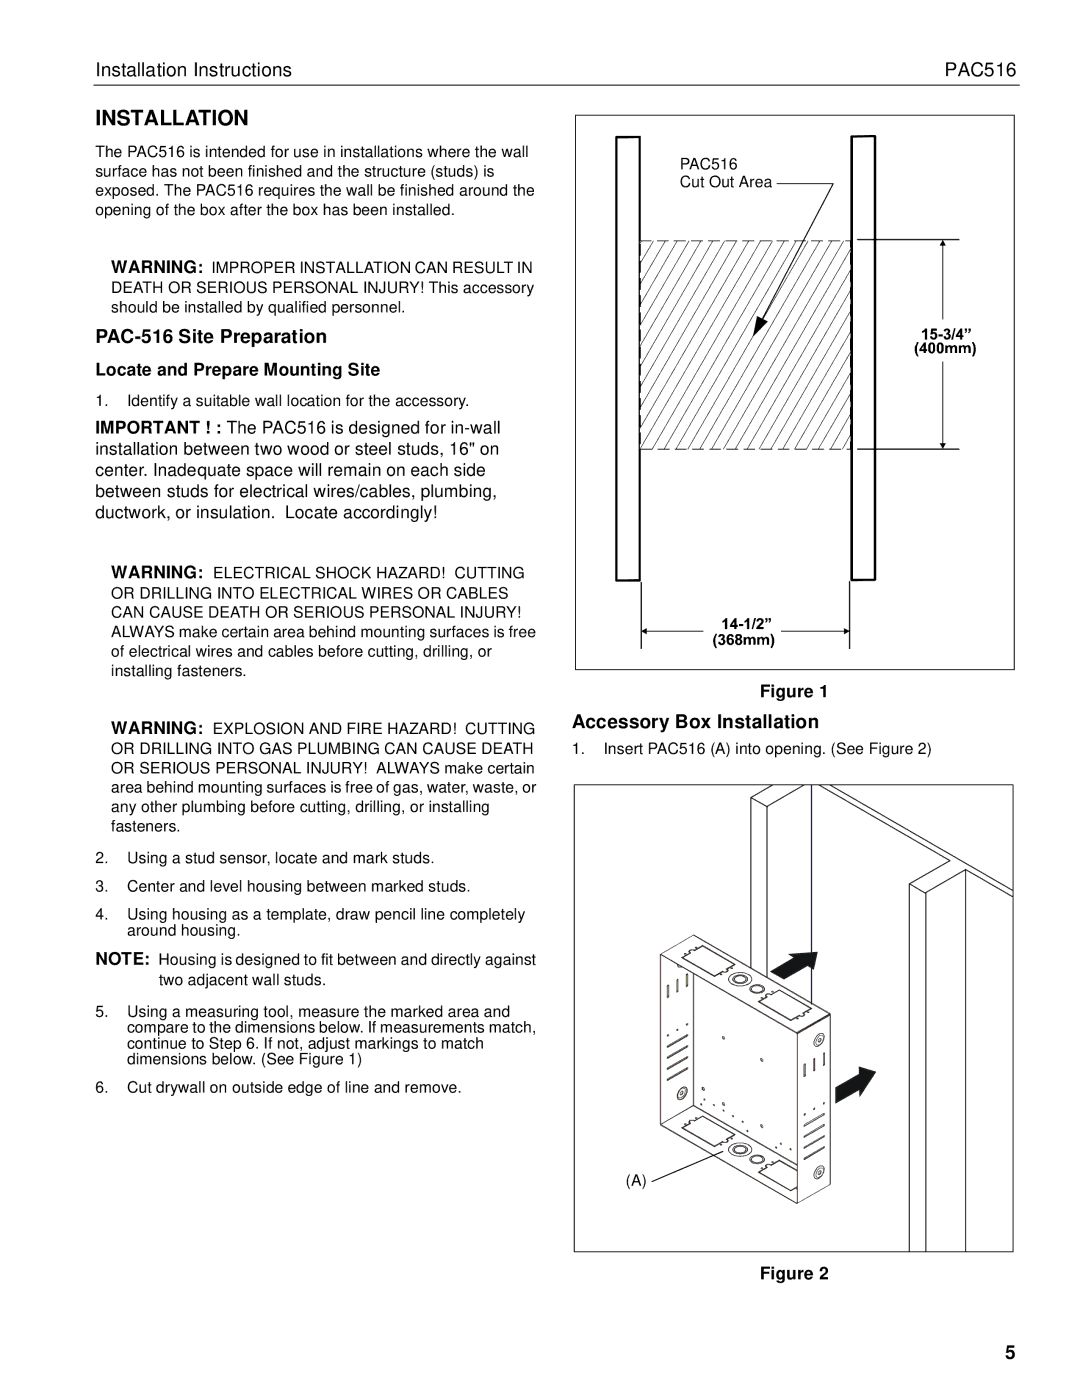
Cut Out Area | ||
exposed. The PAC516 requires the wall be finished around the | ||
| ||
opening of the box after the box has been installed. |
| |
WARNING: IMPROPER INSTALLATION CAN RESULT IN |
| |
DEATH OR SERIOUS PERSONAL INJURY! This accessory |
| |
should be installed by qualified personnel. |
| |
|
| |
Locate and Prepare Mounting Site |
| |
1. Identify a suitable wall location for the accessory. |
| |
IMPORTANT ! : The PAC516 is designed for |
| |
installation between two wood or steel studs, 16" on |
| |
center. Inadequate space will remain on each side |
| |
between studs for electrical wires/cables, plumbing, |
| |
ductwork, or insulation. Locate accordingly! |
| |
WARNING: ELECTRICAL SHOCK HAZARD! CUTTING |
| |
OR DRILLING INTO ELECTRICAL WIRES OR CABLES |
| |
CAN CAUSE DEATH OR SERIOUS PERSONAL INJURY! |
| |
ALWAYS make certain area behind mounting surfaces is free |
| |
of electrical wires and cables before cutting, drilling, or |
| |
installing fasteners. |
|
WARNING: EXPLOSION AND FIRE HAZARD! CUTTING OR DRILLING INTO GAS PLUMBING CAN CAUSE DEATH OR SERIOUS PERSONAL INJURY! ALWAYS make certain area behind mounting surfaces is free of gas, water, waste, or any other plumbing before cutting, drilling, or installing fasteners.
2.Using a stud sensor, locate and mark studs.
3.Center and level housing between marked studs.
4.Using housing as a template, draw pencil line completely around housing.
NOTE: Housing is designed to fit between and directly against two adjacent wall studs.
5.Using a measuring tool, measure the marked area and compare to the dimensions below. If measurements match, continue to Step 6. If not, adjust markings to match dimensions below. (See Figure 1)
6.Cut drywall on outside edge of line and remove.
Figure 1
Accessory Box Installation
1.Insert PAC516 (A) into opening. (See Figure 2)
(A) ![]()
Figure 2
5
