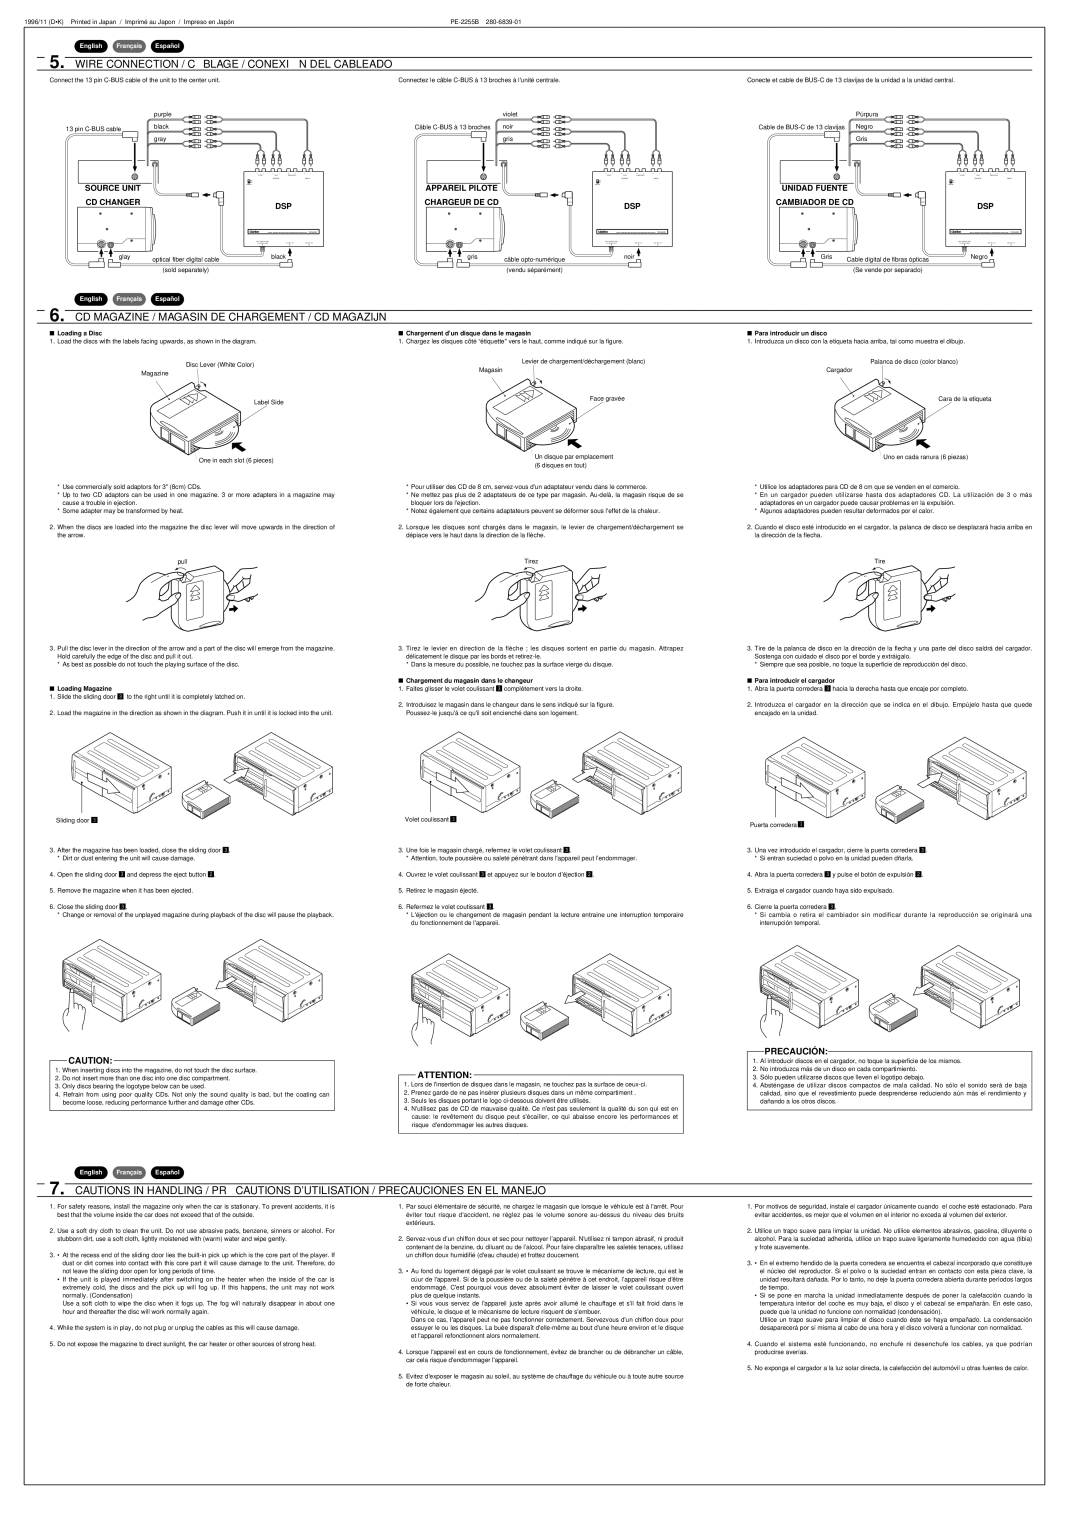
■Loading a Disc
1. Load the discs with the labels facing upwards, as shown in the diagram.
Disc Lever (White Color)
Magazine
Label Side
One in each slot (6 pieces)
*Use commercially sold adaptors for 3" (8cm) CDs.
*Up to two CD adaptors can be used in one magazine. 3 or more adapters in a magazine may cause a trouble in ejection.
*Some adapter may be transformed by heat.
2.When the discs are loaded into the magazine the disc lever will move upwards in the direction of the arrow.
■Chargernent d’un disque dans le magasin
1. Chargez les disques côté “étiquette" vers le haut, comme indiqué sur la figure.
Levier de chargement/déchargement (blanc)
Magasin
Face gravée
Un disque par emplacement (6 disques en tout)
*Pour utiliser des CD de 8 cm, servez-vous d'un adaptateur vendu dans le commerce.
*Ne mettez pas plus de 2 adaptateurs de ce type par magasin. Au-delà, la magasin risque de se bloquer lors de l'ejection.
*Notez également que certains adaptateurs peuvent se déformer sous l'effet de la chaleur.
2.Lorsque les disques sont chargés dans le magasin, le levier de chargement/déchargement se dépiace vers le haut dans la direction de la flèche.
■Para introducir un disco
1. Introduzca un disco con la etiqueta hacia arriba, tal como muestra el dibujo.
Palanca de disco (color blanco)
Cargador
Cara de la etiqueta
Uno en cada ranura (6 piezas)
*Utilice los adaptadores para CD de 8 cm que se venden en el comercio.
*En un cargador pueden utilizarse hasta dos adaptadores CD. La utilización de 3 o más adaptadores en un cargador puede causar problemas en la expulsión.
*Algunos adaptadores pueden resultar deformados por el calor.
2.Cuando el disco esté introducido en el cargador, la palanca de disco se desplazará hacia arriba en la dirección de la flecha.
pull
3.Pull the disc lever in the direction of the arrow and a part of the disc will emerge from the magazine. Hold carefully the edge of the disc and pull it out.
*As best as possible do not touch the playing surface of the disc.
■Loading Magazine
1.Slide the sliding door £ to the right until it is completely latched on.
2.Load the magazine in the direction as shown in the diagram. Push it in until it is locked into the unit.
Sliding door 
3.After the magazine has been loaded, close the sliding door £.
*Dirt or dust entering the unit will cause damage.
4.Open the sliding door £ and depress the eject button ™.
5.Remove the magazine when it has been ejected.
6.Close the sliding door £.
*Change or removal of the unplayed magazine during playback of the disc will pause the playback.
Tirez
3.Tirez le levier en direction de la flèche ; les disques sortent en partie du magasin. Attrapez délicatement le disque par les bords et retirez-le.
*Dans la mesure du possible, ne touchez pas la surface vierge du disque.
■Chargement du magasin dans le changeur
1.Faites glisser le volet coulissant £ complètement vers la droite.
2.Introduisez le magasin dans le changeur dans le sens indiqué sur la figure. Poussez-le jusqu'à ce qu'il soit encienché dans son logement.
Volet coulissant 
3.Une fois le magasin chargé, refermez le volet coulissant £.
*Attention, toute poussière ou saleté pénétrant dans l'appareil peut’endommagerl.
4.Ouvrez le volet coulissant £ et appuyez sur le bouton d’éjection ™.
5.Retirez le magasin éjecté.
6.Refermez le volet coutissant £.
*L'éjection ou le changement de magasin pendant la lecture entraine une interruption temporaire du fonctionnement de l'appareii.
Tire
3.Tire de la palanca de disco en la dirección de la flecha y una parte del disco saldrá del cargador. Sostenga con cuidado el disco por el borde y extráigalo.
*Siempre que sea posible, no toque la superficie de reproducción del disco.
■Para introducir el cargador
1.Abra la puerta corredera £ hacia la derecha hasta que encaje por completo.
2.Introduzca el cargador en la dirección que se indica en el dibujo. Empújelo hasta que quede encajado en la unidad.
Puerta corredera
3.Una vez introducido el cargador, cierre la puerta corredera £.
*Si entran suciedad o polvo en la unidad pueden dñarla.
4.Abra la puerta corredera £ y pulse el botón de expulsión ™.
5.Extraiga el cargador cuando haya sido expulsado.
6.Cierre la puerta corredera £.
*Si cambia o retira el cambiador sin modificar durante la reproducción se originará una interrupción temporal.
CAUTION:
1.When inserting discs into the magazine, do not touch the disc surface.
2.Do not insert more than one disc into one disc compartment.
3.Only discs bearing the logotype below can be used.
4.Refrain from using poor quality CDs. Not only the sound quality is bad, but the coating can become loose, reducing performance further and damage other CDs.
ATTENTION:
1.Lors de l'insertion de disques dans le magasin, ne touchez pas la surface de ceux-ci.
2.Prenez garde de ne pas insérer plusieurs disques dans un même compartiment .
3.Seuls les disques portant le logo ci-dessous doivent être utilisés.
4.N'utilisez pas de CD de mauvaise qualité. Ce n'est pas seulement la qualité du son qui est en cause: le revêtement du disque peut s'écailler, ce qui abaisse encore les performances et risque d'endommager les autres disques.
PRECAUCIÓ N:
1.Al introducir discos en el cargador, no toque la superficie de los mismos.
2.No introduzca más de un disco en cada compartimiento.
3.Sólo pueden utilizarse discos que lleven el logotipo debajo.
4.Absténgase de utilizar discos compactos de mala calidad. No sólo el sonido será de baja calidad, sino que el revestimiento puede desprenderse reduciendo aún más el rendimiento y dañando a los otros discos.
1.For safety reasons, install the magazine only when the car is stationary. To prevent accidents, it is best that the volume inside the car does not exceed that of the outside.
2.Use a soft dry cloth to clean the unit. Do not use abrasive pads, benzene, sinners or alcohol. For stubborn dirt, use a soft cloth, lightly moistened with (warm) water and wipe gently.
3.• At the recess end of the sliding door lies the built-in pick up which is the core part of the player. If dust or dirt comes into contact with this core part it will cause damage to the unit. Therefore, do not leave the sliding door open for long periods of time.
•If the unit is played immediately after switching on the heater when the inside of the car is extremely cold, the discs and the pick up will fog up. If this happens, the unit may not work normally. (Condensation)
Use a soft cloth to wipe the disc when it fogs up. The fog will naturally disappear in about one hour and thereafter the disc will work normally again.
4.While the system is in play, do not plug or unplug the cables as this will cause damage.
5.Do not expose the magazine to direct sunlight, the car heater or other sources of strong heat.
1.Par souci élémentaire de sécurité, ne chargez le magasin que lorsque le véhicule est à l'arrêt. Pour éviter tout risque d'accident, ne églezr pas le volume sonore au-dessus du niveau des bruits extérieurs.
2.Servez-vous d’un chiffon doux et sec pour nettoyer l’appareil. N'utilisez ni tampon abrasif, ni produit contenant de la benzine, du diluant ou de l’alcool. Pour faire disparaître les saletés tenaces, utilisez un chiffon doux humidifié (d'eau chaude) et frottez doucement.
3.• Au fond du logement dégagé par le volet coulissant se trouve le mécanisme de lecture, qui est le cúur de l'appareil. Si de la poussière ou de la saleté pénètre à cet endroit, l’appareil risque d'être endommagé. C'est pourquoi vous devez absolumentéviter de laisser le volet coulissant ouvert plus de quelque instants.
•Si vous vous servez de l'appareil juste après avoir allumé le chauffage et s'il fait froid dans le véhicule, le disque et le mécanisme de lecture risquent de s'embuer.
Dans ce cas, I'appareil peut ne pas fonctionner correctement. Servezvous d'un chiffon doux pour essuyer le ou les disques. La buée disparaît d'elle-même au bout d'une heure environ et le disque et l'appareil refonctionnent alors normalement.
4.Lorsque l'appareil est en cours de fonctionnement,évitez de brancher ou de débrancher un câble, car cela risque d'endommager l'appareil.
5.Evitez d'exposer le magasin au soleil, au système de chauffage du véhicule ou à toute autre source de forte chaleur.
1.Por motivos de seguridad, instale el cargador únicamente cuando el coche esté estacionado. Para evitar accidentes, es mejor que el volumen en el interior no exceda al volumen del exterior.
2.Utilice un trapo suave para limpiar la unidad. No utilice elementos abrasivos, gasolina, diluyente o alcohol. Para la suciedad adherida, utilice un trapo suave ligeramente humedecido con agua (tibia) y frote suavemente.
3.• En el extremo hendido de la puerta corredera se encuentra el cabezal incorporado que constituye el núcleo del reproductor. Si el polvo o la suciedad entran en contacto con esta pieza clave, la unidad resultará dañada. Por lo tanto, no deje la puerta corredera abierta durante períodos largos de tiempo.
•Si se pone en marcha la unidad inmediatamente después de poner la calefacción cuando la temperatura interior del coche es muy baja, el disco y el cabezal se empañarán. En este caso, puede que la unidad no funcione con normalidad (condensación).
Utilice un trapo suave para limpiar el disco cuando éste se haya empañado. La condensación desaparecerá por símisma al cabo de una hora y el disco volverá a funcionar con normalidad.
4.Cuando el sistema esté funcionando, no enchufe ni desenchufe los cables, ya que podrían producirse averías.
5.No exponga el cargador a la luz solar directa, la calefacción del automóvil u otras fuentes de calor.