FEATURES |
GETTING STARTED
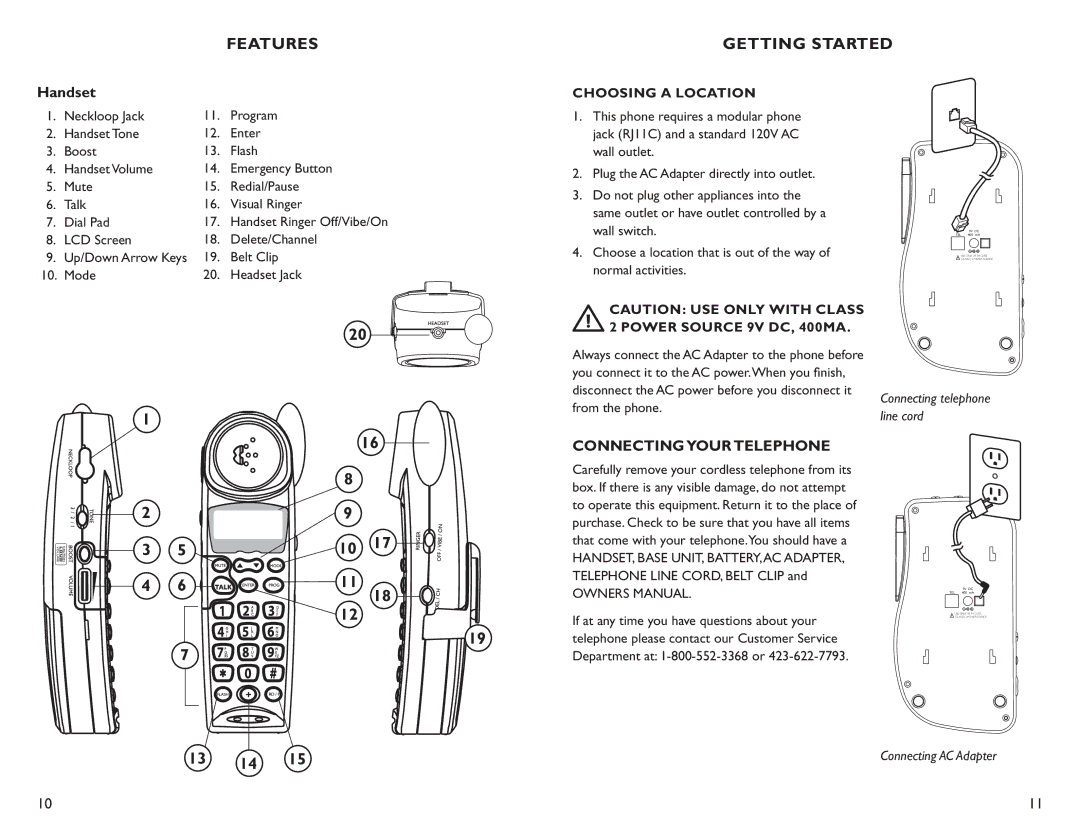
Handset |
|
|
| |
1. | Neckloop Jack | 11. | Program | |
2. | Handset Tone | 12. | Enter | |
3. | Boost | 13. | Flash | |
4. | Handset Volume | 14. | Emergency Button | |
5. | Mute | 15. | Redial/Pause | |
6. | Talk | 16. | Visual Ringer | |
7. | Dial Pad | 17. | Handset Ringer Off/Vibe/On | |
8. | LCD Screen | 18. | Delete/Channel | |
9. | Up/Down Arrow Keys | 19. | Belt Clip | |
10. | Mode | 20. | Headset Jack | |
|
|
| 20 |
|
|
|
|
| |
1
CHOOSING A LOCATION
1.This phone requires a modular phone jack (RJ11C) and a standard 120V AC wall outlet.
2.Plug the AC Adapter directly into outlet.
3.Do not plug other appliances into the same outlet or have outlet controlled by a wall switch.
4.Choose a location that is out of the way of normal activities.
CAUTION: USE ONLY WITH CLASS 2 POWER SOURCE 9V DC, 400MA.
Always connect the AC Adapter to the phone before you connect it to the AC power.When you finish, disconnect the AC power before you disconnect it from the phone.
9V DC
TEL 400 mA
USE ONLY WITH CLASS (CLASSE) 2 POWER SOURCE
Connecting telephone line cord
16
8
CONNECTINGYOUR TELEPHONE
Carefully remove your cordless telephone from its box. If there is any visible damage, do not attempt
2 |
|
3 | 5 |
4 | 6 |
| 7 |
9 10 ![]()
![]()
![]() 11
11 ![]()
![]() 12
12
17 ![]()
18 ![]()
![]()
![]()
19
to operate this equipment. Return it to the place of purchase. Check to be sure that you have all items that come with your telephone.You should have a
HANDSET, BASE UNIT, BATTERY,AC ADAPTER, TELEPHONE LINE CORD, BELT CLIP and
OWNERS MANUAL.
If at any time you have questions about your telephone please contact our Customer Service Department at:
9V DC
TEL 400 mA
USE ONLY WITH CLASS (CLASSE) 2 POWER SOURCE
13 | 14 | 15 | Connecting AC Adapter |
|
10 | 11 |
