Side Guyline

3 Attach Tent to Frame Using Frame Clips

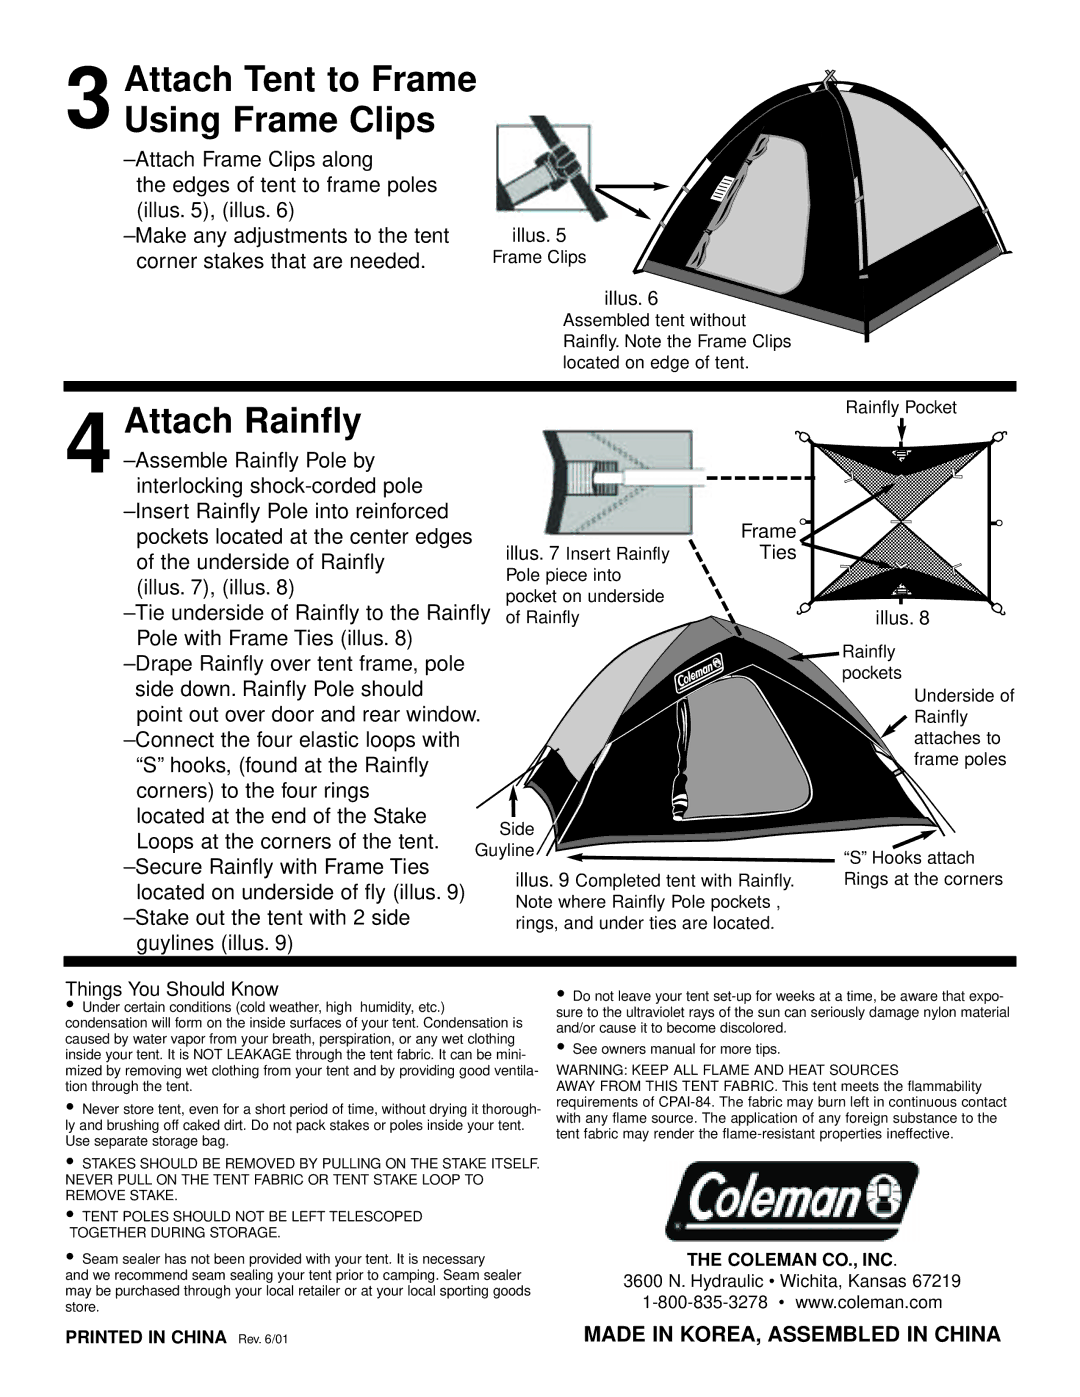
–Attach Frame Clips along

the edges of tent to frame poles (illus. 5), (illus. 6)

–Make any adjustments to the tent corner stakes that are needed.

illus. 5

Frame Clips

illus. 6

Assembled tent without Rainfly. Note the Frame Clips located on edge of tent.

Attach Rainfly

4 –Assemble Rainfly Pole by interlocking shock-corded pole

–Insert Rainfly Pole into reinforced pockets located at the center edges of the underside of Rainfly

(illus. 7), (illus. 8)

–Tie underside of Rainfly to the Rainfly Pole with Frame Ties (illus. 8)

illus. 7 Insert Rainfly Pole piece into pocket on underside of Rainfly

Rainfly Pocket

Frame

Ties

illus. 8

–Drape Rainfly over tent frame, pole side down. Rainfly Pole should point out over door and rear window.

–Connect the four elastic loops with “S” hooks, (found at the Rainfly corners) to the four rings located at the end of the Stake Loops at the corners of the tent.

–Secure Rainfly with Frame Ties located on underside of fly (illus. 9)

–Stake out the tent with 2 side guylines (illus. 9)

Rainfly pockets

Underside of Rainfly attaches to frame poles

“S” Hooks attach

illus. 9 Completed tent with Rainfly. Rings at the corners Note where Rainfly Pole pockets ,

rings, and under ties are located.

Things You Should Know

Under certain conditions (cold weather, high humidity, etc.) condensation will form on the inside surfaces of your tent. Condensation is caused by water vapor from your breath, perspiration, or any wet clothing inside your tent. It is NOT LEAKAGE through the tent fabric. It can be mini- mized by removing wet clothing from your tent and by providing good ventila- tion through the tent.

Never store tent, even for a short period of time, without drying it thorough- ly and brushing off caked dirt. Do not pack stakes or poles inside your tent. Use separate storage bag.

STAKES SHOULD BE REMOVED BY PULLING ON THE STAKE ITSELF. NEVER PULL ON THE TENT FABRIC OR TENT STAKE LOOP TO REMOVE STAKE.

TENT POLES SHOULD NOT BE LEFT TELESCOPED

TOGETHER DURING STORAGE.

Seam sealer has not been provided with your tent. It is necessary

and we recommend seam sealing your tent prior to camping. Seam sealer may be purchased through your local retailer or at your local sporting goods store.

Do not leave your tent set-up for weeks at a time, be aware that expo- sure to the ultraviolet rays of the sun can seriously damage nylon material and/or cause it to become discolored.

See owners manual for more tips.

WARNING: KEEP ALL FLAME AND HEAT SOURCES

AWAY FROM THIS TENT FABRIC. This tent meets the flammability requirements of CPAI-84. The fabric may burn left in continuous contact with any flame source. The application of any foreign substance to the tent fabric may render the flame-resistant properties ineffective.

THE COLEMAN CO., INC.

3600 N. Hydraulic • Wichita, Kansas 67219

1-800-835-3278 • www.coleman.com

PRINTED IN CHINA Rev. 6/01

MADE IN KOREA, ASSEMBLED IN CHINA

Page 2
Image 2
Coleman 9260N707 Attach Rainfly, Attach Tent to Frame Using Frame Clips, Frame Ties Illus, Things You Should Know

9260N707, 9260-703, 9260M704, 9260A702 specifications

The Coleman 9260 series encompasses a range of portable propane stoves designed for outdoor cooking enthusiasts. Models such as the 9260A702, 9260M704, 9260-703, and 9260N707 share several key features and technologies that make them ideal for camping trips, tailgating, or backyard barbecues.

One of the standout features of these models is their robust construction, designed to withstand outdoor elements while ensuring consistent performance. The sturdy frame and high-quality materials provide durability, allowing users to enjoy their cooking experiences without worrying about the wear and tear that can come with outdoor use.

Each stove in the 9260 series is equipped with advanced burner technology, providing superior heat distribution across the cooking surface. This ensures that food cooks evenly, reducing the chances of hot spots that can lead to burnt or undercooked meals. Some models feature two burners, allowing for simultaneous cooking of multiple dishes, which is a significant advantage when preparing meals for a group.

The ignition system on the Coleman 9260 series is designed for ease of use. Many models incorporate an InstaStart ignition feature, allowing users to light the stove with just the push of a button, eliminating the need for matches or lighters. This enhances safety and convenience, especially in windy or damp conditions.

Portability is another significant characteristic of the Coleman 9260 series. These stoves typically feature compact designs and foldable legs, making them easy to transport and store. Weighing in at a reasonable amount, they can fit into most vehicle trunks or be carried in camping gear without hassle.

In terms of fuel efficiency, propane is a popular choice for outdoor cooking, and the models in the 9260 series are designed to maximize fuel usage. With the ability to control flame intensity, users can reduce fuel consumption by adjusting the output according to their cooking needs.

Overall, the Coleman 9260A702, 9260M704, 9260-703, and 9260N707 provide reliable outdoor cooking solutions with their combination of durability, advanced burner technology, easy ignition, portability, and fuel efficiency. These stoves cater to the needs of campers, tailgaters, and backyard chefs alike, making them excellent choices for anyone looking to enhance their outdoor cooking experience.