Operators Manual
Service
Identification
Inside Back
General Operation
Ignition System
Service and Maintenance
Safety & Operation Decals
Height Adjustment
Rotating Blades
\,CRAFTSMAN
Two Bin Bagger Headlight Kit Front Bumper Kit
Setup instructions
Read The Operators
Control Functions
Hour Meter
General Operating Safety
Ignition Switch
PTO Switch
Checks Before Starting
Fuel Recommendations
Do not stop or park rider over dry leaves, grass or
Mowing
Emergency Stopping
Stopping the Rider & Engine
Starting the Engine
Levers Gradually
Forward Travel
Smooth Travel
Forward Travel Practice
Practice Turning in Place
Practice Turning Around a Corner
Executing Turns Turning In Place
Executing an End=Of=Row Zero Turn
Mower Deck Removal Installation
Installing the Mower Deck
Removing the Mower Deck
19HP Briggs & Stratton
Maintenance Schedule
All
Models
Pressure
Clean Debris from Rider and Engine Compartment
Clean Debris from Engine Cooling Areas and AIR Filter
Checktire Pressure
Arbor Lubrication 3-Blade Model Shown
Service Interval 25 hours
Blade Removal Workbench
Clean Deck Check / Replace Mower Blades
Service interval 100 Hours
Cleaning the Battery and Cables
Check Rider Safety System
Operational Safety Checks
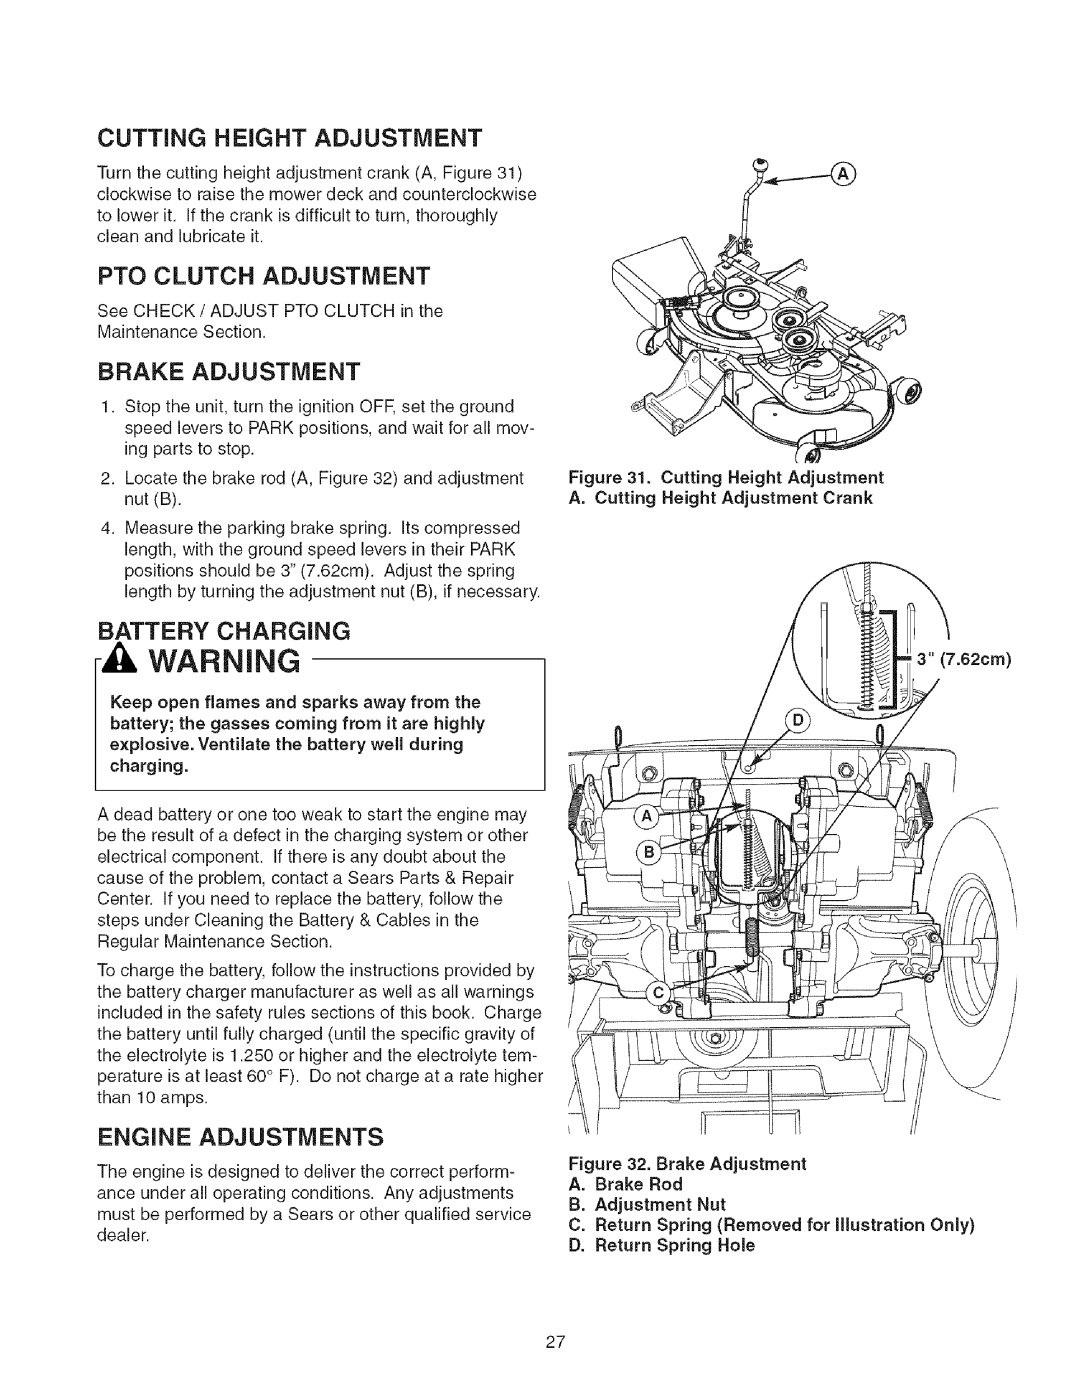
Adjustment Nut
Check / Adjust PTO Clutch
Service interval 200 Hours
Adjustment Window Qty , one shown B. Adjustment Nut
Check Engine OIL Level
Change Engine OIL
Change Engine OIL & Filter
Air Filter Latch Air Filter Cover
AiR Filter & PRE-CLEANER
Air Filter Service
Pre=Cleaner Service
Replace Spark Plug
Adjustment
Speed Balancing Adjustment
Ground Speed Control Lever
Battery Charging
Cutting Height Adjustment
PTO Clutch Adjustment
Brake Adjustment
Side to Side Leveling
Mower Deck Leveling Adjustments
Mower Belt Replacement
Front To Back Leveling
Backside idler Pulley
STO RAG E
Troubleshooting Rider
Mower cut is
Troubleshooting
Mower
Rider will not
ZTS
Garantja Limitada DEL Equipo Montable DE Craftsman
Hardware
Transporte Y Almacenamento
Equipo RElVlOLCADO Unidades Monta
Operacion EN Cuestas
SERViCiO Y MANTENilVllENTO
Calcomania Peligro/Advertencia, inferior
Interruptor
Identificaci6n
2s u
Recolector de Hierba con Bolsa Gemela Faro delantero
Fresca
MOperador
Palancas de velocidad en suelo
Freno de parada
Ahogador
Ajuste de AJtura de Corte de Podadora
Interruptor de Encendido
Medidor de Horas
Interruptor PTO
Nunca permita que pasajeros se paseen en la unidad
Advertencia Reiviolques
Motor
Como Arrancar EL Motor
Manualmente
Manejo Hacia Manejo en Adelante
PR. ,CTICA DE Ivianejo
Traslado sin prob=
Lemas
Prctica de Vuelta en el Lugar
Prbctica de dar Vuelta en una Esquina
Ejecutar un Giro Cero al Final de la Fila
Vuelta en el Mismo Lugar
Instalar o quitar la podadora
Remocion E Instalacion DE LA Cubierta DE LA Podadora
Quitar la Cubierta de la Podadora
Instalar la Cubierta de la Podadora
Programa
DEL MONTABLE, de todos Los Antes de
Anual
Intervalo de Servicio 25 horas
TRO DE AIREA. Rejilla de Admisi6n
Aceite
LUBRICACI6N
Operacion
Para su seguridad personal, los tornillos de
Si la unidad no pasa una prueba de seguridad
Intervalo de Servicio 200 horas
VERIFICAR/AJUSTAR Embrague DEL PTO
Verifique EL Nivel DE Aceite DEL Motor
SERVlCIO DEL Filtro DE Airey DEL PRE
Remoci6n e instalaci6n del filtro de aire
Predepurador
Prepurificador Filtro de aire
Servicio del prepurificador
Servicio del filtro de aire
Reemplace LA BUJiA DE Encendido =
Ajuste DE Palanca DE Control
DE Velocidad
Pernos de Montaje Perilla
Ajustes DEL Motor
Ajuste DE LA Altura DE Corte
Ajuste DEL Embrague DEL PTO
Ajuste DEL Freno
Ajuste DE Nivel DE LA Cubierta DE LA Podadora
Nivelado de un Lado a Otto
Tuerca Exterior
Polea Derecha del Arbol de SujecJ6n
Nivelado de Adelante hacia Atrs
Advertencia
Diagn6stico
Del Tractor
Consumo de
Diagn6stico de la Podadora
RepairParts
ZTS 7500
Frame, Body & Seat Group
Frame Body & Seat Group
ZTS
Footnotes
PTS-4
REF no Part NO. QTY. Description
Frame, Body & Seat Group ZTS
Engine Group 19HP Briggs & Stratton ZTS 7500
Utch
REF no
Engine Group 19HP Briggs Stratton 987321
1618
Carrier & Transmission Group ZTS 7500
Carrier Transmission Group 987362
Frame Assembly
Carrier & Transmission Group ZTS 7500
Refno Partno QTY Description
Carrier Transmission Group
ZTS 7500
Controls Group
Refno QTY Description
Controls Group 986806
Electrical Group ZTS 7500
HeadlightSwitch Seatpan Optional
QTY Description
Electrical Group
Torque to 44 55 ft. Ibs Or 59.4 74.8 Nm PTS-16
REF no QTY Description
Decals Group D987352 987357987358986884986857987350 ZTS 7500
QTY Description
Decals Group D987352 987357987358986884986857987350
Mower Deck Clutch & Support Group
No Part no QTY Description
Mower Deck Clutch Support Group
Mower Deck Height Adjustment Group ZTS 7500
Mower Deck Height Adjustment Group 987324
Mower Deck Housing, Arbors & Blades Group ZTS 7500
Mower Deck Housing Arbors Blades Group 987322
221
868@
13J
1266A
Part Description
Engine Parts
Briggs & Stratton Engine Parts ZTS 7500 = Model No
Hardware identification& TorqueSpecifications
PTS
Servicio de Jnstalaci6n de Sears
Sears Installation Service
Repair Protection Agreements
Acuerdo de Protecci6n de Reparaciones
Call anytime, day or night U.S.A. only
Call anytime, day or night U.S.A. and Canada