Craftsmrn
Adjustment section pages
Contents
Test the safety
Operation safety Instructions
Youll Need Tools
Finished Ceiling
Center of the door. See pages 12
One-Piece Door With Track
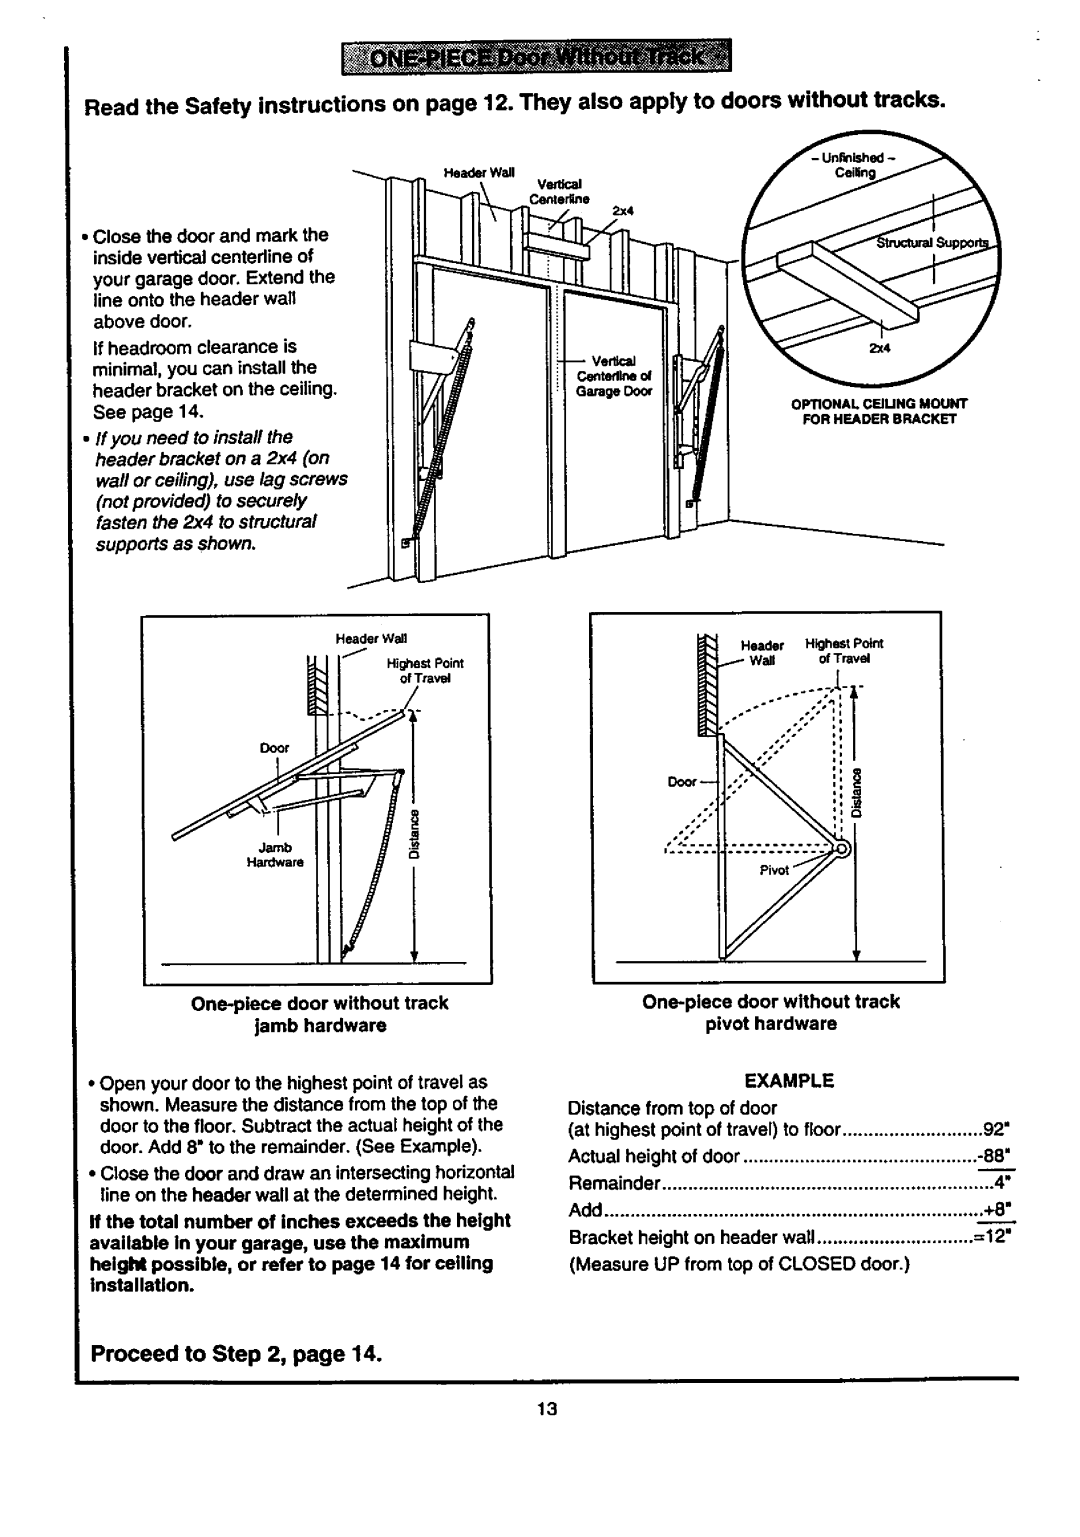
One-Piece Door Without Track
Closed Position
Isaor sigt P,ele=se Garage
Security+
Carton Inventory
SquaHo t2
Sk2
Safety Reversing Sensor Installation Hardware
Installation Hardware
Assembly Step
Assembly Section Pages 8
Omenlo Sas
Assemble the T.rail & Attach Cable Pulley Bracket
Fasten the T-rail to the Opener
Assembly Step
Cover \
Use the second master link to connect
Install Chain/Cable Attach Sprocket Cover
Chain to the flat end of the shaft
Check to make sure the chain Is
Tighten the Chain & Cable
Assembly Step
Determine Header Bracket Location
Installation Section Pages 12 Installation Step
Proceed to ,
Example
Fasten Header
Install the Header Bracket
Bracket to the Wall
Fasten the Header Bracket to the Ceiling
Attach the T-rail to the Header Bracket
Installation Step
Position the Opener
0SH=OCSlU,G
Hang the Opener
Hardware Shown
Install the Door Control
DryWaAnchom
Backview
Install the Light and the Lens
Install the lens
Attach Emergency Release Rope Handle
Electrical Requirements
Permanent Wiring Connections
Facing the door from inside the garage
Safety Reversing System
Lag St=paB
Install the Safety Reversing Sensor
Alternate Wall Mount WithSlot
Alternate Floor Mount
HI,II,l,l,IliiI,%I,I,I,I,D
Fasten Door Bracket
TTIJ.etc-,Pr Igure
=deEd Figure
LockWashe 5/6
Hole Alignment
Same way, using the 5/16 x I 1/4 clevis pin
Connect Door Arm to Trolley
Ooor
AssembletheDoorArm
Adjustment Procedures for One-Piece Doors
How and When to Adjust the Limits
Adjustment Section Adjustment Step
Adjust the UP and Down Limits
Pages 28
Adjust the Force
How and When to Adjust the Forces
Test The Safety Reversing Sensor
Important safety check
Test the Safety Reverse System
Care of Your Opener
Maintenance Schedule
To reduce the risk of severe
Lock feature is designed to
Lock feature
Operation of Your Opener
Control Programming
Receiver and Remote
Rgure
Securityi SECURITY,I
Probable Cause and Solution
Having a Problem?
Remote control has short range
Review the travel limits adjustment procedures on
Probable Cause & Solution
Having a Problem?
Situation
Door opens but wont close
Installation Parts
Repair Parts
Rail Assembly Parts
Opener Assembly Parts
Repair Parts
18173
116
For Sectional Doors Only
Accessories
If you do not have a Premium Control Console
If you have a Premium Control Console
Problems that might require force adjustments
Access Door/Outside Key Release Accessory
Manual Emergency Release Rope & Handle Lockout feature
Safety wamings 11, 19 Opener Termlnals
800473-7247
For in-home major brand repair service
Pare obtener este Manual del
Spanish Please ask