MAINTENANCE
GENERAL MAINTENANCE
Avoid using solvents when cleaning plastic parts. Most plastics are susceptible to damage from various types of commercial solvents and may be damaged by their use. Use clean cloths to remove dirt, dust, oil and grease, etc.
!WARNING: Do not at any time let brake fluids, gasoline,
MAINTENANCE
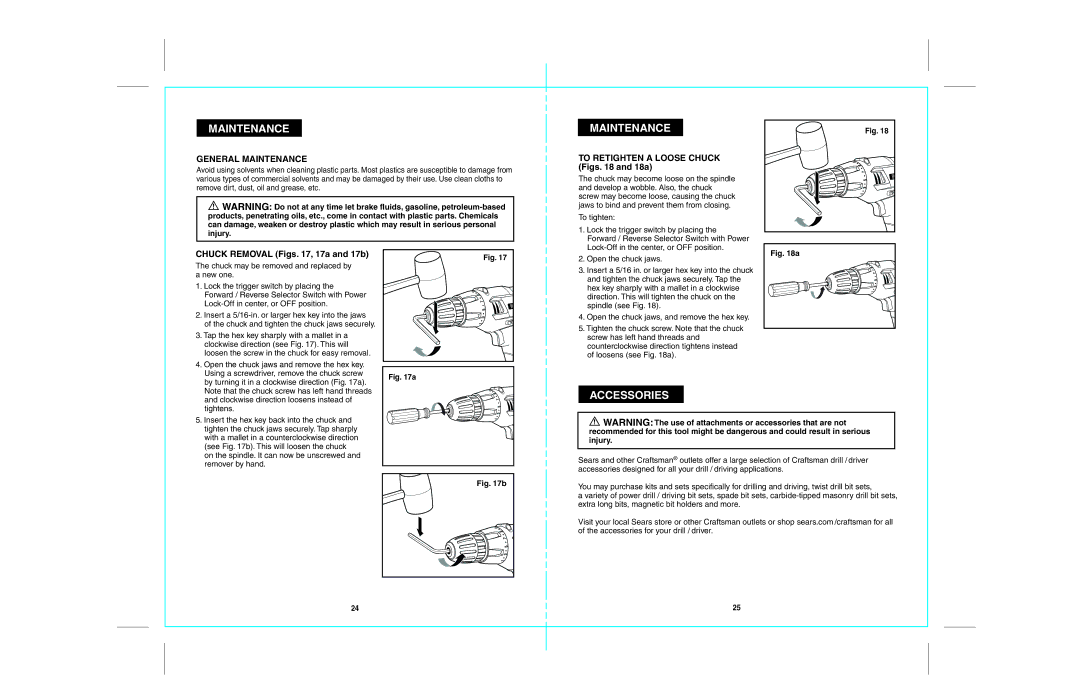
TO RETIGHTEN A LOOSE CHUCK (Figs. 18 and 18a)
The chuck may become loose on the spindle and develop a wobble. Also, the chuck screw may become loose, causing the chuck jaws to bind and prevent them from closing.
To tighten:
1. Lock the trigger switch by placing the |
Forward / Reverse Selector Switch with Power |
Fig. 18
CHUCK REMOVAL (Figs. 17, 17a and 17b)
The chuck may be removed and replaced by a new one.
1. Lock the trigger switch by placing the |
Forward / Reverse Selector Switch with Power |
2. Insert a |
of the chuck and tighten the chuck jaws securely. |
3. Tap the hex key sharply with a mallet in a |
clockwise direction (see Fig. 17). This will |
loosen the screw in the chuck for easy removal. |
4. Open the chuck jaws and remove the hex key. |
Using a screwdriver, remove the chuck screw |
by turning it in a clockwise direction (Fig. 17a). |
Note that the chuck screw has left hand threads |
and clockwise direction loosens instead of |
tightens. |
Fig. 17
2. Open the chuck jaws. |
3. Insert a 5/16 in. or larger hex key into the chuck |
and tighten the chuck jaws securely. Tap the |
hex key sharply with a mallet in a clockwise |
direction. This will tighten the chuck on the |
spindle (see Fig. 18). |
4. Open the chuck jaws, and remove the hex key. |
5. Tighten the chuck screw. Note that the chuck |
screw has left hand threads and |
counterclockwise direction tightens instead |
of loosens (see Fig. 18a). |
ACCESSORIES
Fig. 18a
5. Insert the hex key back into the chuck and |
tighten the chuck jaws securely. Tap sharply |
with a mallet in a counterclockwise direction |
(see Fig. 17b). This will loosen the chuck |
on the spindle. It can now be unscrewed and |
remover by hand. |
Fig. 17b
!WARNING: The use of attachments or accessories that are not recommended for this tool might be dangerous and could result in serious injury.
Sears and other Craftsman® outlets offer a large selection of Craftsman drill / driver accessories designed for all your drill / driving applications.
You may purchase kits and sets specifically for drilling and driving, twist drill bit sets,
a variety of power drill / driving bit sets, spade bit sets,
Visit your local Sears store or other Craftsman outlets or shop sears.com /craftsman for all of the accessories for your drill / driver.
24 | 25 |